How to Cut Your Own Hair at Home – 3 Foolproof Methods

Last Tuesday I found myself standing in my bathroom at 10 PM, holding kitchen scissors and staring at my reflection. Maya had gotten gum in my hair (don’t ask lol), Daniel was traveling, and my usual salon was booked for three weeks.
I almost did it. I almost cut my hair with those dull kitchen shears.
Then I remembered the last time I tried to “just trim a little” and ended up looking like I’d stuck my finger in an electrical socket.
So instead, I ordered proper hair scissors on Amazon and waited two days. Best decision I made that week honestly. Could’ve saved myself a whole emotional breakdown.
Here’s what Ive learned about cutting your own hair without completely destroying it.
Get the Right Tools (Or Don’t Bother)
I cannot stress this enough: kitchen scissors will ruin your hair. They’re too dull and they crush the hair shaft instead of cutting it cleanly.
Related: Which Hairstyles Goes with Wich Dress
Here’s what you actually need:
- Hair scissors: I bought a $20 pair from Amazon (Equinox Professional) and they’ve lasted two years. Sharp blades make all the difference.
- Fine-tooth comb: The plastic one from CVS works fine. You need it to section hair and check for evenness.
- Hair clips: Those black clips from the dollar store that I lose constantly but somehow always find more of.
- Spray bottle: For straight or wavy hair. Skip it if your hair is curly.
- Two mirrors: One in front, one behind. Trust me on this one.
- Old towel: Because hair gets everywhere and somehow immediately attaches itself to wet socks. Ugh!
Know What You’re Actually Trying to Fix
This is where most people (myself included) go wrong. You see split ends and think “I’ll just clean this up” and somehow end up with bangs you didn’t want, which is basically a universal female experience at this point.
Be honest about what’s bothering you:
- Just split ends that need trimming?
- Bangs growing into your eyes?
- Layers that need a little shaping?
If this is your first time, stick to maintenance stuff. Don’t try to give yourself a whole new look. Please don’t lol.

I learned this the hard way when I decided to add “face-framing layers” to my bob and ended up looking like I’d been attacked by a weed whacker. Some things are worth paying for.
Related: What is Hush Cut? Who is it for?
Prep Work (Don’t Skip This Part)
I used to think prep was just washing my hair, but there’s actually more to it if you want even results.
Clean hair cuts better, but wet hair lies differently than dry hair.
Here’s what actually matters:

- Wash if it’s greasy: Product buildup makes hair stick together weird. But don’t feel like you have to wash it just for cutting.
- Damp for straight hair, dry for curly: Straight hair cuts more evenly when it’s slightly damp. Curly hair needs to be dry so you can see how it actually falls.
- Section it properly: Use those black clips to divide your hair into manageable pieces. Work on one section at a time or you’ll lose track of what you’ve done.
- Good lighting is everything: That overhead bathroom light isn’t enough. I drag a table lamp into the bathroom like some kind of exhausted beauty influencer.
How to Trim Split Ends Without Disaster
1. Work in small sections
Clip up the top layers and start with the bottom. I learned this from watching too many YouTube videos at midnight, but it actually works.
2. Try the twist method
Take a small section and twist it tight – the damaged ends stick out like they’re trying to escape. Trim only those ends, not the whole section.
3. Point-cut instead of straight across
Hold the scissors vertically and snip upward into the ends. It looks more natural than a blunt cut.
4. Check your work as you go
Comb through each section after cutting. Look for obvious unevenness, but don’t obsess over perfection.
5. Take your time
I know it’s tempting to rush through it, especially if you’re doing this after the kids are in bed, but slow and steady actually works better here.
Save this post for later ❤️
Related: How to Do a Dragon Braid – For Beginners
The Ponytail Method for Basic Layers
1. Start clean and detangled
Comb it smooth and part it how you normally wear it. No surprises later.
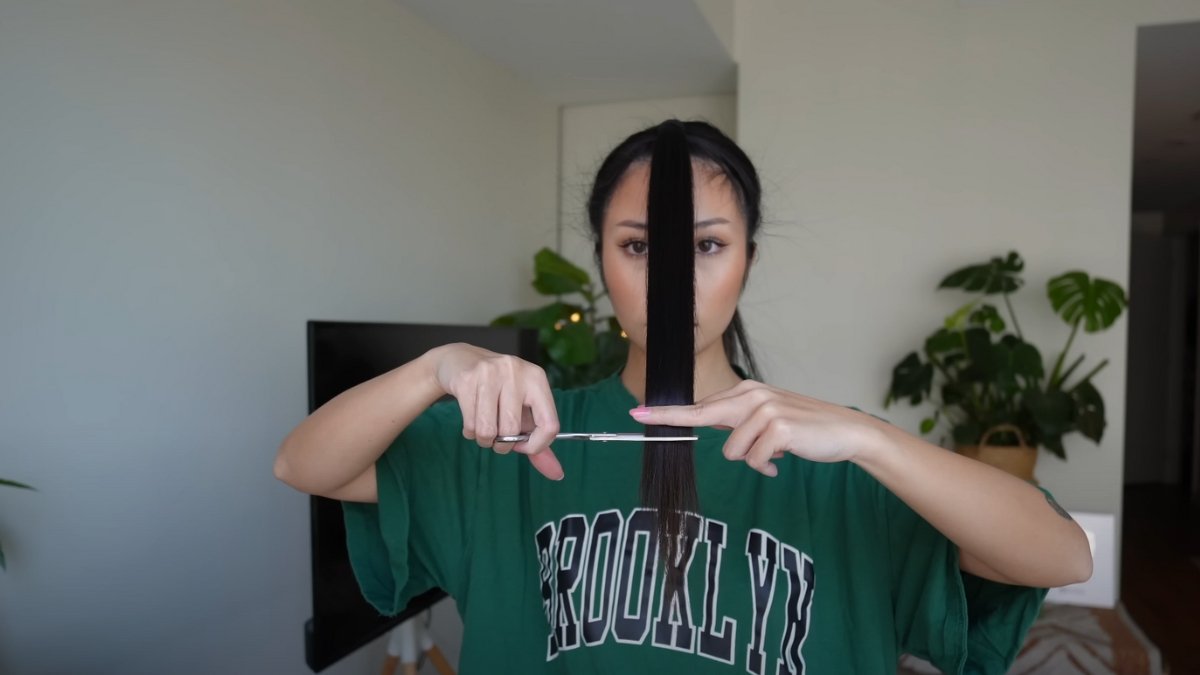
2. High ponytail on top of your head
Pull all your hair straight up like you’re making a fountain. Use a hair tie to secure it, then comb it smooth in the ponytail.
3. Measure twice, cut once
Slide your hand down the ponytail to where you want to cut. Start conservative – you can always cut more.
4. Point-cut the ends
Don’t cut straight across. Cut vertically into the ends so they blend better when you let your hair down.
5. Check and adjust
Let it down, shake it out, and see how it looks. Use that second mirror to check the back.
Touching Up Bangs (Carefully)
1. Dry hair only
Never cut bangs when they’re wet. They’ll shrink up as they dry and you’ll end up with baby bangs when you wanted a trim.
I learned this lesson the expensive way (emergency salon visit to fix my mistakes).
2. Section carefully
Make a triangle section at your hairline. Start smaller than you think – you can always make it wider.
3. Choose your style
Straight bangs: pull the hair straight down. Curtain bangs: part in the middle and angle each side slightly outward.
4. Tiny cuts only
Point-cut in small snips. Stop frequently to check. Bangs grow slowly so there’s no rushing this.
5. Step back and assess
Don’t try to make them perfect – just better than they were.
What Not to Do (From Someone Who’s Done It All)
The biggest mistake is cutting too much at once. I know it seems faster, but you can’t put hair back once you’ve cut it.
Also, don’t cut your hair when you’re angry or stressed or have had wine.
Save this article for later! 👇👇

Bad lighting will mess you up every time – those bathroom shadows hide uneven spots until you’re in the car the next morning.
And please don’t cut wet bangs or curly hair. The shrinkage is real and it’s not forgiving.
Final Thoughts
Look, you’re not trying to become a hairstylist here. You just want to fix what’s bothering you without spending $100 at the salon.
Stick to simple maintenance: split ends, overgrown bangs, maybe some basic layering if you’re feeling brave.
Get decent scissors, take your time, and cut less than you think you need. And if you mess it up? Hair grows, and professional stylists have seen worse (trust me on this one).