The Cutest Little Girl Hairstyles We’ve Ever Seen And My Daughter Agrees
I’m not going to lie — Maya’s hair wins roughly 60% of our morning battles, and I’ve learned that having a backup plan (or twelve) makes all the difference.
These 45 styles saved me on days when the first attempt ended with tears, the second attempt looked crooked, and I was three minutes past when we should have left for school. Some work better for thick hair, some for fine hair, and honestly some just work better when you haven’t had your coffee yet.
45 Adorable Little Girl Hairstyles
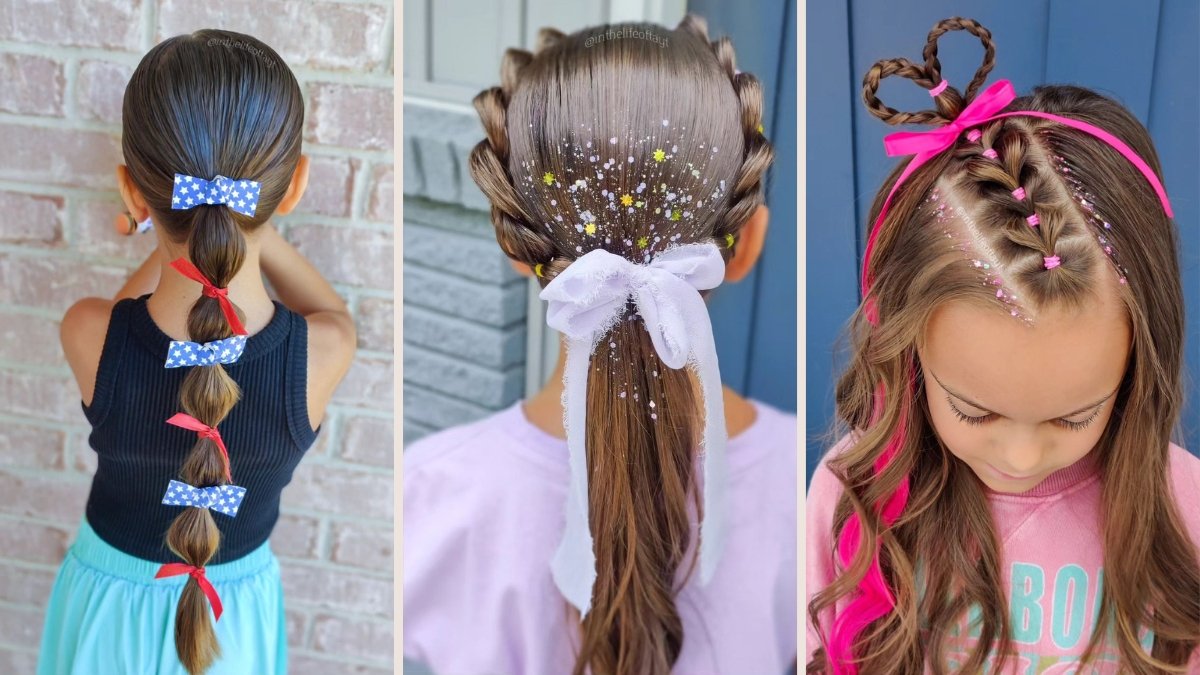
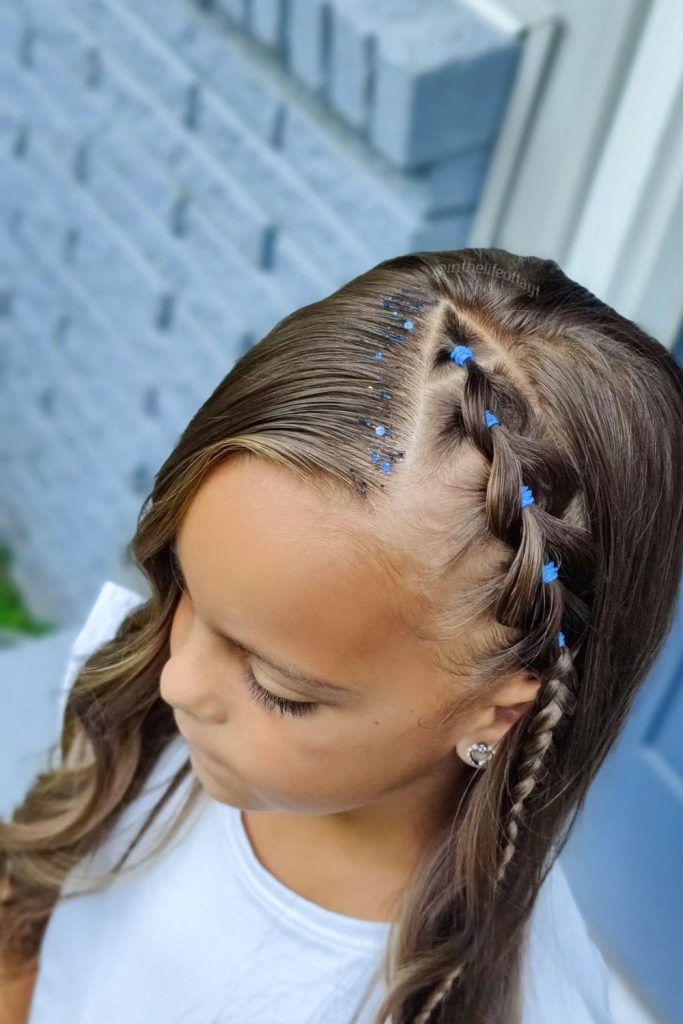
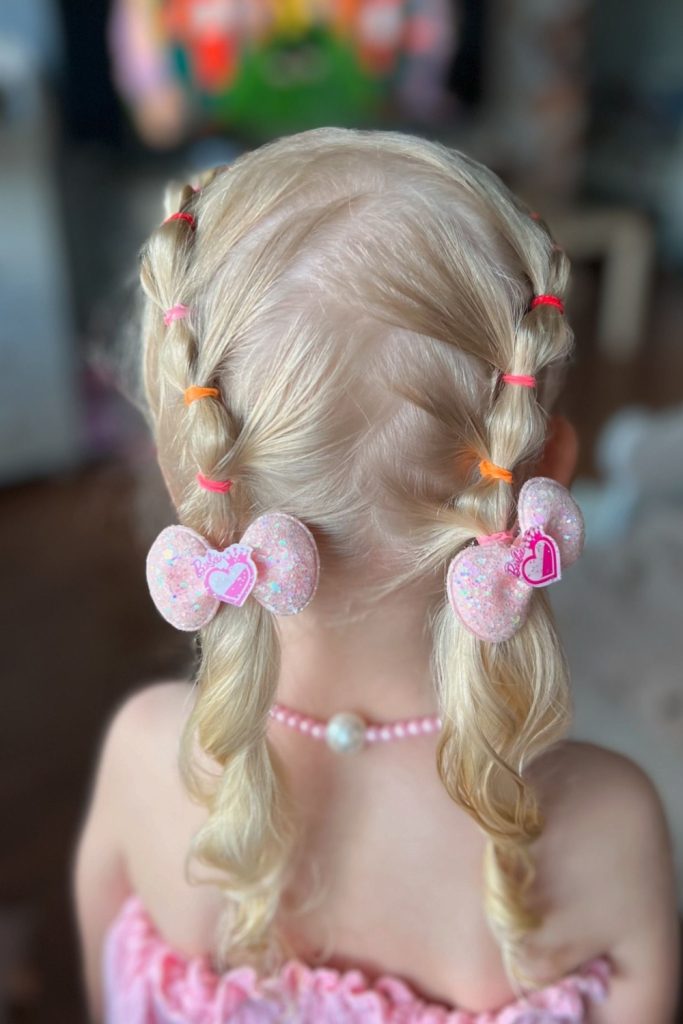
1. Double Ponytail Braids
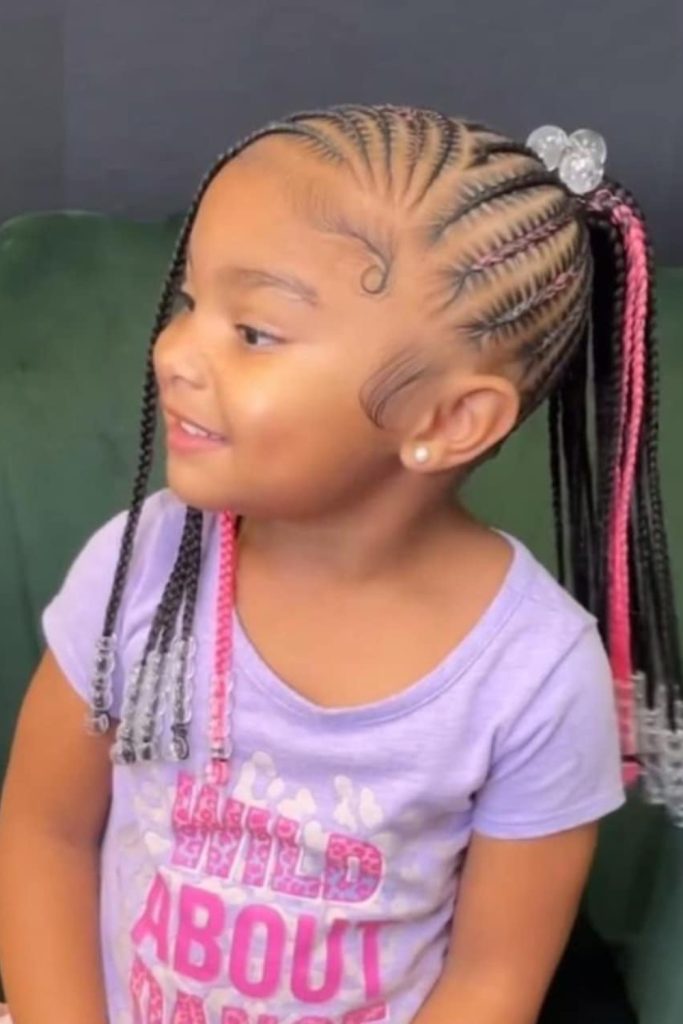
This one takes patience and clean parts, but Maya asks for it by name now. The cornrows lead into two high ponytails with just enough pink thread woven through to make it feel special.
Start by sectioning the hair into neat rows — and I mean neat, because crooked cornrows look crooked in the final result. Add the colored thread while you’re braiding, not after. Secure those ponytails with something stronger than regular elastics because this style needs to last through playground time.
Pro tip: those little beads at the ends aren’t just decoration — they keep everything from unraveling.
2. Heart-Shaped Cornrow Buns
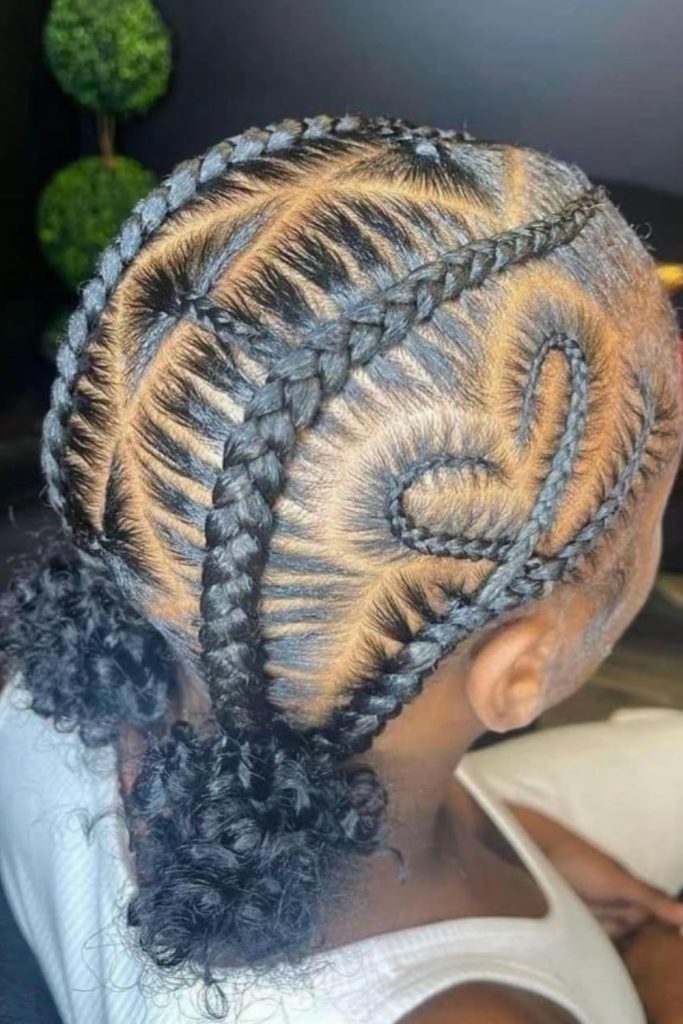
The heart pattern takes longer than you think it will (add fifteen minutes to whatever you estimated), but it photographs beautifully and makes the whole thing feel intentional rather than just “whatever keeps her hair out of her face.”
Work those cornrows into the heart shape first, then twist the ends into low buns at the nape. I use a rattail comb to keep the lines sharp because fuzzy hearts just look like mistakes. The curly texture at the ends gives it movement without looking messy.
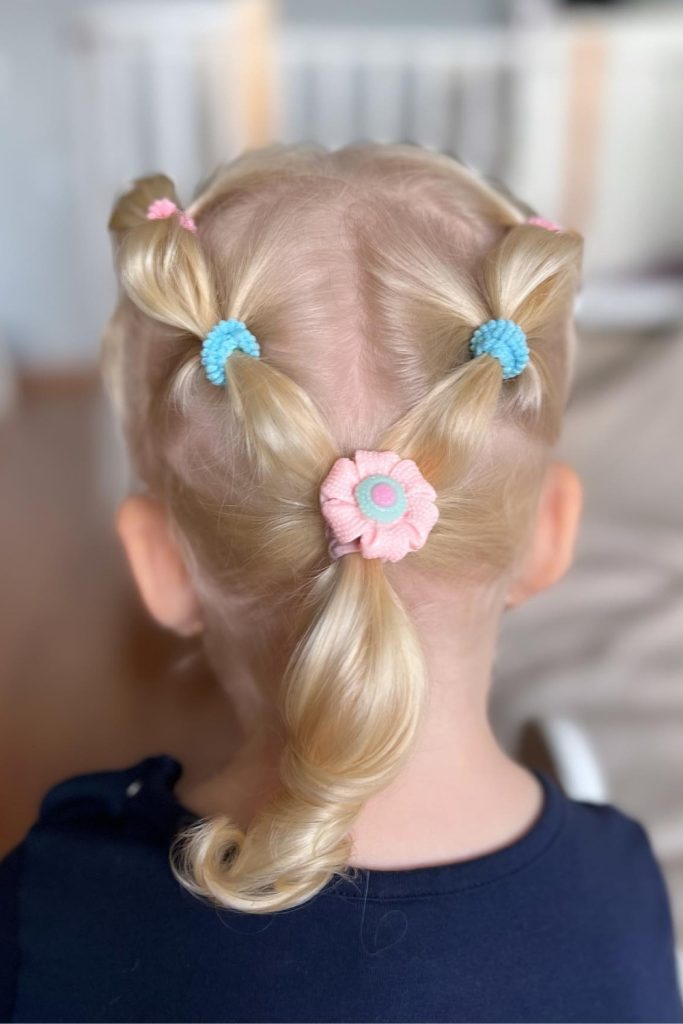
3. Beaded Princess Buns
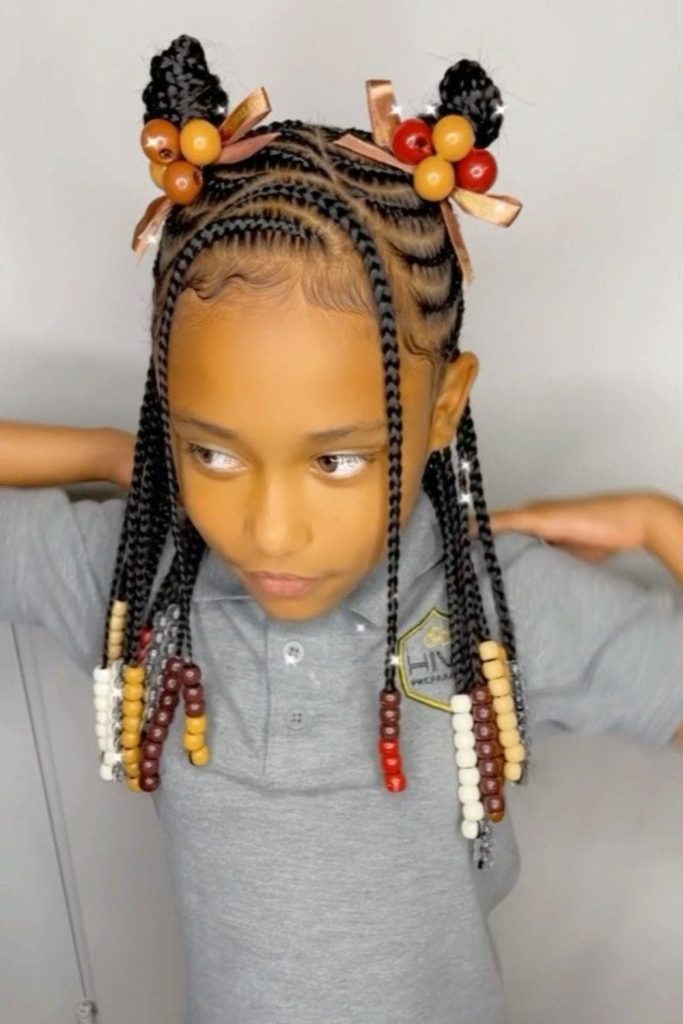
Two high buns plus colorful beads equals instant royalty, according to Maya. The cornrows leading up to the buns keep everything structured, and those little ribbon bows make it feel finished.
Thread the beads onto the braids before you twist them into buns — it’s nearly impossible to add them after. Keep the ribbon bows small or they’ll overpower the whole thing. This style survives birthday parties, dance class, and approximately four hours of intense playground activity.
4. Twisted Ponytails with Butterfly Clips
This is my Tuesday morning go-to because it looks more complicated than it actually is. Section, twist, secure with those tiny clear elastics, then gather into two ponytails and clip on the butterflies.
The key is keeping those twists tight from root to tip. Loose twists unravel by lunchtime and then you get the “Mommy, my hair looks weird” text from the teacher. The butterfly clips aren’t negotiable in our house — Maya has strong opinions about which ones coordinate with which outfits.
5. Elegant Ballet Bun
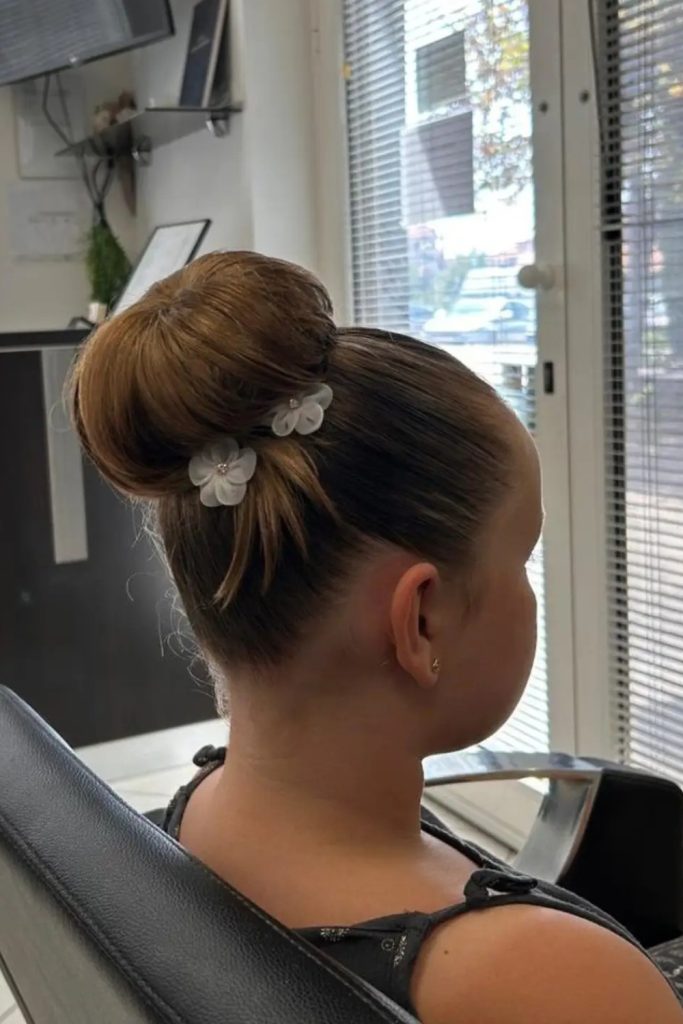
High ponytail, twist into a bun, secure with what feels like a dozen bobby pins, add a few small flowers. It sounds simple until you’re trying to make it smooth and even while a five-year-old is fidgeting and asking if she can watch TV.
Use gel or smoothing cream to tame flyaways — this style shows every imperfection. The flowers are the difference between “attempted fancy” and “actually elegant,” but skip the ones with long stems because they’ll poke her scalp.
6. Twisted Elegance with Butterfly Accent

Perfect for toddlers with shorter hair who still want to feel fancy. Two small twists on one side, secured with those mini elastics that disappear in your purse, finished with a sparkly butterfly clip.
The trick is starting with damp hair — it holds the twists better and looks smoother. Add more hair as you twist back, like a tiny French twist, then clip that butterfly wherever it lands naturally. Sometimes Maya wants two butterflies. Sometimes she wants the purple one that matches her shirt. I’ve learned to just go with it.
7. Double Bow Bun Delight

Center part, two sections, two ponytails twisted into buns, matching bows on top. It’s systematic and Maya can sit still for it, which makes it a winner in my book.
The bows need to match or it looks unintentional rather than cute. Twist the ponytails in the same direction so the buns look balanced. This holds up through soccer practice, which is saying something.
8. Criss-Cross Crown

Small ponytails across the crown, crossed over each other and secured, with the rest pulled into a bun at the back
This one requires patience from both of you. Section carefully, cross methodically, and secure everything twice because those little elastics like to slip. The final bun doesn’t have to be perfect — slightly messy actually looks better with all the structure happening on top.
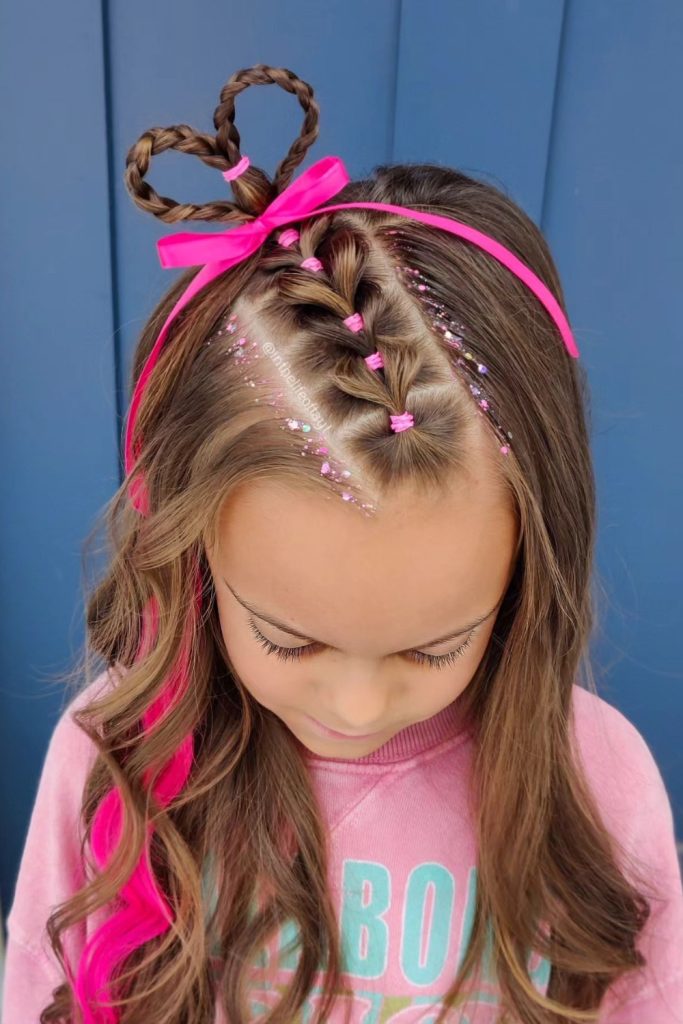
9. Triangle Twists with Bow
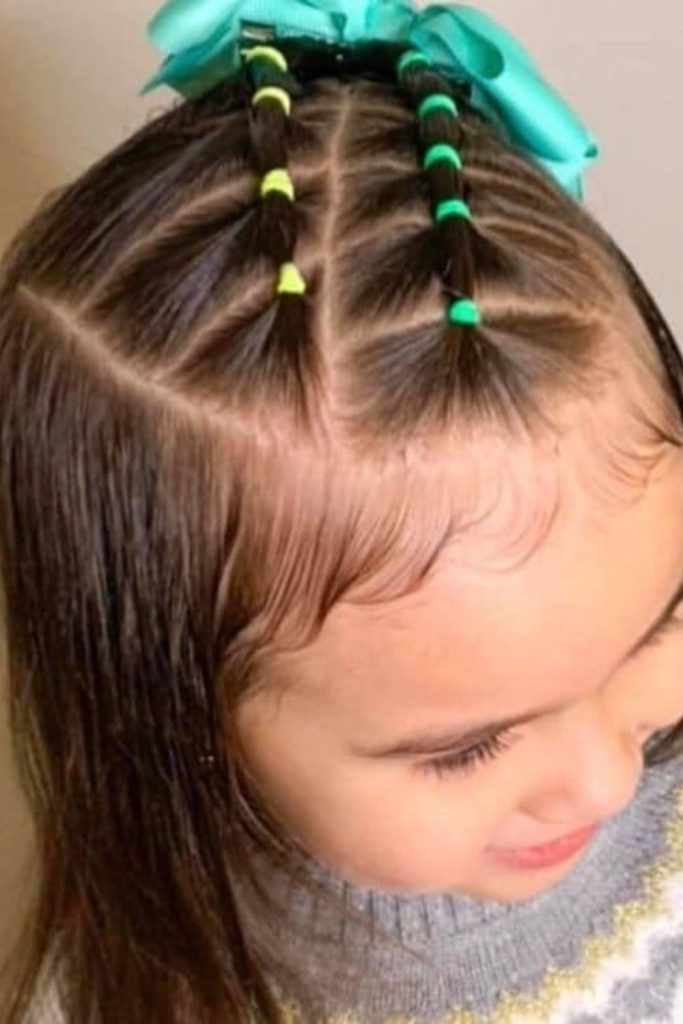
Triangle sections at the front, twisted and secured with colorful elastics every few inches, finished with a big bow. The geometric parting makes it look intentional rather than just twisted and clipped.
Use a rattail comb to get those triangle points sharp. Twist tightly and secure as you go — don’t wait until the end. The bow goes on top of the twists, not mixed in with them, because otherwise it gets lost.
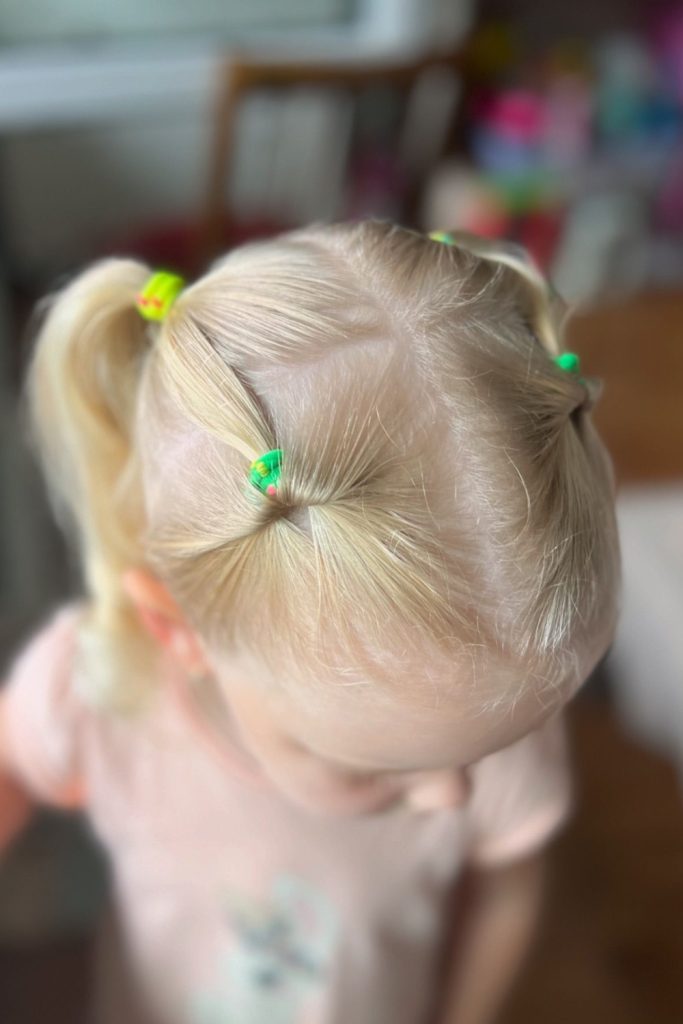
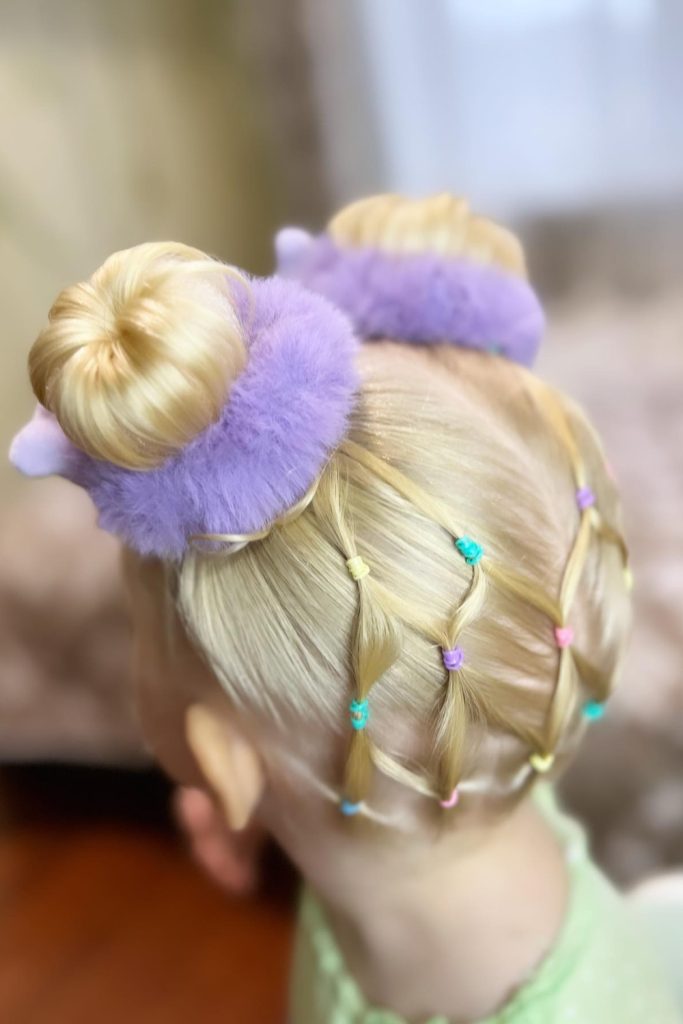
10. Space Buns with Glitter Part

Center part, two high ponytails twisted into buns, glitter gel along the part. Maya discovered glitter gel at her friend’s birthday party and now considers it a necessary food group.
Apply the glitter gel with a fine-tooth comb, not your fingers, unless you want glitter on every surface in your house for the next three weeks. The space buns need to be high and tight or they’ll migrate south by afternoon.
11. Classic Bob Cut
Sometimes the simplest answer is the right answer. Straight across at the shoulders, bangs just above the eyebrows, no styling required beyond a quick brush through.
This works best on fine or straight hair — curly hair needs layers to avoid the triangle shape. The bangs need trimming every six weeks or they’ll be in her eyes, which means constant face-touching, which means constant hand-washing reminders.
12. Side Braided Elegance
Save this post for later ❤️
A side braid that follows the hairline, secured with tiny elastics, while the rest hangs loose. The contrast between structured and flowing makes it feel more sophisticated than it actually is.
Start the braid right at the hairline and add hair as you go — it’s basically a sideways French braid. Keep it close to the scalp so it doesn’t stick out awkwardly. The loose hair needs a quick brush before you start or the braid will look perfect next to messy waves.
13. Mini Space Buns with Floral Clips
Four small sections twisted into mini buns, secured with elastics, decorated with floral clips. It’s like regular space buns but doubled, which makes Maya feel twice as special.
The sections need to be roughly the same size or it looks lopsided. Twist each one tightly before forming the bun, and use bobby pins if the elastics aren’t holding. The floral clips can be different colors — actually, Maya prefers them different colors.
14. Twist and Puff Ponytails
Front sections twisted and gathered into ponytails with a bit of volume teased in. The “puff” is key — flat twists just look like you ran out of time.
Tease the hair gently at the crown before twisting to get that rounded shape. The twists should be loose enough to look soft but tight enough to stay put through a full day of kindergarten chaos.
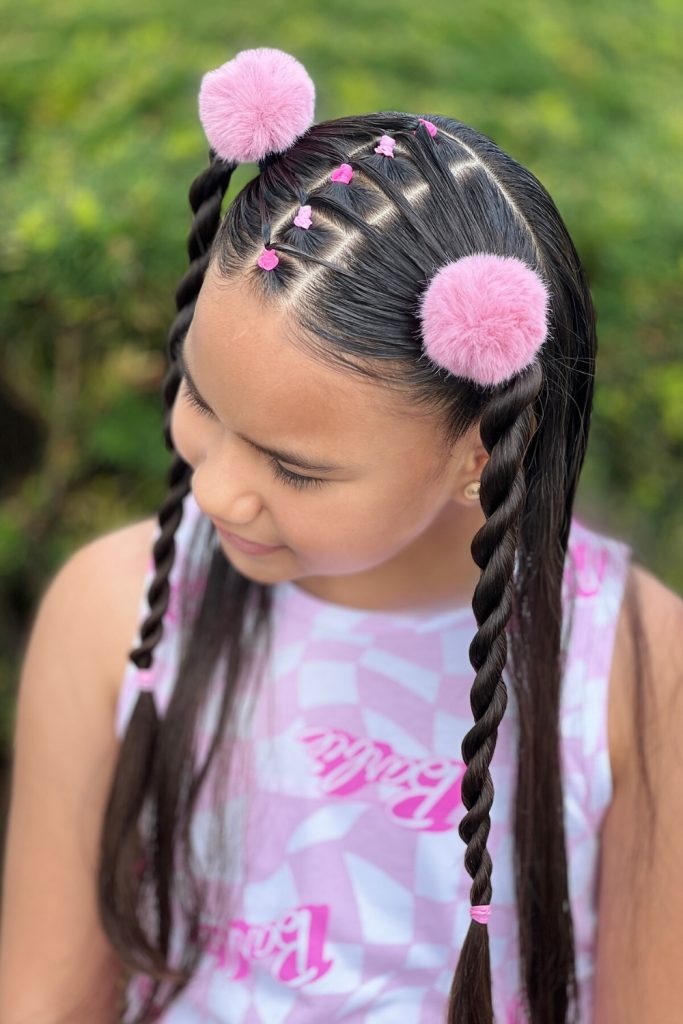
15. Pom-Pom Twists
Small front sections twisted and secured, hair gathered into low pigtails, fluffy pom-poms attached at the base. Maya calls these her “celebration hair” and requests them for anything she considers party-worthy.
The pom-poms need to be secured to something stronger than just the ponytail elastic or they’ll migrate throughout the day. I attach them to bobby pins first, then slide the bobby pins under the elastic. Maya’s current favorite pom-poms are rainbow-colored and roughly the size of golf balls.
16. Rainbow Braid Pigtails
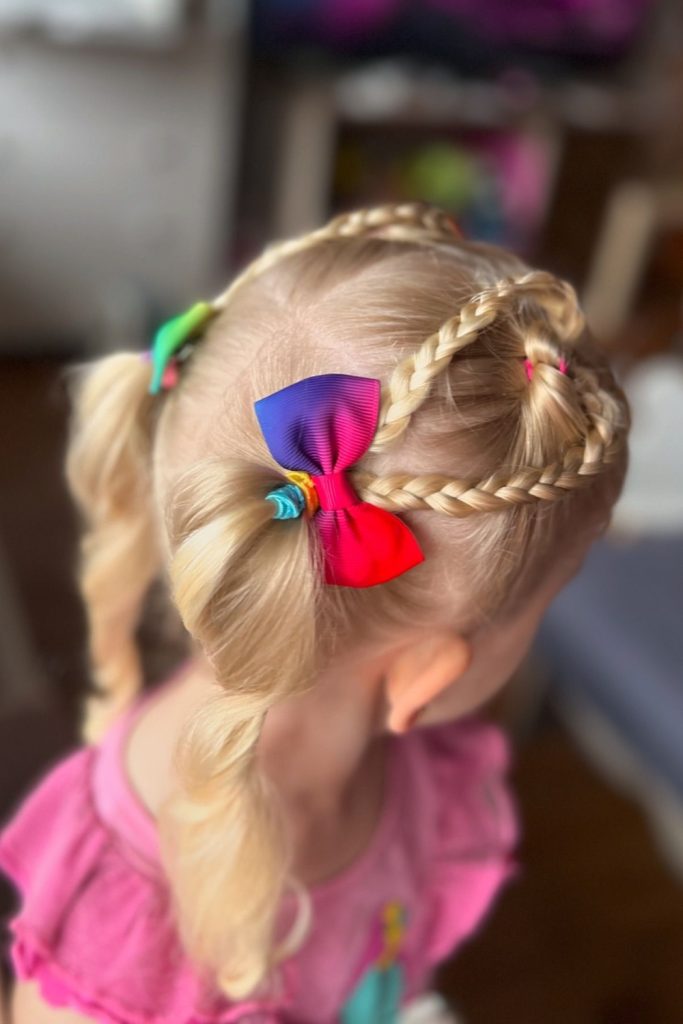
Two sections, small braids that crisscross over the head and end in pigtails, different colored elastics for each braid section to create a rainbow pattern.
Plan your colors before you start or you’ll end up with a random assortment rather than a rainbow. Red, orange, yellow, green, blue, purple — in that order, always, because Maya has memorized Roy G. Biv and will correct you. The bright bows at the end are non-negotiable.
17. Heart-Parted Pigtails
Hair parted in a heart shape at the crown, sides twisted and secured, gathered into pigtails with clips or bows. The heart part takes practice — my first attempts looked more like wonky circles.
Use a rattail comb and go slowly with the heart shape. Start at the center of the forehead and curve out, then back in to meet at the crown. The twists on the sides help define the heart and keep everything neat.
18. Twist and Bow Cascade

Multiple sections twisted back toward the neck, secured with colorful elastics, gathered into low pigtails, finished with matching bows. The “cascade” effect comes from having different length twists.
Start the twists at different points along the hairline so they create layers as they fall back. Each twist needs its own elastic before you gather them into pigtails, or the whole thing unravels the minute she starts moving.
19. Fuzzy Bun Princess
Small sections secured with colorful elastics, twisted into two high buns, finished with fuzzy hair ties. The texture of the fuzzy ties makes everything feel softer and more princess-like, according to Maya.
Section first, secure each section with a colored elastic, then twist into buns and finish with the fuzzy ties on top. The colorful elastics show through and add extra interest. Maya’s current favorite fuzzy ties are white and look like tiny clouds.
20. Elegant Side-Swept Curls
Deep side part, larger section curled and pinned back with a bow, smaller section left to frame the face. This one requires actual curling, which means extra time but also extra elegance.
Use a small barrel curling iron on low heat, and don’t curl the pieces that will be hidden under the bow — waste of time and unnecessary heat on her hair. The bow needs to be positioned carefully to hold the curls without flattening them.
21. Twist and Clip Side Sweep
Side part, front section twisted and secured with a small elastic, rest of the hair pulled gently back, decorated with a coordinating clip
The twist needs to be tight enough to stay put but loose enough to look soft. The clip goes over the elastic to hide it, and the positioning matters — too high looks weird, too low doesn’t hold properly.
22. Triple Knot Pigtails
Six sections total — three on each side — twisted into knots and secured with colorful elastics, then gathered into low pigtails. Maya likes the symmetry and the fact that she can count all the knots.
Make sure your sections are roughly equal or the final pigtails will be different sizes. Twist each section into a proper knot, not just a loose twist, and secure it immediately. The colorful elastics make it look intentional rather than chaotic.
23. Heart-Bow Headband
Center part, each side braided into a heart shape on top of the head, secured with elastics, finished with a colorful bow positioned like a headband. This one gets compliments from other parents.
The heart-shaped braids take patience — braid in a curve to create the heart outline, then secure at the bottom of the “heart.” The bow goes across the back of the head, not on top, so it actually looks like a headband.
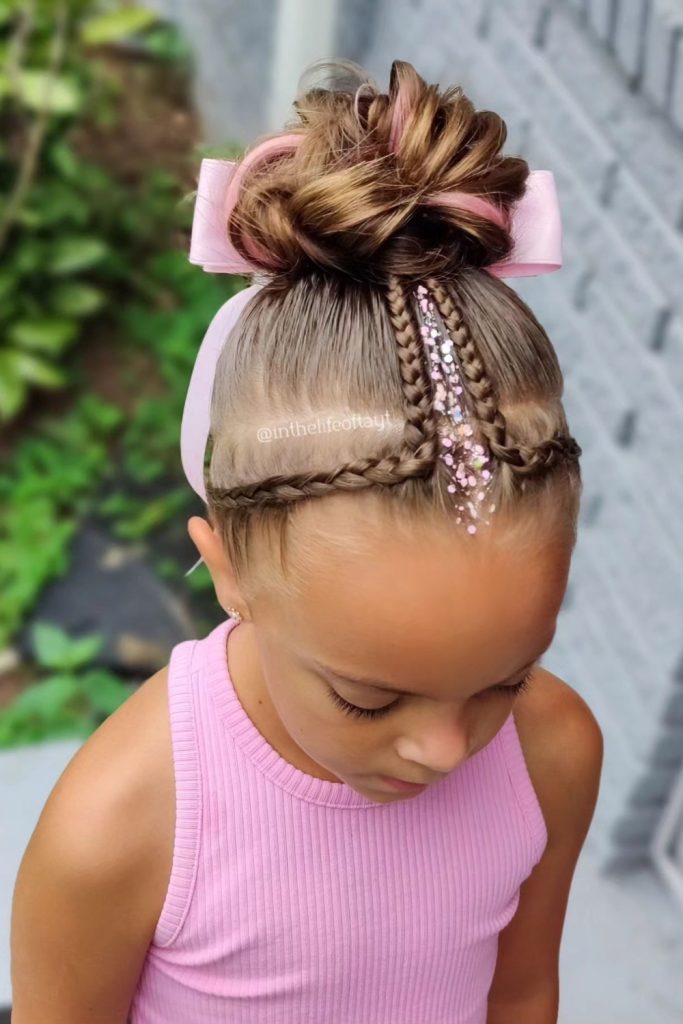
24. Braided Top Knot with Glitter