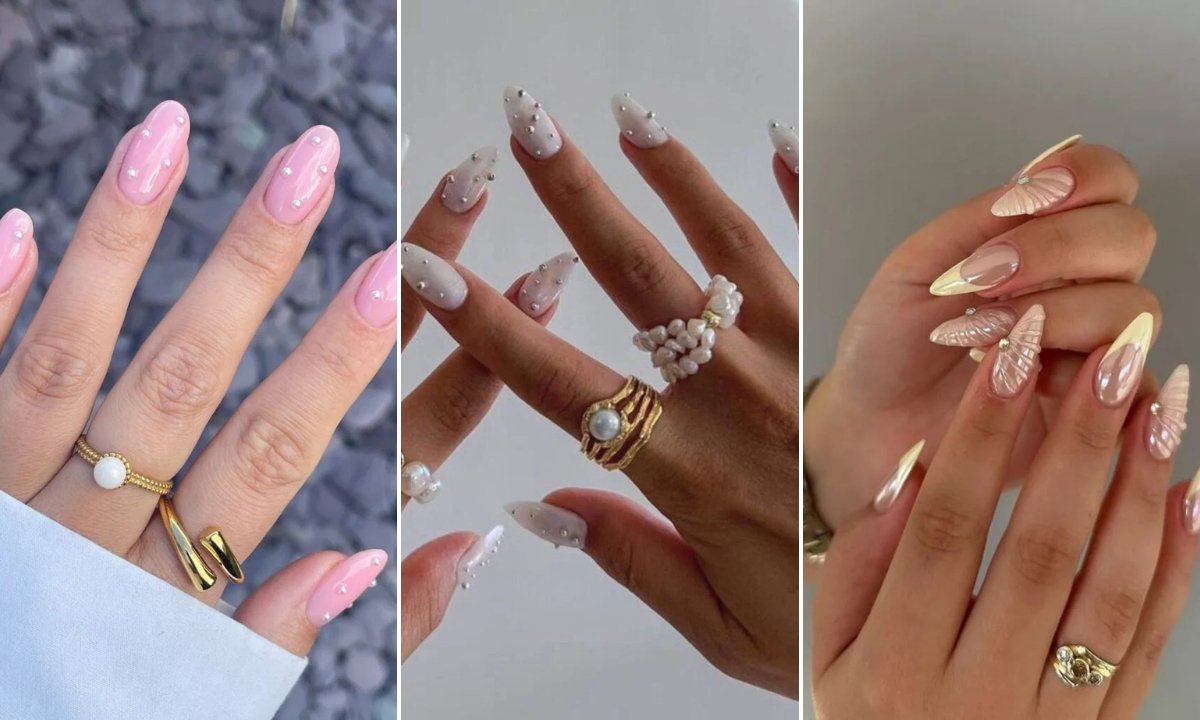
Champagne nails with pearl and gold detailing concentrated at the tips instead of spread everywhere… the almond shape helps the drip effect look intentional.
It’s a nice compromise between dramatic and wearable — you get the luxury effect without the maintenance nightmare.
Shimmering nude base, let it cure, then paint delicate gold outline around tips and add small pearl clusters randomly.
Sheer nude base with tiny colored pearls and gems scattered around… it’s playful without being childish, and the short almond shape keeps everything comfortable.
The different colors add visual interest, but because they’re small and spaced out, it doesn’t feel overwhelming or busy.
Light nude polish, let it cure completely, then place small dots of clear gel where you want each pearl to sit.
Champagne nails with pearl and gold detailing concentrated at the tips instead of spread everywhere… the almond shape helps the drip effect look intentional.
It’s a nice compromise between dramatic and wearable — you get the luxury effect without the maintenance nightmare.
Shimmering nude base, let it cure, then paint delicate gold outline around tips and add small pearl clusters randomly.
Glittery French tips with thin gold outlines and tiny pearl accents… the almond shape gives the gold details room to follow the natural curve.
It’s fancy but not over-the-top fancy, if that makes sense. Like something you’d wear to a nice dinner but wouldn’t feel weird about at the grocery store the next day.
Clear base, fine glitter tips, then trace the shape with metallic gel and add a few pearls while everything’s still workable.
Sheer nude base with tiny colored pearls and gems scattered around… it’s playful without being childish, and the short almond shape keeps everything comfortable.
The different colors add visual interest, but because they’re small and spaced out, it doesn’t feel overwhelming or busy.
Light nude polish, let it cure completely, then place small dots of clear gel where you want each pearl to sit.
Champagne nails with pearl and gold detailing concentrated at the tips instead of spread everywhere… the almond shape helps the drip effect look intentional.
It’s a nice compromise between dramatic and wearable — you get the luxury effect without the maintenance nightmare.
Shimmering nude base, let it cure, then paint delicate gold outline around tips and add small pearl clusters randomly.
Sometimes the simplest version is the best version. This subtle pearl finish on short almond nails is clean enough for work but still feels special.
The chrome powder gives you that glow without being too obvious about it, and over a sheer pink base, it warms up your skin tone instead of washing it out.
Two thin coats of natural base, rub in pearl chrome powder, seal with glossy topcoat
Glittery French tips with thin gold outlines and tiny pearl accents… the almond shape gives the gold details room to follow the natural curve.
It’s fancy but not over-the-top fancy, if that makes sense. Like something you’d wear to a nice dinner but wouldn’t feel weird about at the grocery store the next day.
Clear base, fine glitter tips, then trace the shape with metallic gel and add a few pearls while everything’s still workable.
Sheer nude base with tiny colored pearls and gems scattered around… it’s playful without being childish, and the short almond shape keeps everything comfortable.
The different colors add visual interest, but because they’re small and spaced out, it doesn’t feel overwhelming or busy.
Light nude polish, let it cure completely, then place small dots of clear gel where you want each pearl to sit.
Champagne nails with pearl and gold detailing concentrated at the tips instead of spread everywhere… the almond shape helps the drip effect look intentional.
It’s a nice compromise between dramatic and wearable — you get the luxury effect without the maintenance nightmare.
Shimmering nude base, let it cure, then paint delicate gold outline around tips and add small pearl clusters randomly.
A curved row of micro pearls right at the cuticle line… it’s such a small detail but it makes the whole manicure look more expensive.
The almond shape helps the pearls follow the natural curve, and because they’re at the cuticle instead of the tips, you don’t have to worry about them constantly getting in your way.
Apply a sheer beige base, add a light pearl chrome layer, then press the tiny pearls into a thin line of clear gel at the cuticle.
Sometimes the simplest version is the best version. This subtle pearl finish on short almond nails is clean enough for work but still feels special.
The chrome powder gives you that glow without being too obvious about it, and over a sheer pink base, it warms up your skin tone instead of washing it out.
Two thin coats of natural base, rub in pearl chrome powder, seal with glossy topcoat
Glittery French tips with thin gold outlines and tiny pearl accents… the almond shape gives the gold details room to follow the natural curve.
It’s fancy but not over-the-top fancy, if that makes sense. Like something you’d wear to a nice dinner but wouldn’t feel weird about at the grocery store the next day.
Clear base, fine glitter tips, then trace the shape with metallic gel and add a few pearls while everything’s still workable.
Sheer nude base with tiny colored pearls and gems scattered around… it’s playful without being childish, and the short almond shape keeps everything comfortable.
The different colors add visual interest, but because they’re small and spaced out, it doesn’t feel overwhelming or busy.
Light nude polish, let it cure completely, then place small dots of clear gel where you want each pearl to sit.
Champagne nails with pearl and gold detailing concentrated at the tips instead of spread everywhere… the almond shape helps the drip effect look intentional.
It’s a nice compromise between dramatic and wearable — you get the luxury effect without the maintenance nightmare.
Shimmering nude base, let it cure, then paint delicate gold outline around tips and add small pearl clusters randomly.
Chrome nails with scattered pearls and crystals in the center instead of at the edges… it’s a small change that makes a huge difference in how wearable this feels.
The long almond shape keeps everything balanced, and honestly, the chrome base does most of the work here — the pearls are just the finishing touch.
Start with your silver-pearl chrome base, place the embellishments while the gel is tacky, and space them evenly so it doesn’t look random.
The ombré base on these coffin nails is pretty, but what I really like is how the pearls are placed toward the center instead of loaded at the tips.
It keeps the design from looking top-heavy, and frankly, it’s way more practical — you’re not constantly worrying about catching the embellishments on everything.
Blend your milky nude with white, cure it, then add different sized pearls while the gel is slightly sticky for better adhesion.
Pink nails with tiny pearls and pastel hearts are exactly as sweet as they sound, and on short almond nails, they don’t feel juvenile.
Start with a nude-pink base, paint the little hearts in different spots so it looks organic, then fill the gaps with micro pearls to balance everything out.
The whole design stays smooth and snag-free, which is honestly my main requirement for any nail art these days.
A curved row of micro pearls right at the cuticle line… it’s such a small detail but it makes the whole manicure look more expensive.
The almond shape helps the pearls follow the natural curve, and because they’re at the cuticle instead of the tips, you don’t have to worry about them constantly getting in your way.
Apply a sheer beige base, add a light pearl chrome layer, then press the tiny pearls into a thin line of clear gel at the cuticle.
Sometimes the simplest version is the best version. This subtle pearl finish on short almond nails is clean enough for work but still feels special.
The chrome powder gives you that glow without being too obvious about it, and over a sheer pink base, it warms up your skin tone instead of washing it out.
Two thin coats of natural base, rub in pearl chrome powder, seal with glossy topcoat
Glittery French tips with thin gold outlines and tiny pearl accents… the almond shape gives the gold details room to follow the natural curve.
It’s fancy but not over-the-top fancy, if that makes sense. Like something you’d wear to a nice dinner but wouldn’t feel weird about at the grocery store the next day.
Clear base, fine glitter tips, then trace the shape with metallic gel and add a few pearls while everything’s still workable.
Sheer nude base with tiny colored pearls and gems scattered around… it’s playful without being childish, and the short almond shape keeps everything comfortable.
The different colors add visual interest, but because they’re small and spaced out, it doesn’t feel overwhelming or busy.
Light nude polish, let it cure completely, then place small dots of clear gel where you want each pearl to sit.
Champagne nails with pearl and gold detailing concentrated at the tips instead of spread everywhere… the almond shape helps the drip effect look intentional.
It’s a nice compromise between dramatic and wearable — you get the luxury effect without the maintenance nightmare.
Shimmering nude base, let it cure, then paint delicate gold outline around tips and add small pearl clusters randomly.
I’ve been staring at pearl nail inspiration photos for weeks now, and honestly? I keep getting stuck on the same questions everyone else seems to have. The pearls look gorgeous in photos, but will they actually stay put when I’m loading the dishwasher or wrestling with Jake’s soccer cleats?
And then there’s the whole base color thing. Half the tutorials I’ve watched use completely different shades and swear theirs is “the only way” to make pearls look right.
So I did what I always do when I can’t decide — I researched everything, tried a few versions myself, and put together 28 ideas that actually work in real life.
Here’s what I figured out.
What nail shape looks best with pearl?
Short square or short squoval shapes are your safest bet if you want something that won’t drive you crazy within three days.
The pearls sit close to the nail surface, so you’re not constantly snagging them on everything. Almond nails work beautifully too, especially if you like the way small pearl accents follow that natural curve.
Coffin nails give you the most real estate for dramatic designs, but I’m going to be honest — if you’re doing school pickup and grocery runs, longer shapes with heavy pearl work get annoying fast.
Save this article for later! 👇👇
What colors look best as pearly nails?
Soft, clean base colors make pearl nails look expensive instead of craft-store DIY. Milky white, sheer pink, or a good neutral nude are your classics for a reason.
These colors let the pearl finish be the star without competing for attention. Ivory and cream work too, especially if you want something warmer than straight white.
You can absolutely use darker colors like black or navy, but keep the pearl elements simple — too much contrast can look busy instead of elegant (and trust me, I learned this the hard way).
Gold Pearl Clusters
This is exactly what I’d get for a wedding — clean white square nails that feel structured but still have that glamorous edge.
The pearls and gold beads add depth without making your hands look too busy, and honestly, the French tip base makes the whole thing feel more wearable than full-coverage glitter.
To recreate this, start with a milky base, paint clean French tips, then add the pearl clusters to just two accent nails (any more and it gets overwhelming).
The raised gel waves on these almond nails look like actual oyster shells, which is either really cool or completely over the top depending on your mood that day.
I love how the length gives you room for the texture work, but I’d be lying if I said this wouldn’t get old fast during my usual Tuesday routine of coffee with Donna and Target runs.
To get this effect, build each textured layer slowly so the waves stay smooth, then add the pearls while the gel is still tacky.
The nude and white combination feels romantic without being too sweet, and the almond shape lets you do those little heart outlines without cramming them in.
This is probably my favorite from the “cute but not trying too hard” category — it’s the kind of design that looks thoughtful but doesn’t scream for attention.
Paint the heart shapes first with a fine brush, then press micro pearls along the edges while the gel is still slightly wet so they actually stick.
Long almond nails with that frosty white base look expensive, and the curved pearl lines add just enough detail without making everything feel cluttered.
The raised gel texture gives the whole thing a soft, almost matte finish that photographs beautifully (which matters if you’re planning to post this).
Keep the base sheer, draw your swirl patterns first, then place the pearls along the curves while the gel is still workable
Chrome nails with scattered pearls and crystals in the center instead of at the edges… it’s a small change that makes a huge difference in how wearable this feels.
The long almond shape keeps everything balanced, and honestly, the chrome base does most of the work here — the pearls are just the finishing touch.
Start with your silver-pearl chrome base, place the embellishments while the gel is tacky, and space them evenly so it doesn’t look random.
The ombré base on these coffin nails is pretty, but what I really like is how the pearls are placed toward the center instead of loaded at the tips.
It keeps the design from looking top-heavy, and frankly, it’s way more practical — you’re not constantly worrying about catching the embellishments on everything.
Blend your milky nude with white, cure it, then add different sized pearls while the gel is slightly sticky for better adhesion.
Pink nails with tiny pearls and pastel hearts are exactly as sweet as they sound, and on short almond nails, they don’t feel juvenile.
Start with a nude-pink base, paint the little hearts in different spots so it looks organic, then fill the gaps with micro pearls to balance everything out.
The whole design stays smooth and snag-free, which is honestly my main requirement for any nail art these days.
A curved row of micro pearls right at the cuticle line… it’s such a small detail but it makes the whole manicure look more expensive.
The almond shape helps the pearls follow the natural curve, and because they’re at the cuticle instead of the tips, you don’t have to worry about them constantly getting in your way.
Apply a sheer beige base, add a light pearl chrome layer, then press the tiny pearls into a thin line of clear gel at the cuticle.
Sometimes the simplest version is the best version. This subtle pearl finish on short almond nails is clean enough for work but still feels special.
The chrome powder gives you that glow without being too obvious about it, and over a sheer pink base, it warms up your skin tone instead of washing it out.
Two thin coats of natural base, rub in pearl chrome powder, seal with glossy topcoat
Glittery French tips with thin gold outlines and tiny pearl accents… the almond shape gives the gold details room to follow the natural curve.
It’s fancy but not over-the-top fancy, if that makes sense. Like something you’d wear to a nice dinner but wouldn’t feel weird about at the grocery store the next day.
Clear base, fine glitter tips, then trace the shape with metallic gel and add a few pearls while everything’s still workable.
Sheer nude base with tiny colored pearls and gems scattered around… it’s playful without being childish, and the short almond shape keeps everything comfortable.
The different colors add visual interest, but because they’re small and spaced out, it doesn’t feel overwhelming or busy.
Light nude polish, let it cure completely, then place small dots of clear gel where you want each pearl to sit.
Champagne nails with pearl and gold detailing concentrated at the tips instead of spread everywhere… the almond shape helps the drip effect look intentional.
It’s a nice compromise between dramatic and wearable — you get the luxury effect without the maintenance nightmare.
Shimmering nude base, let it cure, then paint delicate gold outline around tips and add small pearl clusters randomly.
I’ve been staring at pearl nail inspiration photos for weeks now, and honestly? I keep getting stuck on the same questions everyone else seems to have. The pearls look gorgeous in photos, but will they actually stay put when I’m loading the dishwasher or wrestling with Jake’s soccer cleats?
And then there’s the whole base color thing. Half the tutorials I’ve watched use completely different shades and swear theirs is “the only way” to make pearls look right.
So I did what I always do when I can’t decide — I researched everything, tried a few versions myself, and put together 28 ideas that actually work in real life.
Here’s what I figured out.
What nail shape looks best with pearl?
Short square or short squoval shapes are your safest bet if you want something that won’t drive you crazy within three days.
The pearls sit close to the nail surface, so you’re not constantly snagging them on everything. Almond nails work beautifully too, especially if you like the way small pearl accents follow that natural curve.
Coffin nails give you the most real estate for dramatic designs, but I’m going to be honest — if you’re doing school pickup and grocery runs, longer shapes with heavy pearl work get annoying fast.
Save this article for later! 👇👇
What colors look best as pearly nails?
Soft, clean base colors make pearl nails look expensive instead of craft-store DIY. Milky white, sheer pink, or a good neutral nude are your classics for a reason.
These colors let the pearl finish be the star without competing for attention. Ivory and cream work too, especially if you want something warmer than straight white.
You can absolutely use darker colors like black or navy, but keep the pearl elements simple — too much contrast can look busy instead of elegant (and trust me, I learned this the hard way).
Gold Pearl Clusters
This is exactly what I’d get for a wedding — clean white square nails that feel structured but still have that glamorous edge.
The pearls and gold beads add depth without making your hands look too busy, and honestly, the French tip base makes the whole thing feel more wearable than full-coverage glitter.
To recreate this, start with a milky base, paint clean French tips, then add the pearl clusters to just two accent nails (any more and it gets overwhelming).
The raised gel waves on these almond nails look like actual oyster shells, which is either really cool or completely over the top depending on your mood that day.
I love how the length gives you room for the texture work, but I’d be lying if I said this wouldn’t get old fast during my usual Tuesday routine of coffee with Donna and Target runs.
To get this effect, build each textured layer slowly so the waves stay smooth, then add the pearls while the gel is still tacky.
The nude and white combination feels romantic without being too sweet, and the almond shape lets you do those little heart outlines without cramming them in.
This is probably my favorite from the “cute but not trying too hard” category — it’s the kind of design that looks thoughtful but doesn’t scream for attention.
Paint the heart shapes first with a fine brush, then press micro pearls along the edges while the gel is still slightly wet so they actually stick.
Long almond nails with that frosty white base look expensive, and the curved pearl lines add just enough detail without making everything feel cluttered.
The raised gel texture gives the whole thing a soft, almost matte finish that photographs beautifully (which matters if you’re planning to post this).
Keep the base sheer, draw your swirl patterns first, then place the pearls along the curves while the gel is still workable
Chrome nails with scattered pearls and crystals in the center instead of at the edges… it’s a small change that makes a huge difference in how wearable this feels.
The long almond shape keeps everything balanced, and honestly, the chrome base does most of the work here — the pearls are just the finishing touch.
Start with your silver-pearl chrome base, place the embellishments while the gel is tacky, and space them evenly so it doesn’t look random.
The ombré base on these coffin nails is pretty, but what I really like is how the pearls are placed toward the center instead of loaded at the tips.
It keeps the design from looking top-heavy, and frankly, it’s way more practical — you’re not constantly worrying about catching the embellishments on everything.
Blend your milky nude with white, cure it, then add different sized pearls while the gel is slightly sticky for better adhesion.
Pink nails with tiny pearls and pastel hearts are exactly as sweet as they sound, and on short almond nails, they don’t feel juvenile.
Start with a nude-pink base, paint the little hearts in different spots so it looks organic, then fill the gaps with micro pearls to balance everything out.
The whole design stays smooth and snag-free, which is honestly my main requirement for any nail art these days.
A curved row of micro pearls right at the cuticle line… it’s such a small detail but it makes the whole manicure look more expensive.
The almond shape helps the pearls follow the natural curve, and because they’re at the cuticle instead of the tips, you don’t have to worry about them constantly getting in your way.
Apply a sheer beige base, add a light pearl chrome layer, then press the tiny pearls into a thin line of clear gel at the cuticle.
Sometimes the simplest version is the best version. This subtle pearl finish on short almond nails is clean enough for work but still feels special.
The chrome powder gives you that glow without being too obvious about it, and over a sheer pink base, it warms up your skin tone instead of washing it out.
Two thin coats of natural base, rub in pearl chrome powder, seal with glossy topcoat
Glittery French tips with thin gold outlines and tiny pearl accents… the almond shape gives the gold details room to follow the natural curve.
It’s fancy but not over-the-top fancy, if that makes sense. Like something you’d wear to a nice dinner but wouldn’t feel weird about at the grocery store the next day.
Clear base, fine glitter tips, then trace the shape with metallic gel and add a few pearls while everything’s still workable.
Sheer nude base with tiny colored pearls and gems scattered around… it’s playful without being childish, and the short almond shape keeps everything comfortable.
The different colors add visual interest, but because they’re small and spaced out, it doesn’t feel overwhelming or busy.
Light nude polish, let it cure completely, then place small dots of clear gel where you want each pearl to sit.
Champagne nails with pearl and gold detailing concentrated at the tips instead of spread everywhere… the almond shape helps the drip effect look intentional.
It’s a nice compromise between dramatic and wearable — you get the luxury effect without the maintenance nightmare.
Shimmering nude base, let it cure, then paint delicate gold outline around tips and add small pearl clusters randomly.
I’ve been staring at pearl nail inspiration photos for weeks now, and honestly? I keep getting stuck on the same questions everyone else seems to have. The pearls look gorgeous in photos, but will they actually stay put when I’m loading the dishwasher or wrestling with Jake’s soccer cleats?
And then there’s the whole base color thing. Half the tutorials I’ve watched use completely different shades and swear theirs is “the only way” to make pearls look right.
So I did what I always do when I can’t decide — I researched everything, tried a few versions myself, and put together 28 ideas that actually work in real life.
Here’s what I figured out.
What nail shape looks best with pearl?
Short square or short squoval shapes are your safest bet if you want something that won’t drive you crazy within three days.
The pearls sit close to the nail surface, so you’re not constantly snagging them on everything. Almond nails work beautifully too, especially if you like the way small pearl accents follow that natural curve.
Coffin nails give you the most real estate for dramatic designs, but I’m going to be honest — if you’re doing school pickup and grocery runs, longer shapes with heavy pearl work get annoying fast.
Save this article for later! 👇👇
What colors look best as pearly nails?
Soft, clean base colors make pearl nails look expensive instead of craft-store DIY. Milky white, sheer pink, or a good neutral nude are your classics for a reason.
These colors let the pearl finish be the star without competing for attention. Ivory and cream work too, especially if you want something warmer than straight white.
You can absolutely use darker colors like black or navy, but keep the pearl elements simple — too much contrast can look busy instead of elegant (and trust me, I learned this the hard way).
Gold Pearl Clusters
This is exactly what I’d get for a wedding — clean white square nails that feel structured but still have that glamorous edge.
The pearls and gold beads add depth without making your hands look too busy, and honestly, the French tip base makes the whole thing feel more wearable than full-coverage glitter.
To recreate this, start with a milky base, paint clean French tips, then add the pearl clusters to just two accent nails (any more and it gets overwhelming).
The raised gel waves on these almond nails look like actual oyster shells, which is either really cool or completely over the top depending on your mood that day.
I love how the length gives you room for the texture work, but I’d be lying if I said this wouldn’t get old fast during my usual Tuesday routine of coffee with Donna and Target runs.
To get this effect, build each textured layer slowly so the waves stay smooth, then add the pearls while the gel is still tacky.
The nude and white combination feels romantic without being too sweet, and the almond shape lets you do those little heart outlines without cramming them in.
This is probably my favorite from the “cute but not trying too hard” category — it’s the kind of design that looks thoughtful but doesn’t scream for attention.
Paint the heart shapes first with a fine brush, then press micro pearls along the edges while the gel is still slightly wet so they actually stick.
Long almond nails with that frosty white base look expensive, and the curved pearl lines add just enough detail without making everything feel cluttered.
The raised gel texture gives the whole thing a soft, almost matte finish that photographs beautifully (which matters if you’re planning to post this).
Keep the base sheer, draw your swirl patterns first, then place the pearls along the curves while the gel is still workable
Chrome nails with scattered pearls and crystals in the center instead of at the edges… it’s a small change that makes a huge difference in how wearable this feels.
The long almond shape keeps everything balanced, and honestly, the chrome base does most of the work here — the pearls are just the finishing touch.
Start with your silver-pearl chrome base, place the embellishments while the gel is tacky, and space them evenly so it doesn’t look random.
The ombré base on these coffin nails is pretty, but what I really like is how the pearls are placed toward the center instead of loaded at the tips.
It keeps the design from looking top-heavy, and frankly, it’s way more practical — you’re not constantly worrying about catching the embellishments on everything.
Blend your milky nude with white, cure it, then add different sized pearls while the gel is slightly sticky for better adhesion.
Pink nails with tiny pearls and pastel hearts are exactly as sweet as they sound, and on short almond nails, they don’t feel juvenile.
Start with a nude-pink base, paint the little hearts in different spots so it looks organic, then fill the gaps with micro pearls to balance everything out.
The whole design stays smooth and snag-free, which is honestly my main requirement for any nail art these days.
A curved row of micro pearls right at the cuticle line… it’s such a small detail but it makes the whole manicure look more expensive.
The almond shape helps the pearls follow the natural curve, and because they’re at the cuticle instead of the tips, you don’t have to worry about them constantly getting in your way.
Apply a sheer beige base, add a light pearl chrome layer, then press the tiny pearls into a thin line of clear gel at the cuticle.
Sometimes the simplest version is the best version. This subtle pearl finish on short almond nails is clean enough for work but still feels special.
The chrome powder gives you that glow without being too obvious about it, and over a sheer pink base, it warms up your skin tone instead of washing it out.
Two thin coats of natural base, rub in pearl chrome powder, seal with glossy topcoat
Glittery French tips with thin gold outlines and tiny pearl accents… the almond shape gives the gold details room to follow the natural curve.
It’s fancy but not over-the-top fancy, if that makes sense. Like something you’d wear to a nice dinner but wouldn’t feel weird about at the grocery store the next day.
Clear base, fine glitter tips, then trace the shape with metallic gel and add a few pearls while everything’s still workable.
Sheer nude base with tiny colored pearls and gems scattered around… it’s playful without being childish, and the short almond shape keeps everything comfortable.
The different colors add visual interest, but because they’re small and spaced out, it doesn’t feel overwhelming or busy.
Light nude polish, let it cure completely, then place small dots of clear gel where you want each pearl to sit.
Champagne nails with pearl and gold detailing concentrated at the tips instead of spread everywhere… the almond shape helps the drip effect look intentional.
It’s a nice compromise between dramatic and wearable — you get the luxury effect without the maintenance nightmare.
Shimmering nude base, let it cure, then paint delicate gold outline around tips and add small pearl clusters randomly.
I’ve been staring at pearl nail inspiration photos for weeks now, and honestly? I keep getting stuck on the same questions everyone else seems to have. The pearls look gorgeous in photos, but will they actually stay put when I’m loading the dishwasher or wrestling with Jake’s soccer cleats?
And then there’s the whole base color thing. Half the tutorials I’ve watched use completely different shades and swear theirs is “the only way” to make pearls look right.
So I did what I always do when I can’t decide — I researched everything, tried a few versions myself, and put together 28 ideas that actually work in real life.
Here’s what I figured out.
What nail shape looks best with pearl?
Short square or short squoval shapes are your safest bet if you want something that won’t drive you crazy within three days.
The pearls sit close to the nail surface, so you’re not constantly snagging them on everything. Almond nails work beautifully too, especially if you like the way small pearl accents follow that natural curve.
Coffin nails give you the most real estate for dramatic designs, but I’m going to be honest — if you’re doing school pickup and grocery runs, longer shapes with heavy pearl work get annoying fast.
Save this article for later! 👇👇
What colors look best as pearly nails?
Soft, clean base colors make pearl nails look expensive instead of craft-store DIY. Milky white, sheer pink, or a good neutral nude are your classics for a reason.
These colors let the pearl finish be the star without competing for attention. Ivory and cream work too, especially if you want something warmer than straight white.
You can absolutely use darker colors like black or navy, but keep the pearl elements simple — too much contrast can look busy instead of elegant (and trust me, I learned this the hard way).
Gold Pearl Clusters
This is exactly what I’d get for a wedding — clean white square nails that feel structured but still have that glamorous edge.
The pearls and gold beads add depth without making your hands look too busy, and honestly, the French tip base makes the whole thing feel more wearable than full-coverage glitter.
To recreate this, start with a milky base, paint clean French tips, then add the pearl clusters to just two accent nails (any more and it gets overwhelming).
The raised gel waves on these almond nails look like actual oyster shells, which is either really cool or completely over the top depending on your mood that day.
I love how the length gives you room for the texture work, but I’d be lying if I said this wouldn’t get old fast during my usual Tuesday routine of coffee with Donna and Target runs.
To get this effect, build each textured layer slowly so the waves stay smooth, then add the pearls while the gel is still tacky.
The nude and white combination feels romantic without being too sweet, and the almond shape lets you do those little heart outlines without cramming them in.
This is probably my favorite from the “cute but not trying too hard” category — it’s the kind of design that looks thoughtful but doesn’t scream for attention.
Paint the heart shapes first with a fine brush, then press micro pearls along the edges while the gel is still slightly wet so they actually stick.
Long almond nails with that frosty white base look expensive, and the curved pearl lines add just enough detail without making everything feel cluttered.
The raised gel texture gives the whole thing a soft, almost matte finish that photographs beautifully (which matters if you’re planning to post this).
Keep the base sheer, draw your swirl patterns first, then place the pearls along the curves while the gel is still workable
Chrome nails with scattered pearls and crystals in the center instead of at the edges… it’s a small change that makes a huge difference in how wearable this feels.
The long almond shape keeps everything balanced, and honestly, the chrome base does most of the work here — the pearls are just the finishing touch.
Start with your silver-pearl chrome base, place the embellishments while the gel is tacky, and space them evenly so it doesn’t look random.
The ombré base on these coffin nails is pretty, but what I really like is how the pearls are placed toward the center instead of loaded at the tips.
It keeps the design from looking top-heavy, and frankly, it’s way more practical — you’re not constantly worrying about catching the embellishments on everything.
Blend your milky nude with white, cure it, then add different sized pearls while the gel is slightly sticky for better adhesion.
Pink nails with tiny pearls and pastel hearts are exactly as sweet as they sound, and on short almond nails, they don’t feel juvenile.
Start with a nude-pink base, paint the little hearts in different spots so it looks organic, then fill the gaps with micro pearls to balance everything out.
The whole design stays smooth and snag-free, which is honestly my main requirement for any nail art these days.
A curved row of micro pearls right at the cuticle line… it’s such a small detail but it makes the whole manicure look more expensive.
The almond shape helps the pearls follow the natural curve, and because they’re at the cuticle instead of the tips, you don’t have to worry about them constantly getting in your way.
Apply a sheer beige base, add a light pearl chrome layer, then press the tiny pearls into a thin line of clear gel at the cuticle.
Sometimes the simplest version is the best version. This subtle pearl finish on short almond nails is clean enough for work but still feels special.
The chrome powder gives you that glow without being too obvious about it, and over a sheer pink base, it warms up your skin tone instead of washing it out.
Two thin coats of natural base, rub in pearl chrome powder, seal with glossy topcoat
Glittery French tips with thin gold outlines and tiny pearl accents… the almond shape gives the gold details room to follow the natural curve.
It’s fancy but not over-the-top fancy, if that makes sense. Like something you’d wear to a nice dinner but wouldn’t feel weird about at the grocery store the next day.
Clear base, fine glitter tips, then trace the shape with metallic gel and add a few pearls while everything’s still workable.
Sheer nude base with tiny colored pearls and gems scattered around… it’s playful without being childish, and the short almond shape keeps everything comfortable.
The different colors add visual interest, but because they’re small and spaced out, it doesn’t feel overwhelming or busy.
Light nude polish, let it cure completely, then place small dots of clear gel where you want each pearl to sit.
Champagne nails with pearl and gold detailing concentrated at the tips instead of spread everywhere… the almond shape helps the drip effect look intentional.
It’s a nice compromise between dramatic and wearable — you get the luxury effect without the maintenance nightmare.
Shimmering nude base, let it cure, then paint delicate gold outline around tips and add small pearl clusters randomly.
I’ve been staring at pearl nail inspiration photos for weeks now, and honestly? I keep getting stuck on the same questions everyone else seems to have. The pearls look gorgeous in photos, but will they actually stay put when I’m loading the dishwasher or wrestling with Jake’s soccer cleats?
And then there’s the whole base color thing. Half the tutorials I’ve watched use completely different shades and swear theirs is “the only way” to make pearls look right.
So I did what I always do when I can’t decide — I researched everything, tried a few versions myself, and put together 28 ideas that actually work in real life.
Here’s what I figured out.
What nail shape looks best with pearl?
Short square or short squoval shapes are your safest bet if you want something that won’t drive you crazy within three days.
The pearls sit close to the nail surface, so you’re not constantly snagging them on everything. Almond nails work beautifully too, especially if you like the way small pearl accents follow that natural curve.
Coffin nails give you the most real estate for dramatic designs, but I’m going to be honest — if you’re doing school pickup and grocery runs, longer shapes with heavy pearl work get annoying fast.
Save this article for later! 👇👇
What colors look best as pearly nails?
Soft, clean base colors make pearl nails look expensive instead of craft-store DIY. Milky white, sheer pink, or a good neutral nude are your classics for a reason.
These colors let the pearl finish be the star without competing for attention. Ivory and cream work too, especially if you want something warmer than straight white.
You can absolutely use darker colors like black or navy, but keep the pearl elements simple — too much contrast can look busy instead of elegant (and trust me, I learned this the hard way).
Gold Pearl Clusters
This is exactly what I’d get for a wedding — clean white square nails that feel structured but still have that glamorous edge.
The pearls and gold beads add depth without making your hands look too busy, and honestly, the French tip base makes the whole thing feel more wearable than full-coverage glitter.
To recreate this, start with a milky base, paint clean French tips, then add the pearl clusters to just two accent nails (any more and it gets overwhelming).
The raised gel waves on these almond nails look like actual oyster shells, which is either really cool or completely over the top depending on your mood that day.
I love how the length gives you room for the texture work, but I’d be lying if I said this wouldn’t get old fast during my usual Tuesday routine of coffee with Donna and Target runs.
To get this effect, build each textured layer slowly so the waves stay smooth, then add the pearls while the gel is still tacky.
The nude and white combination feels romantic without being too sweet, and the almond shape lets you do those little heart outlines without cramming them in.
This is probably my favorite from the “cute but not trying too hard” category — it’s the kind of design that looks thoughtful but doesn’t scream for attention.
Paint the heart shapes first with a fine brush, then press micro pearls along the edges while the gel is still slightly wet so they actually stick.
Long almond nails with that frosty white base look expensive, and the curved pearl lines add just enough detail without making everything feel cluttered.
The raised gel texture gives the whole thing a soft, almost matte finish that photographs beautifully (which matters if you’re planning to post this).
Keep the base sheer, draw your swirl patterns first, then place the pearls along the curves while the gel is still workable
Chrome nails with scattered pearls and crystals in the center instead of at the edges… it’s a small change that makes a huge difference in how wearable this feels.
The long almond shape keeps everything balanced, and honestly, the chrome base does most of the work here — the pearls are just the finishing touch.
Start with your silver-pearl chrome base, place the embellishments while the gel is tacky, and space them evenly so it doesn’t look random.
The ombré base on these coffin nails is pretty, but what I really like is how the pearls are placed toward the center instead of loaded at the tips.
It keeps the design from looking top-heavy, and frankly, it’s way more practical — you’re not constantly worrying about catching the embellishments on everything.
Blend your milky nude with white, cure it, then add different sized pearls while the gel is slightly sticky for better adhesion.
Pink nails with tiny pearls and pastel hearts are exactly as sweet as they sound, and on short almond nails, they don’t feel juvenile.
Start with a nude-pink base, paint the little hearts in different spots so it looks organic, then fill the gaps with micro pearls to balance everything out.
The whole design stays smooth and snag-free, which is honestly my main requirement for any nail art these days.
A curved row of micro pearls right at the cuticle line… it’s such a small detail but it makes the whole manicure look more expensive.
The almond shape helps the pearls follow the natural curve, and because they’re at the cuticle instead of the tips, you don’t have to worry about them constantly getting in your way.
Apply a sheer beige base, add a light pearl chrome layer, then press the tiny pearls into a thin line of clear gel at the cuticle.
Sometimes the simplest version is the best version. This subtle pearl finish on short almond nails is clean enough for work but still feels special.
The chrome powder gives you that glow without being too obvious about it, and over a sheer pink base, it warms up your skin tone instead of washing it out.
Two thin coats of natural base, rub in pearl chrome powder, seal with glossy topcoat
Glittery French tips with thin gold outlines and tiny pearl accents… the almond shape gives the gold details room to follow the natural curve.
It’s fancy but not over-the-top fancy, if that makes sense. Like something you’d wear to a nice dinner but wouldn’t feel weird about at the grocery store the next day.
Clear base, fine glitter tips, then trace the shape with metallic gel and add a few pearls while everything’s still workable.
Sheer nude base with tiny colored pearls and gems scattered around… it’s playful without being childish, and the short almond shape keeps everything comfortable.
The different colors add visual interest, but because they’re small and spaced out, it doesn’t feel overwhelming or busy.
Light nude polish, let it cure completely, then place small dots of clear gel where you want each pearl to sit.
Champagne nails with pearl and gold detailing concentrated at the tips instead of spread everywhere… the almond shape helps the drip effect look intentional.
It’s a nice compromise between dramatic and wearable — you get the luxury effect without the maintenance nightmare.
Shimmering nude base, let it cure, then paint delicate gold outline around tips and add small pearl clusters randomly.
I’ve been staring at pearl nail inspiration photos for weeks now, and honestly? I keep getting stuck on the same questions everyone else seems to have. The pearls look gorgeous in photos, but will they actually stay put when I’m loading the dishwasher or wrestling with Jake’s soccer cleats?
And then there’s the whole base color thing. Half the tutorials I’ve watched use completely different shades and swear theirs is “the only way” to make pearls look right.
So I did what I always do when I can’t decide — I researched everything, tried a few versions myself, and put together 28 ideas that actually work in real life.
Here’s what I figured out.
What nail shape looks best with pearl?
Short square or short squoval shapes are your safest bet if you want something that won’t drive you crazy within three days.
The pearls sit close to the nail surface, so you’re not constantly snagging them on everything. Almond nails work beautifully too, especially if you like the way small pearl accents follow that natural curve.
Coffin nails give you the most real estate for dramatic designs, but I’m going to be honest — if you’re doing school pickup and grocery runs, longer shapes with heavy pearl work get annoying fast.
Save this article for later! 👇👇
What colors look best as pearly nails?
Soft, clean base colors make pearl nails look expensive instead of craft-store DIY. Milky white, sheer pink, or a good neutral nude are your classics for a reason.
These colors let the pearl finish be the star without competing for attention. Ivory and cream work too, especially if you want something warmer than straight white.
You can absolutely use darker colors like black or navy, but keep the pearl elements simple — too much contrast can look busy instead of elegant (and trust me, I learned this the hard way).
Gold Pearl Clusters
This is exactly what I’d get for a wedding — clean white square nails that feel structured but still have that glamorous edge.
The pearls and gold beads add depth without making your hands look too busy, and honestly, the French tip base makes the whole thing feel more wearable than full-coverage glitter.
To recreate this, start with a milky base, paint clean French tips, then add the pearl clusters to just two accent nails (any more and it gets overwhelming).
The raised gel waves on these almond nails look like actual oyster shells, which is either really cool or completely over the top depending on your mood that day.
I love how the length gives you room for the texture work, but I’d be lying if I said this wouldn’t get old fast during my usual Tuesday routine of coffee with Donna and Target runs.
To get this effect, build each textured layer slowly so the waves stay smooth, then add the pearls while the gel is still tacky.
The nude and white combination feels romantic without being too sweet, and the almond shape lets you do those little heart outlines without cramming them in.
This is probably my favorite from the “cute but not trying too hard” category — it’s the kind of design that looks thoughtful but doesn’t scream for attention.
Paint the heart shapes first with a fine brush, then press micro pearls along the edges while the gel is still slightly wet so they actually stick.
Long almond nails with that frosty white base look expensive, and the curved pearl lines add just enough detail without making everything feel cluttered.
The raised gel texture gives the whole thing a soft, almost matte finish that photographs beautifully (which matters if you’re planning to post this).
Keep the base sheer, draw your swirl patterns first, then place the pearls along the curves while the gel is still workable
Chrome nails with scattered pearls and crystals in the center instead of at the edges… it’s a small change that makes a huge difference in how wearable this feels.
The long almond shape keeps everything balanced, and honestly, the chrome base does most of the work here — the pearls are just the finishing touch.
Start with your silver-pearl chrome base, place the embellishments while the gel is tacky, and space them evenly so it doesn’t look random.
The ombré base on these coffin nails is pretty, but what I really like is how the pearls are placed toward the center instead of loaded at the tips.
It keeps the design from looking top-heavy, and frankly, it’s way more practical — you’re not constantly worrying about catching the embellishments on everything.
Blend your milky nude with white, cure it, then add different sized pearls while the gel is slightly sticky for better adhesion.
Pink nails with tiny pearls and pastel hearts are exactly as sweet as they sound, and on short almond nails, they don’t feel juvenile.
Start with a nude-pink base, paint the little hearts in different spots so it looks organic, then fill the gaps with micro pearls to balance everything out.
The whole design stays smooth and snag-free, which is honestly my main requirement for any nail art these days.
A curved row of micro pearls right at the cuticle line… it’s such a small detail but it makes the whole manicure look more expensive.
The almond shape helps the pearls follow the natural curve, and because they’re at the cuticle instead of the tips, you don’t have to worry about them constantly getting in your way.
Apply a sheer beige base, add a light pearl chrome layer, then press the tiny pearls into a thin line of clear gel at the cuticle.
Sometimes the simplest version is the best version. This subtle pearl finish on short almond nails is clean enough for work but still feels special.
The chrome powder gives you that glow without being too obvious about it, and over a sheer pink base, it warms up your skin tone instead of washing it out.
Two thin coats of natural base, rub in pearl chrome powder, seal with glossy topcoat
Glittery French tips with thin gold outlines and tiny pearl accents… the almond shape gives the gold details room to follow the natural curve.
It’s fancy but not over-the-top fancy, if that makes sense. Like something you’d wear to a nice dinner but wouldn’t feel weird about at the grocery store the next day.
Clear base, fine glitter tips, then trace the shape with metallic gel and add a few pearls while everything’s still workable.
Sheer nude base with tiny colored pearls and gems scattered around… it’s playful without being childish, and the short almond shape keeps everything comfortable.
The different colors add visual interest, but because they’re small and spaced out, it doesn’t feel overwhelming or busy.
Light nude polish, let it cure completely, then place small dots of clear gel where you want each pearl to sit.
Champagne nails with pearl and gold detailing concentrated at the tips instead of spread everywhere… the almond shape helps the drip effect look intentional.
It’s a nice compromise between dramatic and wearable — you get the luxury effect without the maintenance nightmare.
Shimmering nude base, let it cure, then paint delicate gold outline around tips and add small pearl clusters randomly.
I’ve been staring at pearl nail inspiration photos for weeks now, and honestly? I keep getting stuck on the same questions everyone else seems to have. The pearls look gorgeous in photos, but will they actually stay put when I’m loading the dishwasher or wrestling with Jake’s soccer cleats?
And then there’s the whole base color thing. Half the tutorials I’ve watched use completely different shades and swear theirs is “the only way” to make pearls look right.
So I did what I always do when I can’t decide — I researched everything, tried a few versions myself, and put together 28 ideas that actually work in real life.
Here’s what I figured out.
What nail shape looks best with pearl?
Short square or short squoval shapes are your safest bet if you want something that won’t drive you crazy within three days.
The pearls sit close to the nail surface, so you’re not constantly snagging them on everything. Almond nails work beautifully too, especially if you like the way small pearl accents follow that natural curve.
Coffin nails give you the most real estate for dramatic designs, but I’m going to be honest — if you’re doing school pickup and grocery runs, longer shapes with heavy pearl work get annoying fast.
Save this article for later! 👇👇
What colors look best as pearly nails?
Soft, clean base colors make pearl nails look expensive instead of craft-store DIY. Milky white, sheer pink, or a good neutral nude are your classics for a reason.
These colors let the pearl finish be the star without competing for attention. Ivory and cream work too, especially if you want something warmer than straight white.
You can absolutely use darker colors like black or navy, but keep the pearl elements simple — too much contrast can look busy instead of elegant (and trust me, I learned this the hard way).
Gold Pearl Clusters
This is exactly what I’d get for a wedding — clean white square nails that feel structured but still have that glamorous edge.
The pearls and gold beads add depth without making your hands look too busy, and honestly, the French tip base makes the whole thing feel more wearable than full-coverage glitter.
To recreate this, start with a milky base, paint clean French tips, then add the pearl clusters to just two accent nails (any more and it gets overwhelming).
The raised gel waves on these almond nails look like actual oyster shells, which is either really cool or completely over the top depending on your mood that day.
I love how the length gives you room for the texture work, but I’d be lying if I said this wouldn’t get old fast during my usual Tuesday routine of coffee with Donna and Target runs.
To get this effect, build each textured layer slowly so the waves stay smooth, then add the pearls while the gel is still tacky.
The nude and white combination feels romantic without being too sweet, and the almond shape lets you do those little heart outlines without cramming them in.
This is probably my favorite from the “cute but not trying too hard” category — it’s the kind of design that looks thoughtful but doesn’t scream for attention.
Paint the heart shapes first with a fine brush, then press micro pearls along the edges while the gel is still slightly wet so they actually stick.
Long almond nails with that frosty white base look expensive, and the curved pearl lines add just enough detail without making everything feel cluttered.
The raised gel texture gives the whole thing a soft, almost matte finish that photographs beautifully (which matters if you’re planning to post this).
Keep the base sheer, draw your swirl patterns first, then place the pearls along the curves while the gel is still workable
Chrome nails with scattered pearls and crystals in the center instead of at the edges… it’s a small change that makes a huge difference in how wearable this feels.
The long almond shape keeps everything balanced, and honestly, the chrome base does most of the work here — the pearls are just the finishing touch.
Start with your silver-pearl chrome base, place the embellishments while the gel is tacky, and space them evenly so it doesn’t look random.
The ombré base on these coffin nails is pretty, but what I really like is how the pearls are placed toward the center instead of loaded at the tips.
It keeps the design from looking top-heavy, and frankly, it’s way more practical — you’re not constantly worrying about catching the embellishments on everything.
Blend your milky nude with white, cure it, then add different sized pearls while the gel is slightly sticky for better adhesion.
Pink nails with tiny pearls and pastel hearts are exactly as sweet as they sound, and on short almond nails, they don’t feel juvenile.
Start with a nude-pink base, paint the little hearts in different spots so it looks organic, then fill the gaps with micro pearls to balance everything out.
The whole design stays smooth and snag-free, which is honestly my main requirement for any nail art these days.
A curved row of micro pearls right at the cuticle line… it’s such a small detail but it makes the whole manicure look more expensive.
The almond shape helps the pearls follow the natural curve, and because they’re at the cuticle instead of the tips, you don’t have to worry about them constantly getting in your way.
Apply a sheer beige base, add a light pearl chrome layer, then press the tiny pearls into a thin line of clear gel at the cuticle.
Sometimes the simplest version is the best version. This subtle pearl finish on short almond nails is clean enough for work but still feels special.
The chrome powder gives you that glow without being too obvious about it, and over a sheer pink base, it warms up your skin tone instead of washing it out.
Two thin coats of natural base, rub in pearl chrome powder, seal with glossy topcoat
Glittery French tips with thin gold outlines and tiny pearl accents… the almond shape gives the gold details room to follow the natural curve.
It’s fancy but not over-the-top fancy, if that makes sense. Like something you’d wear to a nice dinner but wouldn’t feel weird about at the grocery store the next day.
Clear base, fine glitter tips, then trace the shape with metallic gel and add a few pearls while everything’s still workable.
Sheer nude base with tiny colored pearls and gems scattered around… it’s playful without being childish, and the short almond shape keeps everything comfortable.
The different colors add visual interest, but because they’re small and spaced out, it doesn’t feel overwhelming or busy.
Light nude polish, let it cure completely, then place small dots of clear gel where you want each pearl to sit.
Champagne nails with pearl and gold detailing concentrated at the tips instead of spread everywhere… the almond shape helps the drip effect look intentional.
It’s a nice compromise between dramatic and wearable — you get the luxury effect without the maintenance nightmare.
Shimmering nude base, let it cure, then paint delicate gold outline around tips and add small pearl clusters randomly.
Chrome nails with scattered pearls and crystals in the center instead of at the edges… it’s a small change that makes a huge difference in how wearable this feels.
The long almond shape keeps everything balanced, and honestly, the chrome base does most of the work here — the pearls are just the finishing touch.
Start with your silver-pearl chrome base, place the embellishments while the gel is tacky, and space them evenly so it doesn’t look random.
The ombré base on these coffin nails is pretty, but what I really like is how the pearls are placed toward the center instead of loaded at the tips.
It keeps the design from looking top-heavy, and frankly, it’s way more practical — you’re not constantly worrying about catching the embellishments on everything.
Blend your milky nude with white, cure it, then add different sized pearls while the gel is slightly sticky for better adhesion.
Pink nails with tiny pearls and pastel hearts are exactly as sweet as they sound, and on short almond nails, they don’t feel juvenile.
Start with a nude-pink base, paint the little hearts in different spots so it looks organic, then fill the gaps with micro pearls to balance everything out.
The whole design stays smooth and snag-free, which is honestly my main requirement for any nail art these days.
A curved row of micro pearls right at the cuticle line… it’s such a small detail but it makes the whole manicure look more expensive.
The almond shape helps the pearls follow the natural curve, and because they’re at the cuticle instead of the tips, you don’t have to worry about them constantly getting in your way.
Apply a sheer beige base, add a light pearl chrome layer, then press the tiny pearls into a thin line of clear gel at the cuticle.
Sometimes the simplest version is the best version. This subtle pearl finish on short almond nails is clean enough for work but still feels special.
The chrome powder gives you that glow without being too obvious about it, and over a sheer pink base, it warms up your skin tone instead of washing it out.
Two thin coats of natural base, rub in pearl chrome powder, seal with glossy topcoat
Glittery French tips with thin gold outlines and tiny pearl accents… the almond shape gives the gold details room to follow the natural curve.
It’s fancy but not over-the-top fancy, if that makes sense. Like something you’d wear to a nice dinner but wouldn’t feel weird about at the grocery store the next day.
Clear base, fine glitter tips, then trace the shape with metallic gel and add a few pearls while everything’s still workable.
Sheer nude base with tiny colored pearls and gems scattered around… it’s playful without being childish, and the short almond shape keeps everything comfortable.
The different colors add visual interest, but because they’re small and spaced out, it doesn’t feel overwhelming or busy.
Light nude polish, let it cure completely, then place small dots of clear gel where you want each pearl to sit.
Champagne nails with pearl and gold detailing concentrated at the tips instead of spread everywhere… the almond shape helps the drip effect look intentional.
It’s a nice compromise between dramatic and wearable — you get the luxury effect without the maintenance nightmare.
Shimmering nude base, let it cure, then paint delicate gold outline around tips and add small pearl clusters randomly.
I’ve been staring at pearl nail inspiration photos for weeks now, and honestly? I keep getting stuck on the same questions everyone else seems to have. The pearls look gorgeous in photos, but will they actually stay put when I’m loading the dishwasher or wrestling with Jake’s soccer cleats?
And then there’s the whole base color thing. Half the tutorials I’ve watched use completely different shades and swear theirs is “the only way” to make pearls look right.
So I did what I always do when I can’t decide — I researched everything, tried a few versions myself, and put together 28 ideas that actually work in real life.
Here’s what I figured out.
What nail shape looks best with pearl?
Short square or short squoval shapes are your safest bet if you want something that won’t drive you crazy within three days.
The pearls sit close to the nail surface, so you’re not constantly snagging them on everything. Almond nails work beautifully too, especially if you like the way small pearl accents follow that natural curve.
Coffin nails give you the most real estate for dramatic designs, but I’m going to be honest — if you’re doing school pickup and grocery runs, longer shapes with heavy pearl work get annoying fast.
Save this article for later! 👇👇
What colors look best as pearly nails?
Soft, clean base colors make pearl nails look expensive instead of craft-store DIY. Milky white, sheer pink, or a good neutral nude are your classics for a reason.
These colors let the pearl finish be the star without competing for attention. Ivory and cream work too, especially if you want something warmer than straight white.
You can absolutely use darker colors like black or navy, but keep the pearl elements simple — too much contrast can look busy instead of elegant (and trust me, I learned this the hard way).
Gold Pearl Clusters
This is exactly what I’d get for a wedding — clean white square nails that feel structured but still have that glamorous edge.
The pearls and gold beads add depth without making your hands look too busy, and honestly, the French tip base makes the whole thing feel more wearable than full-coverage glitter.
To recreate this, start with a milky base, paint clean French tips, then add the pearl clusters to just two accent nails (any more and it gets overwhelming).
The raised gel waves on these almond nails look like actual oyster shells, which is either really cool or completely over the top depending on your mood that day.
I love how the length gives you room for the texture work, but I’d be lying if I said this wouldn’t get old fast during my usual Tuesday routine of coffee with Donna and Target runs.
To get this effect, build each textured layer slowly so the waves stay smooth, then add the pearls while the gel is still tacky.
The nude and white combination feels romantic without being too sweet, and the almond shape lets you do those little heart outlines without cramming them in.
This is probably my favorite from the “cute but not trying too hard” category — it’s the kind of design that looks thoughtful but doesn’t scream for attention.
Paint the heart shapes first with a fine brush, then press micro pearls along the edges while the gel is still slightly wet so they actually stick.
Long almond nails with that frosty white base look expensive, and the curved pearl lines add just enough detail without making everything feel cluttered.
The raised gel texture gives the whole thing a soft, almost matte finish that photographs beautifully (which matters if you’re planning to post this).
Keep the base sheer, draw your swirl patterns first, then place the pearls along the curves while the gel is still workable
Chrome nails with scattered pearls and crystals in the center instead of at the edges… it’s a small change that makes a huge difference in how wearable this feels.
The long almond shape keeps everything balanced, and honestly, the chrome base does most of the work here — the pearls are just the finishing touch.
Start with your silver-pearl chrome base, place the embellishments while the gel is tacky, and space them evenly so it doesn’t look random.
The ombré base on these coffin nails is pretty, but what I really like is how the pearls are placed toward the center instead of loaded at the tips.
It keeps the design from looking top-heavy, and frankly, it’s way more practical — you’re not constantly worrying about catching the embellishments on everything.
Blend your milky nude with white, cure it, then add different sized pearls while the gel is slightly sticky for better adhesion.
Pink nails with tiny pearls and pastel hearts are exactly as sweet as they sound, and on short almond nails, they don’t feel juvenile.
Start with a nude-pink base, paint the little hearts in different spots so it looks organic, then fill the gaps with micro pearls to balance everything out.
The whole design stays smooth and snag-free, which is honestly my main requirement for any nail art these days.
A curved row of micro pearls right at the cuticle line… it’s such a small detail but it makes the whole manicure look more expensive.
The almond shape helps the pearls follow the natural curve, and because they’re at the cuticle instead of the tips, you don’t have to worry about them constantly getting in your way.
Apply a sheer beige base, add a light pearl chrome layer, then press the tiny pearls into a thin line of clear gel at the cuticle.
Sometimes the simplest version is the best version. This subtle pearl finish on short almond nails is clean enough for work but still feels special.
The chrome powder gives you that glow without being too obvious about it, and over a sheer pink base, it warms up your skin tone instead of washing it out.
Two thin coats of natural base, rub in pearl chrome powder, seal with glossy topcoat
Glittery French tips with thin gold outlines and tiny pearl accents… the almond shape gives the gold details room to follow the natural curve.
It’s fancy but not over-the-top fancy, if that makes sense. Like something you’d wear to a nice dinner but wouldn’t feel weird about at the grocery store the next day.
Clear base, fine glitter tips, then trace the shape with metallic gel and add a few pearls while everything’s still workable.
Sheer nude base with tiny colored pearls and gems scattered around… it’s playful without being childish, and the short almond shape keeps everything comfortable.
The different colors add visual interest, but because they’re small and spaced out, it doesn’t feel overwhelming or busy.
Light nude polish, let it cure completely, then place small dots of clear gel where you want each pearl to sit.
Champagne nails with pearl and gold detailing concentrated at the tips instead of spread everywhere… the almond shape helps the drip effect look intentional.
It’s a nice compromise between dramatic and wearable — you get the luxury effect without the maintenance nightmare.
Shimmering nude base, let it cure, then paint delicate gold outline around tips and add small pearl clusters randomly.
Chrome nails with scattered pearls and crystals in the center instead of at the edges… it’s a small change that makes a huge difference in how wearable this feels.
The long almond shape keeps everything balanced, and honestly, the chrome base does most of the work here — the pearls are just the finishing touch.
Start with your silver-pearl chrome base, place the embellishments while the gel is tacky, and space them evenly so it doesn’t look random.
The ombré base on these coffin nails is pretty, but what I really like is how the pearls are placed toward the center instead of loaded at the tips.
It keeps the design from looking top-heavy, and frankly, it’s way more practical — you’re not constantly worrying about catching the embellishments on everything.
Blend your milky nude with white, cure it, then add different sized pearls while the gel is slightly sticky for better adhesion.
Pink nails with tiny pearls and pastel hearts are exactly as sweet as they sound, and on short almond nails, they don’t feel juvenile.
Start with a nude-pink base, paint the little hearts in different spots so it looks organic, then fill the gaps with micro pearls to balance everything out.
The whole design stays smooth and snag-free, which is honestly my main requirement for any nail art these days.
A curved row of micro pearls right at the cuticle line… it’s such a small detail but it makes the whole manicure look more expensive.
The almond shape helps the pearls follow the natural curve, and because they’re at the cuticle instead of the tips, you don’t have to worry about them constantly getting in your way.
Apply a sheer beige base, add a light pearl chrome layer, then press the tiny pearls into a thin line of clear gel at the cuticle.
Sometimes the simplest version is the best version. This subtle pearl finish on short almond nails is clean enough for work but still feels special.
The chrome powder gives you that glow without being too obvious about it, and over a sheer pink base, it warms up your skin tone instead of washing it out.
Two thin coats of natural base, rub in pearl chrome powder, seal with glossy topcoat
Glittery French tips with thin gold outlines and tiny pearl accents… the almond shape gives the gold details room to follow the natural curve.
It’s fancy but not over-the-top fancy, if that makes sense. Like something you’d wear to a nice dinner but wouldn’t feel weird about at the grocery store the next day.
Clear base, fine glitter tips, then trace the shape with metallic gel and add a few pearls while everything’s still workable.
Sheer nude base with tiny colored pearls and gems scattered around… it’s playful without being childish, and the short almond shape keeps everything comfortable.
The different colors add visual interest, but because they’re small and spaced out, it doesn’t feel overwhelming or busy.
Light nude polish, let it cure completely, then place small dots of clear gel where you want each pearl to sit.
Champagne nails with pearl and gold detailing concentrated at the tips instead of spread everywhere… the almond shape helps the drip effect look intentional.
It’s a nice compromise between dramatic and wearable — you get the luxury effect without the maintenance nightmare.
Shimmering nude base, let it cure, then paint delicate gold outline around tips and add small pearl clusters randomly.
I’ve been staring at pearl nail inspiration photos for weeks now, and honestly? I keep getting stuck on the same questions everyone else seems to have. The pearls look gorgeous in photos, but will they actually stay put when I’m loading the dishwasher or wrestling with Jake’s soccer cleats?
And then there’s the whole base color thing. Half the tutorials I’ve watched use completely different shades and swear theirs is “the only way” to make pearls look right.
So I did what I always do when I can’t decide — I researched everything, tried a few versions myself, and put together 28 ideas that actually work in real life.
Here’s what I figured out.
What nail shape looks best with pearl?
Short square or short squoval shapes are your safest bet if you want something that won’t drive you crazy within three days.
The pearls sit close to the nail surface, so you’re not constantly snagging them on everything. Almond nails work beautifully too, especially if you like the way small pearl accents follow that natural curve.
Coffin nails give you the most real estate for dramatic designs, but I’m going to be honest — if you’re doing school pickup and grocery runs, longer shapes with heavy pearl work get annoying fast.
Save this article for later! 👇👇
What colors look best as pearly nails?
Soft, clean base colors make pearl nails look expensive instead of craft-store DIY. Milky white, sheer pink, or a good neutral nude are your classics for a reason.
These colors let the pearl finish be the star without competing for attention. Ivory and cream work too, especially if you want something warmer than straight white.
You can absolutely use darker colors like black or navy, but keep the pearl elements simple — too much contrast can look busy instead of elegant (and trust me, I learned this the hard way).
Gold Pearl Clusters
This is exactly what I’d get for a wedding — clean white square nails that feel structured but still have that glamorous edge.
The pearls and gold beads add depth without making your hands look too busy, and honestly, the French tip base makes the whole thing feel more wearable than full-coverage glitter.
To recreate this, start with a milky base, paint clean French tips, then add the pearl clusters to just two accent nails (any more and it gets overwhelming).
The raised gel waves on these almond nails look like actual oyster shells, which is either really cool or completely over the top depending on your mood that day.
I love how the length gives you room for the texture work, but I’d be lying if I said this wouldn’t get old fast during my usual Tuesday routine of coffee with Donna and Target runs.
To get this effect, build each textured layer slowly so the waves stay smooth, then add the pearls while the gel is still tacky.
The nude and white combination feels romantic without being too sweet, and the almond shape lets you do those little heart outlines without cramming them in.
This is probably my favorite from the “cute but not trying too hard” category — it’s the kind of design that looks thoughtful but doesn’t scream for attention.
Paint the heart shapes first with a fine brush, then press micro pearls along the edges while the gel is still slightly wet so they actually stick.
Long almond nails with that frosty white base look expensive, and the curved pearl lines add just enough detail without making everything feel cluttered.
The raised gel texture gives the whole thing a soft, almost matte finish that photographs beautifully (which matters if you’re planning to post this).
Keep the base sheer, draw your swirl patterns first, then place the pearls along the curves while the gel is still workable
Chrome nails with scattered pearls and crystals in the center instead of at the edges… it’s a small change that makes a huge difference in how wearable this feels.
The long almond shape keeps everything balanced, and honestly, the chrome base does most of the work here — the pearls are just the finishing touch.
Start with your silver-pearl chrome base, place the embellishments while the gel is tacky, and space them evenly so it doesn’t look random.
The ombré base on these coffin nails is pretty, but what I really like is how the pearls are placed toward the center instead of loaded at the tips.
It keeps the design from looking top-heavy, and frankly, it’s way more practical — you’re not constantly worrying about catching the embellishments on everything.
Blend your milky nude with white, cure it, then add different sized pearls while the gel is slightly sticky for better adhesion.
Pink nails with tiny pearls and pastel hearts are exactly as sweet as they sound, and on short almond nails, they don’t feel juvenile.
Start with a nude-pink base, paint the little hearts in different spots so it looks organic, then fill the gaps with micro pearls to balance everything out.
The whole design stays smooth and snag-free, which is honestly my main requirement for any nail art these days.
A curved row of micro pearls right at the cuticle line… it’s such a small detail but it makes the whole manicure look more expensive.
The almond shape helps the pearls follow the natural curve, and because they’re at the cuticle instead of the tips, you don’t have to worry about them constantly getting in your way.
Apply a sheer beige base, add a light pearl chrome layer, then press the tiny pearls into a thin line of clear gel at the cuticle.
Sometimes the simplest version is the best version. This subtle pearl finish on short almond nails is clean enough for work but still feels special.
The chrome powder gives you that glow without being too obvious about it, and over a sheer pink base, it warms up your skin tone instead of washing it out.
Two thin coats of natural base, rub in pearl chrome powder, seal with glossy topcoat
Glittery French tips with thin gold outlines and tiny pearl accents… the almond shape gives the gold details room to follow the natural curve.
It’s fancy but not over-the-top fancy, if that makes sense. Like something you’d wear to a nice dinner but wouldn’t feel weird about at the grocery store the next day.
Clear base, fine glitter tips, then trace the shape with metallic gel and add a few pearls while everything’s still workable.
Sheer nude base with tiny colored pearls and gems scattered around… it’s playful without being childish, and the short almond shape keeps everything comfortable.
The different colors add visual interest, but because they’re small and spaced out, it doesn’t feel overwhelming or busy.
Light nude polish, let it cure completely, then place small dots of clear gel where you want each pearl to sit.
Champagne nails with pearl and gold detailing concentrated at the tips instead of spread everywhere… the almond shape helps the drip effect look intentional.
It’s a nice compromise between dramatic and wearable — you get the luxury effect without the maintenance nightmare.
Shimmering nude base, let it cure, then paint delicate gold outline around tips and add small pearl clusters randomly.
Chrome nails with scattered pearls and crystals in the center instead of at the edges… it’s a small change that makes a huge difference in how wearable this feels.
The long almond shape keeps everything balanced, and honestly, the chrome base does most of the work here — the pearls are just the finishing touch.
Start with your silver-pearl chrome base, place the embellishments while the gel is tacky, and space them evenly so it doesn’t look random.
The ombré base on these coffin nails is pretty, but what I really like is how the pearls are placed toward the center instead of loaded at the tips.
It keeps the design from looking top-heavy, and frankly, it’s way more practical — you’re not constantly worrying about catching the embellishments on everything.
Blend your milky nude with white, cure it, then add different sized pearls while the gel is slightly sticky for better adhesion.
Pink nails with tiny pearls and pastel hearts are exactly as sweet as they sound, and on short almond nails, they don’t feel juvenile.
Start with a nude-pink base, paint the little hearts in different spots so it looks organic, then fill the gaps with micro pearls to balance everything out.
The whole design stays smooth and snag-free, which is honestly my main requirement for any nail art these days.
A curved row of micro pearls right at the cuticle line… it’s such a small detail but it makes the whole manicure look more expensive.
The almond shape helps the pearls follow the natural curve, and because they’re at the cuticle instead of the tips, you don’t have to worry about them constantly getting in your way.
Apply a sheer beige base, add a light pearl chrome layer, then press the tiny pearls into a thin line of clear gel at the cuticle.
Sometimes the simplest version is the best version. This subtle pearl finish on short almond nails is clean enough for work but still feels special.
The chrome powder gives you that glow without being too obvious about it, and over a sheer pink base, it warms up your skin tone instead of washing it out.
Two thin coats of natural base, rub in pearl chrome powder, seal with glossy topcoat
Glittery French tips with thin gold outlines and tiny pearl accents… the almond shape gives the gold details room to follow the natural curve.
It’s fancy but not over-the-top fancy, if that makes sense. Like something you’d wear to a nice dinner but wouldn’t feel weird about at the grocery store the next day.
Clear base, fine glitter tips, then trace the shape with metallic gel and add a few pearls while everything’s still workable.
Sheer nude base with tiny colored pearls and gems scattered around… it’s playful without being childish, and the short almond shape keeps everything comfortable.
The different colors add visual interest, but because they’re small and spaced out, it doesn’t feel overwhelming or busy.
Light nude polish, let it cure completely, then place small dots of clear gel where you want each pearl to sit.
Champagne nails with pearl and gold detailing concentrated at the tips instead of spread everywhere… the almond shape helps the drip effect look intentional.
It’s a nice compromise between dramatic and wearable — you get the luxury effect without the maintenance nightmare.
Shimmering nude base, let it cure, then paint delicate gold outline around tips and add small pearl clusters randomly.
I’ve been staring at pearl nail inspiration photos for weeks now, and honestly? I keep getting stuck on the same questions everyone else seems to have. The pearls look gorgeous in photos, but will they actually stay put when I’m loading the dishwasher or wrestling with Jake’s soccer cleats?
And then there’s the whole base color thing. Half the tutorials I’ve watched use completely different shades and swear theirs is “the only way” to make pearls look right.
So I did what I always do when I can’t decide — I researched everything, tried a few versions myself, and put together 28 ideas that actually work in real life.
Here’s what I figured out.
What nail shape looks best with pearl?
Short square or short squoval shapes are your safest bet if you want something that won’t drive you crazy within three days.
The pearls sit close to the nail surface, so you’re not constantly snagging them on everything. Almond nails work beautifully too, especially if you like the way small pearl accents follow that natural curve.
Coffin nails give you the most real estate for dramatic designs, but I’m going to be honest — if you’re doing school pickup and grocery runs, longer shapes with heavy pearl work get annoying fast.
Save this article for later! 👇👇
What colors look best as pearly nails?
Soft, clean base colors make pearl nails look expensive instead of craft-store DIY. Milky white, sheer pink, or a good neutral nude are your classics for a reason.
These colors let the pearl finish be the star without competing for attention. Ivory and cream work too, especially if you want something warmer than straight white.
You can absolutely use darker colors like black or navy, but keep the pearl elements simple — too much contrast can look busy instead of elegant (and trust me, I learned this the hard way).
Gold Pearl Clusters
This is exactly what I’d get for a wedding — clean white square nails that feel structured but still have that glamorous edge.
The pearls and gold beads add depth without making your hands look too busy, and honestly, the French tip base makes the whole thing feel more wearable than full-coverage glitter.
To recreate this, start with a milky base, paint clean French tips, then add the pearl clusters to just two accent nails (any more and it gets overwhelming).
The raised gel waves on these almond nails look like actual oyster shells, which is either really cool or completely over the top depending on your mood that day.
I love how the length gives you room for the texture work, but I’d be lying if I said this wouldn’t get old fast during my usual Tuesday routine of coffee with Donna and Target runs.
To get this effect, build each textured layer slowly so the waves stay smooth, then add the pearls while the gel is still tacky.
The nude and white combination feels romantic without being too sweet, and the almond shape lets you do those little heart outlines without cramming them in.
This is probably my favorite from the “cute but not trying too hard” category — it’s the kind of design that looks thoughtful but doesn’t scream for attention.
Paint the heart shapes first with a fine brush, then press micro pearls along the edges while the gel is still slightly wet so they actually stick.
Long almond nails with that frosty white base look expensive, and the curved pearl lines add just enough detail without making everything feel cluttered.
The raised gel texture gives the whole thing a soft, almost matte finish that photographs beautifully (which matters if you’re planning to post this).
Keep the base sheer, draw your swirl patterns first, then place the pearls along the curves while the gel is still workable
Chrome nails with scattered pearls and crystals in the center instead of at the edges… it’s a small change that makes a huge difference in how wearable this feels.
The long almond shape keeps everything balanced, and honestly, the chrome base does most of the work here — the pearls are just the finishing touch.
Start with your silver-pearl chrome base, place the embellishments while the gel is tacky, and space them evenly so it doesn’t look random.
The ombré base on these coffin nails is pretty, but what I really like is how the pearls are placed toward the center instead of loaded at the tips.
It keeps the design from looking top-heavy, and frankly, it’s way more practical — you’re not constantly worrying about catching the embellishments on everything.
Blend your milky nude with white, cure it, then add different sized pearls while the gel is slightly sticky for better adhesion.
Pink nails with tiny pearls and pastel hearts are exactly as sweet as they sound, and on short almond nails, they don’t feel juvenile.
Start with a nude-pink base, paint the little hearts in different spots so it looks organic, then fill the gaps with micro pearls to balance everything out.
The whole design stays smooth and snag-free, which is honestly my main requirement for any nail art these days.
A curved row of micro pearls right at the cuticle line… it’s such a small detail but it makes the whole manicure look more expensive.
The almond shape helps the pearls follow the natural curve, and because they’re at the cuticle instead of the tips, you don’t have to worry about them constantly getting in your way.
Apply a sheer beige base, add a light pearl chrome layer, then press the tiny pearls into a thin line of clear gel at the cuticle.
Sometimes the simplest version is the best version. This subtle pearl finish on short almond nails is clean enough for work but still feels special.
The chrome powder gives you that glow without being too obvious about it, and over a sheer pink base, it warms up your skin tone instead of washing it out.
Two thin coats of natural base, rub in pearl chrome powder, seal with glossy topcoat
Glittery French tips with thin gold outlines and tiny pearl accents… the almond shape gives the gold details room to follow the natural curve.
It’s fancy but not over-the-top fancy, if that makes sense. Like something you’d wear to a nice dinner but wouldn’t feel weird about at the grocery store the next day.
Clear base, fine glitter tips, then trace the shape with metallic gel and add a few pearls while everything’s still workable.
Sheer nude base with tiny colored pearls and gems scattered around… it’s playful without being childish, and the short almond shape keeps everything comfortable.
The different colors add visual interest, but because they’re small and spaced out, it doesn’t feel overwhelming or busy.
Light nude polish, let it cure completely, then place small dots of clear gel where you want each pearl to sit.
Champagne nails with pearl and gold detailing concentrated at the tips instead of spread everywhere… the almond shape helps the drip effect look intentional.
It’s a nice compromise between dramatic and wearable — you get the luxury effect without the maintenance nightmare.
Shimmering nude base, let it cure, then paint delicate gold outline around tips and add small pearl clusters randomly.
Chrome nails with scattered pearls and crystals in the center instead of at the edges… it’s a small change that makes a huge difference in how wearable this feels.
The long almond shape keeps everything balanced, and honestly, the chrome base does most of the work here — the pearls are just the finishing touch.
Start with your silver-pearl chrome base, place the embellishments while the gel is tacky, and space them evenly so it doesn’t look random.
The ombré base on these coffin nails is pretty, but what I really like is how the pearls are placed toward the center instead of loaded at the tips.
It keeps the design from looking top-heavy, and frankly, it’s way more practical — you’re not constantly worrying about catching the embellishments on everything.
Blend your milky nude with white, cure it, then add different sized pearls while the gel is slightly sticky for better adhesion.
Pink nails with tiny pearls and pastel hearts are exactly as sweet as they sound, and on short almond nails, they don’t feel juvenile.
Start with a nude-pink base, paint the little hearts in different spots so it looks organic, then fill the gaps with micro pearls to balance everything out.
The whole design stays smooth and snag-free, which is honestly my main requirement for any nail art these days.
A curved row of micro pearls right at the cuticle line… it’s such a small detail but it makes the whole manicure look more expensive.
The almond shape helps the pearls follow the natural curve, and because they’re at the cuticle instead of the tips, you don’t have to worry about them constantly getting in your way.
Apply a sheer beige base, add a light pearl chrome layer, then press the tiny pearls into a thin line of clear gel at the cuticle.
Sometimes the simplest version is the best version. This subtle pearl finish on short almond nails is clean enough for work but still feels special.
The chrome powder gives you that glow without being too obvious about it, and over a sheer pink base, it warms up your skin tone instead of washing it out.
Two thin coats of natural base, rub in pearl chrome powder, seal with glossy topcoat
Glittery French tips with thin gold outlines and tiny pearl accents… the almond shape gives the gold details room to follow the natural curve.
It’s fancy but not over-the-top fancy, if that makes sense. Like something you’d wear to a nice dinner but wouldn’t feel weird about at the grocery store the next day.
Clear base, fine glitter tips, then trace the shape with metallic gel and add a few pearls while everything’s still workable.
Sheer nude base with tiny colored pearls and gems scattered around… it’s playful without being childish, and the short almond shape keeps everything comfortable.
The different colors add visual interest, but because they’re small and spaced out, it doesn’t feel overwhelming or busy.
Light nude polish, let it cure completely, then place small dots of clear gel where you want each pearl to sit.
Champagne nails with pearl and gold detailing concentrated at the tips instead of spread everywhere… the almond shape helps the drip effect look intentional.
It’s a nice compromise between dramatic and wearable — you get the luxury effect without the maintenance nightmare.
Shimmering nude base, let it cure, then paint delicate gold outline around tips and add small pearl clusters randomly.
I’ve been staring at pearl nail inspiration photos for weeks now, and honestly? I keep getting stuck on the same questions everyone else seems to have. The pearls look gorgeous in photos, but will they actually stay put when I’m loading the dishwasher or wrestling with Jake’s soccer cleats?
And then there’s the whole base color thing. Half the tutorials I’ve watched use completely different shades and swear theirs is “the only way” to make pearls look right.
So I did what I always do when I can’t decide — I researched everything, tried a few versions myself, and put together 28 ideas that actually work in real life.
Here’s what I figured out.
What nail shape looks best with pearl?
Short square or short squoval shapes are your safest bet if you want something that won’t drive you crazy within three days.
The pearls sit close to the nail surface, so you’re not constantly snagging them on everything. Almond nails work beautifully too, especially if you like the way small pearl accents follow that natural curve.
Coffin nails give you the most real estate for dramatic designs, but I’m going to be honest — if you’re doing school pickup and grocery runs, longer shapes with heavy pearl work get annoying fast.
Save this article for later! 👇👇
What colors look best as pearly nails?
Soft, clean base colors make pearl nails look expensive instead of craft-store DIY. Milky white, sheer pink, or a good neutral nude are your classics for a reason.
These colors let the pearl finish be the star without competing for attention. Ivory and cream work too, especially if you want something warmer than straight white.
You can absolutely use darker colors like black or navy, but keep the pearl elements simple — too much contrast can look busy instead of elegant (and trust me, I learned this the hard way).
Gold Pearl Clusters
This is exactly what I’d get for a wedding — clean white square nails that feel structured but still have that glamorous edge.
The pearls and gold beads add depth without making your hands look too busy, and honestly, the French tip base makes the whole thing feel more wearable than full-coverage glitter.
To recreate this, start with a milky base, paint clean French tips, then add the pearl clusters to just two accent nails (any more and it gets overwhelming).
The raised gel waves on these almond nails look like actual oyster shells, which is either really cool or completely over the top depending on your mood that day.
I love how the length gives you room for the texture work, but I’d be lying if I said this wouldn’t get old fast during my usual Tuesday routine of coffee with Donna and Target runs.
To get this effect, build each textured layer slowly so the waves stay smooth, then add the pearls while the gel is still tacky.
The nude and white combination feels romantic without being too sweet, and the almond shape lets you do those little heart outlines without cramming them in.
This is probably my favorite from the “cute but not trying too hard” category — it’s the kind of design that looks thoughtful but doesn’t scream for attention.
Paint the heart shapes first with a fine brush, then press micro pearls along the edges while the gel is still slightly wet so they actually stick.
Long almond nails with that frosty white base look expensive, and the curved pearl lines add just enough detail without making everything feel cluttered.
The raised gel texture gives the whole thing a soft, almost matte finish that photographs beautifully (which matters if you’re planning to post this).
Keep the base sheer, draw your swirl patterns first, then place the pearls along the curves while the gel is still workable
Chrome nails with scattered pearls and crystals in the center instead of at the edges… it’s a small change that makes a huge difference in how wearable this feels.
The long almond shape keeps everything balanced, and honestly, the chrome base does most of the work here — the pearls are just the finishing touch.
Start with your silver-pearl chrome base, place the embellishments while the gel is tacky, and space them evenly so it doesn’t look random.
The ombré base on these coffin nails is pretty, but what I really like is how the pearls are placed toward the center instead of loaded at the tips.
It keeps the design from looking top-heavy, and frankly, it’s way more practical — you’re not constantly worrying about catching the embellishments on everything.
Blend your milky nude with white, cure it, then add different sized pearls while the gel is slightly sticky for better adhesion.
Pink nails with tiny pearls and pastel hearts are exactly as sweet as they sound, and on short almond nails, they don’t feel juvenile.
Start with a nude-pink base, paint the little hearts in different spots so it looks organic, then fill the gaps with micro pearls to balance everything out.
The whole design stays smooth and snag-free, which is honestly my main requirement for any nail art these days.
A curved row of micro pearls right at the cuticle line… it’s such a small detail but it makes the whole manicure look more expensive.
The almond shape helps the pearls follow the natural curve, and because they’re at the cuticle instead of the tips, you don’t have to worry about them constantly getting in your way.
Apply a sheer beige base, add a light pearl chrome layer, then press the tiny pearls into a thin line of clear gel at the cuticle.
Sometimes the simplest version is the best version. This subtle pearl finish on short almond nails is clean enough for work but still feels special.
The chrome powder gives you that glow without being too obvious about it, and over a sheer pink base, it warms up your skin tone instead of washing it out.
Two thin coats of natural base, rub in pearl chrome powder, seal with glossy topcoat
Glittery French tips with thin gold outlines and tiny pearl accents… the almond shape gives the gold details room to follow the natural curve.
It’s fancy but not over-the-top fancy, if that makes sense. Like something you’d wear to a nice dinner but wouldn’t feel weird about at the grocery store the next day.
Clear base, fine glitter tips, then trace the shape with metallic gel and add a few pearls while everything’s still workable.
Sheer nude base with tiny colored pearls and gems scattered around… it’s playful without being childish, and the short almond shape keeps everything comfortable.
The different colors add visual interest, but because they’re small and spaced out, it doesn’t feel overwhelming or busy.
Light nude polish, let it cure completely, then place small dots of clear gel where you want each pearl to sit.
Champagne nails with pearl and gold detailing concentrated at the tips instead of spread everywhere… the almond shape helps the drip effect look intentional.
It’s a nice compromise between dramatic and wearable — you get the luxury effect without the maintenance nightmare.
Shimmering nude base, let it cure, then paint delicate gold outline around tips and add small pearl clusters randomly.
Chrome nails with scattered pearls and crystals in the center instead of at the edges… it’s a small change that makes a huge difference in how wearable this feels.
The long almond shape keeps everything balanced, and honestly, the chrome base does most of the work here — the pearls are just the finishing touch.
Start with your silver-pearl chrome base, place the embellishments while the gel is tacky, and space them evenly so it doesn’t look random.
The ombré base on these coffin nails is pretty, but what I really like is how the pearls are placed toward the center instead of loaded at the tips.
It keeps the design from looking top-heavy, and frankly, it’s way more practical — you’re not constantly worrying about catching the embellishments on everything.
Blend your milky nude with white, cure it, then add different sized pearls while the gel is slightly sticky for better adhesion.
Pink nails with tiny pearls and pastel hearts are exactly as sweet as they sound, and on short almond nails, they don’t feel juvenile.
Start with a nude-pink base, paint the little hearts in different spots so it looks organic, then fill the gaps with micro pearls to balance everything out.
The whole design stays smooth and snag-free, which is honestly my main requirement for any nail art these days.
A curved row of micro pearls right at the cuticle line… it’s such a small detail but it makes the whole manicure look more expensive.
The almond shape helps the pearls follow the natural curve, and because they’re at the cuticle instead of the tips, you don’t have to worry about them constantly getting in your way.
Apply a sheer beige base, add a light pearl chrome layer, then press the tiny pearls into a thin line of clear gel at the cuticle.
Sometimes the simplest version is the best version. This subtle pearl finish on short almond nails is clean enough for work but still feels special.
The chrome powder gives you that glow without being too obvious about it, and over a sheer pink base, it warms up your skin tone instead of washing it out.
Two thin coats of natural base, rub in pearl chrome powder, seal with glossy topcoat
Glittery French tips with thin gold outlines and tiny pearl accents… the almond shape gives the gold details room to follow the natural curve.
It’s fancy but not over-the-top fancy, if that makes sense. Like something you’d wear to a nice dinner but wouldn’t feel weird about at the grocery store the next day.
Clear base, fine glitter tips, then trace the shape with metallic gel and add a few pearls while everything’s still workable.
Sheer nude base with tiny colored pearls and gems scattered around… it’s playful without being childish, and the short almond shape keeps everything comfortable.
The different colors add visual interest, but because they’re small and spaced out, it doesn’t feel overwhelming or busy.
Light nude polish, let it cure completely, then place small dots of clear gel where you want each pearl to sit.
Champagne nails with pearl and gold detailing concentrated at the tips instead of spread everywhere… the almond shape helps the drip effect look intentional.
It’s a nice compromise between dramatic and wearable — you get the luxury effect without the maintenance nightmare.
Shimmering nude base, let it cure, then paint delicate gold outline around tips and add small pearl clusters randomly.
I’ve been staring at pearl nail inspiration photos for weeks now, and honestly? I keep getting stuck on the same questions everyone else seems to have. The pearls look gorgeous in photos, but will they actually stay put when I’m loading the dishwasher or wrestling with Jake’s soccer cleats?
And then there’s the whole base color thing. Half the tutorials I’ve watched use completely different shades and swear theirs is “the only way” to make pearls look right.
So I did what I always do when I can’t decide — I researched everything, tried a few versions myself, and put together 28 ideas that actually work in real life.
Here’s what I figured out.
What nail shape looks best with pearl?
Short square or short squoval shapes are your safest bet if you want something that won’t drive you crazy within three days.
The pearls sit close to the nail surface, so you’re not constantly snagging them on everything. Almond nails work beautifully too, especially if you like the way small pearl accents follow that natural curve.
Coffin nails give you the most real estate for dramatic designs, but I’m going to be honest — if you’re doing school pickup and grocery runs, longer shapes with heavy pearl work get annoying fast.
Save this article for later! 👇👇
What colors look best as pearly nails?
Soft, clean base colors make pearl nails look expensive instead of craft-store DIY. Milky white, sheer pink, or a good neutral nude are your classics for a reason.
These colors let the pearl finish be the star without competing for attention. Ivory and cream work too, especially if you want something warmer than straight white.
You can absolutely use darker colors like black or navy, but keep the pearl elements simple — too much contrast can look busy instead of elegant (and trust me, I learned this the hard way).
Gold Pearl Clusters
This is exactly what I’d get for a wedding — clean white square nails that feel structured but still have that glamorous edge.
The pearls and gold beads add depth without making your hands look too busy, and honestly, the French tip base makes the whole thing feel more wearable than full-coverage glitter.
To recreate this, start with a milky base, paint clean French tips, then add the pearl clusters to just two accent nails (any more and it gets overwhelming).
The raised gel waves on these almond nails look like actual oyster shells, which is either really cool or completely over the top depending on your mood that day.
I love how the length gives you room for the texture work, but I’d be lying if I said this wouldn’t get old fast during my usual Tuesday routine of coffee with Donna and Target runs.
To get this effect, build each textured layer slowly so the waves stay smooth, then add the pearls while the gel is still tacky.
The nude and white combination feels romantic without being too sweet, and the almond shape lets you do those little heart outlines without cramming them in.
This is probably my favorite from the “cute but not trying too hard” category — it’s the kind of design that looks thoughtful but doesn’t scream for attention.
Paint the heart shapes first with a fine brush, then press micro pearls along the edges while the gel is still slightly wet so they actually stick.
Long almond nails with that frosty white base look expensive, and the curved pearl lines add just enough detail without making everything feel cluttered.
The raised gel texture gives the whole thing a soft, almost matte finish that photographs beautifully (which matters if you’re planning to post this).
Keep the base sheer, draw your swirl patterns first, then place the pearls along the curves while the gel is still workable
Chrome nails with scattered pearls and crystals in the center instead of at the edges… it’s a small change that makes a huge difference in how wearable this feels.
The long almond shape keeps everything balanced, and honestly, the chrome base does most of the work here — the pearls are just the finishing touch.
Start with your silver-pearl chrome base, place the embellishments while the gel is tacky, and space them evenly so it doesn’t look random.
The ombré base on these coffin nails is pretty, but what I really like is how the pearls are placed toward the center instead of loaded at the tips.
It keeps the design from looking top-heavy, and frankly, it’s way more practical — you’re not constantly worrying about catching the embellishments on everything.
Blend your milky nude with white, cure it, then add different sized pearls while the gel is slightly sticky for better adhesion.
Pink nails with tiny pearls and pastel hearts are exactly as sweet as they sound, and on short almond nails, they don’t feel juvenile.
Start with a nude-pink base, paint the little hearts in different spots so it looks organic, then fill the gaps with micro pearls to balance everything out.
The whole design stays smooth and snag-free, which is honestly my main requirement for any nail art these days.
A curved row of micro pearls right at the cuticle line… it’s such a small detail but it makes the whole manicure look more expensive.
The almond shape helps the pearls follow the natural curve, and because they’re at the cuticle instead of the tips, you don’t have to worry about them constantly getting in your way.
Apply a sheer beige base, add a light pearl chrome layer, then press the tiny pearls into a thin line of clear gel at the cuticle.
Sometimes the simplest version is the best version. This subtle pearl finish on short almond nails is clean enough for work but still feels special.
The chrome powder gives you that glow without being too obvious about it, and over a sheer pink base, it warms up your skin tone instead of washing it out.
Two thin coats of natural base, rub in pearl chrome powder, seal with glossy topcoat
Glittery French tips with thin gold outlines and tiny pearl accents… the almond shape gives the gold details room to follow the natural curve.
It’s fancy but not over-the-top fancy, if that makes sense. Like something you’d wear to a nice dinner but wouldn’t feel weird about at the grocery store the next day.
Clear base, fine glitter tips, then trace the shape with metallic gel and add a few pearls while everything’s still workable.
Sheer nude base with tiny colored pearls and gems scattered around… it’s playful without being childish, and the short almond shape keeps everything comfortable.
The different colors add visual interest, but because they’re small and spaced out, it doesn’t feel overwhelming or busy.
Light nude polish, let it cure completely, then place small dots of clear gel where you want each pearl to sit.
Champagne nails with pearl and gold detailing concentrated at the tips instead of spread everywhere… the almond shape helps the drip effect look intentional.
It’s a nice compromise between dramatic and wearable — you get the luxury effect without the maintenance nightmare.
Shimmering nude base, let it cure, then paint delicate gold outline around tips and add small pearl clusters randomly.
A curved row of micro pearls right at the cuticle line… it’s such a small detail but it makes the whole manicure look more expensive.
The almond shape helps the pearls follow the natural curve, and because they’re at the cuticle instead of the tips, you don’t have to worry about them constantly getting in your way.
Apply a sheer beige base, add a light pearl chrome layer, then press the tiny pearls into a thin line of clear gel at the cuticle.
Sometimes the simplest version is the best version. This subtle pearl finish on short almond nails is clean enough for work but still feels special.
The chrome powder gives you that glow without being too obvious about it, and over a sheer pink base, it warms up your skin tone instead of washing it out.
Two thin coats of natural base, rub in pearl chrome powder, seal with glossy topcoat
Glittery French tips with thin gold outlines and tiny pearl accents… the almond shape gives the gold details room to follow the natural curve.
It’s fancy but not over-the-top fancy, if that makes sense. Like something you’d wear to a nice dinner but wouldn’t feel weird about at the grocery store the next day.
Clear base, fine glitter tips, then trace the shape with metallic gel and add a few pearls while everything’s still workable.
Sheer nude base with tiny colored pearls and gems scattered around… it’s playful without being childish, and the short almond shape keeps everything comfortable.
The different colors add visual interest, but because they’re small and spaced out, it doesn’t feel overwhelming or busy.
Light nude polish, let it cure completely, then place small dots of clear gel where you want each pearl to sit.
Champagne nails with pearl and gold detailing concentrated at the tips instead of spread everywhere… the almond shape helps the drip effect look intentional.
It’s a nice compromise between dramatic and wearable — you get the luxury effect without the maintenance nightmare.
Shimmering nude base, let it cure, then paint delicate gold outline around tips and add small pearl clusters randomly.
Chrome nails with scattered pearls and crystals in the center instead of at the edges… it’s a small change that makes a huge difference in how wearable this feels.
The long almond shape keeps everything balanced, and honestly, the chrome base does most of the work here — the pearls are just the finishing touch.
Start with your silver-pearl chrome base, place the embellishments while the gel is tacky, and space them evenly so it doesn’t look random.
The ombré base on these coffin nails is pretty, but what I really like is how the pearls are placed toward the center instead of loaded at the tips.
It keeps the design from looking top-heavy, and frankly, it’s way more practical — you’re not constantly worrying about catching the embellishments on everything.
Blend your milky nude with white, cure it, then add different sized pearls while the gel is slightly sticky for better adhesion.
Pink nails with tiny pearls and pastel hearts are exactly as sweet as they sound, and on short almond nails, they don’t feel juvenile.
Start with a nude-pink base, paint the little hearts in different spots so it looks organic, then fill the gaps with micro pearls to balance everything out.
The whole design stays smooth and snag-free, which is honestly my main requirement for any nail art these days.
A curved row of micro pearls right at the cuticle line… it’s such a small detail but it makes the whole manicure look more expensive.
The almond shape helps the pearls follow the natural curve, and because they’re at the cuticle instead of the tips, you don’t have to worry about them constantly getting in your way.
Apply a sheer beige base, add a light pearl chrome layer, then press the tiny pearls into a thin line of clear gel at the cuticle.
Sometimes the simplest version is the best version. This subtle pearl finish on short almond nails is clean enough for work but still feels special.
The chrome powder gives you that glow without being too obvious about it, and over a sheer pink base, it warms up your skin tone instead of washing it out.
Two thin coats of natural base, rub in pearl chrome powder, seal with glossy topcoat
Glittery French tips with thin gold outlines and tiny pearl accents… the almond shape gives the gold details room to follow the natural curve.
It’s fancy but not over-the-top fancy, if that makes sense. Like something you’d wear to a nice dinner but wouldn’t feel weird about at the grocery store the next day.
Clear base, fine glitter tips, then trace the shape with metallic gel and add a few pearls while everything’s still workable.
Sheer nude base with tiny colored pearls and gems scattered around… it’s playful without being childish, and the short almond shape keeps everything comfortable.
The different colors add visual interest, but because they’re small and spaced out, it doesn’t feel overwhelming or busy.
Light nude polish, let it cure completely, then place small dots of clear gel where you want each pearl to sit.
Champagne nails with pearl and gold detailing concentrated at the tips instead of spread everywhere… the almond shape helps the drip effect look intentional.
It’s a nice compromise between dramatic and wearable — you get the luxury effect without the maintenance nightmare.
Shimmering nude base, let it cure, then paint delicate gold outline around tips and add small pearl clusters randomly.
I’ve been staring at pearl nail inspiration photos for weeks now, and honestly? I keep getting stuck on the same questions everyone else seems to have. The pearls look gorgeous in photos, but will they actually stay put when I’m loading the dishwasher or wrestling with Jake’s soccer cleats?
And then there’s the whole base color thing. Half the tutorials I’ve watched use completely different shades and swear theirs is “the only way” to make pearls look right.
So I did what I always do when I can’t decide — I researched everything, tried a few versions myself, and put together 28 ideas that actually work in real life.
Here’s what I figured out.
What nail shape looks best with pearl?
Short square or short squoval shapes are your safest bet if you want something that won’t drive you crazy within three days.
The pearls sit close to the nail surface, so you’re not constantly snagging them on everything. Almond nails work beautifully too, especially if you like the way small pearl accents follow that natural curve.
Coffin nails give you the most real estate for dramatic designs, but I’m going to be honest — if you’re doing school pickup and grocery runs, longer shapes with heavy pearl work get annoying fast.
Save this article for later! 👇👇
What colors look best as pearly nails?
Soft, clean base colors make pearl nails look expensive instead of craft-store DIY. Milky white, sheer pink, or a good neutral nude are your classics for a reason.
These colors let the pearl finish be the star without competing for attention. Ivory and cream work too, especially if you want something warmer than straight white.
You can absolutely use darker colors like black or navy, but keep the pearl elements simple — too much contrast can look busy instead of elegant (and trust me, I learned this the hard way).
Gold Pearl Clusters
This is exactly what I’d get for a wedding — clean white square nails that feel structured but still have that glamorous edge.
The pearls and gold beads add depth without making your hands look too busy, and honestly, the French tip base makes the whole thing feel more wearable than full-coverage glitter.
To recreate this, start with a milky base, paint clean French tips, then add the pearl clusters to just two accent nails (any more and it gets overwhelming).
The raised gel waves on these almond nails look like actual oyster shells, which is either really cool or completely over the top depending on your mood that day.
I love how the length gives you room for the texture work, but I’d be lying if I said this wouldn’t get old fast during my usual Tuesday routine of coffee with Donna and Target runs.
To get this effect, build each textured layer slowly so the waves stay smooth, then add the pearls while the gel is still tacky.
The nude and white combination feels romantic without being too sweet, and the almond shape lets you do those little heart outlines without cramming them in.
This is probably my favorite from the “cute but not trying too hard” category — it’s the kind of design that looks thoughtful but doesn’t scream for attention.
Paint the heart shapes first with a fine brush, then press micro pearls along the edges while the gel is still slightly wet so they actually stick.
Long almond nails with that frosty white base look expensive, and the curved pearl lines add just enough detail without making everything feel cluttered.
The raised gel texture gives the whole thing a soft, almost matte finish that photographs beautifully (which matters if you’re planning to post this).
Keep the base sheer, draw your swirl patterns first, then place the pearls along the curves while the gel is still workable
Chrome nails with scattered pearls and crystals in the center instead of at the edges… it’s a small change that makes a huge difference in how wearable this feels.
The long almond shape keeps everything balanced, and honestly, the chrome base does most of the work here — the pearls are just the finishing touch.
Start with your silver-pearl chrome base, place the embellishments while the gel is tacky, and space them evenly so it doesn’t look random.
The ombré base on these coffin nails is pretty, but what I really like is how the pearls are placed toward the center instead of loaded at the tips.
It keeps the design from looking top-heavy, and frankly, it’s way more practical — you’re not constantly worrying about catching the embellishments on everything.
Blend your milky nude with white, cure it, then add different sized pearls while the gel is slightly sticky for better adhesion.
Pink nails with tiny pearls and pastel hearts are exactly as sweet as they sound, and on short almond nails, they don’t feel juvenile.
Start with a nude-pink base, paint the little hearts in different spots so it looks organic, then fill the gaps with micro pearls to balance everything out.
The whole design stays smooth and snag-free, which is honestly my main requirement for any nail art these days.
A curved row of micro pearls right at the cuticle line… it’s such a small detail but it makes the whole manicure look more expensive.
The almond shape helps the pearls follow the natural curve, and because they’re at the cuticle instead of the tips, you don’t have to worry about them constantly getting in your way.
Apply a sheer beige base, add a light pearl chrome layer, then press the tiny pearls into a thin line of clear gel at the cuticle.
Sometimes the simplest version is the best version. This subtle pearl finish on short almond nails is clean enough for work but still feels special.
The chrome powder gives you that glow without being too obvious about it, and over a sheer pink base, it warms up your skin tone instead of washing it out.
Two thin coats of natural base, rub in pearl chrome powder, seal with glossy topcoat
Glittery French tips with thin gold outlines and tiny pearl accents… the almond shape gives the gold details room to follow the natural curve.
It’s fancy but not over-the-top fancy, if that makes sense. Like something you’d wear to a nice dinner but wouldn’t feel weird about at the grocery store the next day.
Clear base, fine glitter tips, then trace the shape with metallic gel and add a few pearls while everything’s still workable.
Sheer nude base with tiny colored pearls and gems scattered around… it’s playful without being childish, and the short almond shape keeps everything comfortable.
The different colors add visual interest, but because they’re small and spaced out, it doesn’t feel overwhelming or busy.
Light nude polish, let it cure completely, then place small dots of clear gel where you want each pearl to sit.
Champagne nails with pearl and gold detailing concentrated at the tips instead of spread everywhere… the almond shape helps the drip effect look intentional.
It’s a nice compromise between dramatic and wearable — you get the luxury effect without the maintenance nightmare.
Shimmering nude base, let it cure, then paint delicate gold outline around tips and add small pearl clusters randomly.
A curved row of micro pearls right at the cuticle line… it’s such a small detail but it makes the whole manicure look more expensive.
The almond shape helps the pearls follow the natural curve, and because they’re at the cuticle instead of the tips, you don’t have to worry about them constantly getting in your way.
Apply a sheer beige base, add a light pearl chrome layer, then press the tiny pearls into a thin line of clear gel at the cuticle.
Sometimes the simplest version is the best version. This subtle pearl finish on short almond nails is clean enough for work but still feels special.
The chrome powder gives you that glow without being too obvious about it, and over a sheer pink base, it warms up your skin tone instead of washing it out.
Two thin coats of natural base, rub in pearl chrome powder, seal with glossy topcoat
Glittery French tips with thin gold outlines and tiny pearl accents… the almond shape gives the gold details room to follow the natural curve.
It’s fancy but not over-the-top fancy, if that makes sense. Like something you’d wear to a nice dinner but wouldn’t feel weird about at the grocery store the next day.
Clear base, fine glitter tips, then trace the shape with metallic gel and add a few pearls while everything’s still workable.
Sheer nude base with tiny colored pearls and gems scattered around… it’s playful without being childish, and the short almond shape keeps everything comfortable.
The different colors add visual interest, but because they’re small and spaced out, it doesn’t feel overwhelming or busy.
Light nude polish, let it cure completely, then place small dots of clear gel where you want each pearl to sit.
Champagne nails with pearl and gold detailing concentrated at the tips instead of spread everywhere… the almond shape helps the drip effect look intentional.
It’s a nice compromise between dramatic and wearable — you get the luxury effect without the maintenance nightmare.
Shimmering nude base, let it cure, then paint delicate gold outline around tips and add small pearl clusters randomly.
Chrome nails with scattered pearls and crystals in the center instead of at the edges… it’s a small change that makes a huge difference in how wearable this feels.
The long almond shape keeps everything balanced, and honestly, the chrome base does most of the work here — the pearls are just the finishing touch.
Start with your silver-pearl chrome base, place the embellishments while the gel is tacky, and space them evenly so it doesn’t look random.
The ombré base on these coffin nails is pretty, but what I really like is how the pearls are placed toward the center instead of loaded at the tips.
It keeps the design from looking top-heavy, and frankly, it’s way more practical — you’re not constantly worrying about catching the embellishments on everything.
Blend your milky nude with white, cure it, then add different sized pearls while the gel is slightly sticky for better adhesion.
Pink nails with tiny pearls and pastel hearts are exactly as sweet as they sound, and on short almond nails, they don’t feel juvenile.
Start with a nude-pink base, paint the little hearts in different spots so it looks organic, then fill the gaps with micro pearls to balance everything out.
The whole design stays smooth and snag-free, which is honestly my main requirement for any nail art these days.
A curved row of micro pearls right at the cuticle line… it’s such a small detail but it makes the whole manicure look more expensive.
The almond shape helps the pearls follow the natural curve, and because they’re at the cuticle instead of the tips, you don’t have to worry about them constantly getting in your way.
Apply a sheer beige base, add a light pearl chrome layer, then press the tiny pearls into a thin line of clear gel at the cuticle.
Sometimes the simplest version is the best version. This subtle pearl finish on short almond nails is clean enough for work but still feels special.
The chrome powder gives you that glow without being too obvious about it, and over a sheer pink base, it warms up your skin tone instead of washing it out.
Two thin coats of natural base, rub in pearl chrome powder, seal with glossy topcoat
Glittery French tips with thin gold outlines and tiny pearl accents… the almond shape gives the gold details room to follow the natural curve.
It’s fancy but not over-the-top fancy, if that makes sense. Like something you’d wear to a nice dinner but wouldn’t feel weird about at the grocery store the next day.
Clear base, fine glitter tips, then trace the shape with metallic gel and add a few pearls while everything’s still workable.
Sheer nude base with tiny colored pearls and gems scattered around… it’s playful without being childish, and the short almond shape keeps everything comfortable.
The different colors add visual interest, but because they’re small and spaced out, it doesn’t feel overwhelming or busy.
Light nude polish, let it cure completely, then place small dots of clear gel where you want each pearl to sit.
Champagne nails with pearl and gold detailing concentrated at the tips instead of spread everywhere… the almond shape helps the drip effect look intentional.
It’s a nice compromise between dramatic and wearable — you get the luxury effect without the maintenance nightmare.
Shimmering nude base, let it cure, then paint delicate gold outline around tips and add small pearl clusters randomly.
I’ve been staring at pearl nail inspiration photos for weeks now, and honestly? I keep getting stuck on the same questions everyone else seems to have. The pearls look gorgeous in photos, but will they actually stay put when I’m loading the dishwasher or wrestling with Jake’s soccer cleats?
And then there’s the whole base color thing. Half the tutorials I’ve watched use completely different shades and swear theirs is “the only way” to make pearls look right.
So I did what I always do when I can’t decide — I researched everything, tried a few versions myself, and put together 28 ideas that actually work in real life.
Here’s what I figured out.
What nail shape looks best with pearl?
Short square or short squoval shapes are your safest bet if you want something that won’t drive you crazy within three days.
The pearls sit close to the nail surface, so you’re not constantly snagging them on everything. Almond nails work beautifully too, especially if you like the way small pearl accents follow that natural curve.
Coffin nails give you the most real estate for dramatic designs, but I’m going to be honest — if you’re doing school pickup and grocery runs, longer shapes with heavy pearl work get annoying fast.
Save this article for later! 👇👇
What colors look best as pearly nails?
Soft, clean base colors make pearl nails look expensive instead of craft-store DIY. Milky white, sheer pink, or a good neutral nude are your classics for a reason.
These colors let the pearl finish be the star without competing for attention. Ivory and cream work too, especially if you want something warmer than straight white.
You can absolutely use darker colors like black or navy, but keep the pearl elements simple — too much contrast can look busy instead of elegant (and trust me, I learned this the hard way).
Gold Pearl Clusters
This is exactly what I’d get for a wedding — clean white square nails that feel structured but still have that glamorous edge.
The pearls and gold beads add depth without making your hands look too busy, and honestly, the French tip base makes the whole thing feel more wearable than full-coverage glitter.
To recreate this, start with a milky base, paint clean French tips, then add the pearl clusters to just two accent nails (any more and it gets overwhelming).
The raised gel waves on these almond nails look like actual oyster shells, which is either really cool or completely over the top depending on your mood that day.
I love how the length gives you room for the texture work, but I’d be lying if I said this wouldn’t get old fast during my usual Tuesday routine of coffee with Donna and Target runs.
To get this effect, build each textured layer slowly so the waves stay smooth, then add the pearls while the gel is still tacky.
The nude and white combination feels romantic without being too sweet, and the almond shape lets you do those little heart outlines without cramming them in.
This is probably my favorite from the “cute but not trying too hard” category — it’s the kind of design that looks thoughtful but doesn’t scream for attention.
Paint the heart shapes first with a fine brush, then press micro pearls along the edges while the gel is still slightly wet so they actually stick.
Long almond nails with that frosty white base look expensive, and the curved pearl lines add just enough detail without making everything feel cluttered.
The raised gel texture gives the whole thing a soft, almost matte finish that photographs beautifully (which matters if you’re planning to post this).
Keep the base sheer, draw your swirl patterns first, then place the pearls along the curves while the gel is still workable
Chrome nails with scattered pearls and crystals in the center instead of at the edges… it’s a small change that makes a huge difference in how wearable this feels.
The long almond shape keeps everything balanced, and honestly, the chrome base does most of the work here — the pearls are just the finishing touch.
Start with your silver-pearl chrome base, place the embellishments while the gel is tacky, and space them evenly so it doesn’t look random.
The ombré base on these coffin nails is pretty, but what I really like is how the pearls are placed toward the center instead of loaded at the tips.
It keeps the design from looking top-heavy, and frankly, it’s way more practical — you’re not constantly worrying about catching the embellishments on everything.
Blend your milky nude with white, cure it, then add different sized pearls while the gel is slightly sticky for better adhesion.
Pink nails with tiny pearls and pastel hearts are exactly as sweet as they sound, and on short almond nails, they don’t feel juvenile.
Start with a nude-pink base, paint the little hearts in different spots so it looks organic, then fill the gaps with micro pearls to balance everything out.
The whole design stays smooth and snag-free, which is honestly my main requirement for any nail art these days.
A curved row of micro pearls right at the cuticle line… it’s such a small detail but it makes the whole manicure look more expensive.
The almond shape helps the pearls follow the natural curve, and because they’re at the cuticle instead of the tips, you don’t have to worry about them constantly getting in your way.
Apply a sheer beige base, add a light pearl chrome layer, then press the tiny pearls into a thin line of clear gel at the cuticle.
Sometimes the simplest version is the best version. This subtle pearl finish on short almond nails is clean enough for work but still feels special.
The chrome powder gives you that glow without being too obvious about it, and over a sheer pink base, it warms up your skin tone instead of washing it out.
Two thin coats of natural base, rub in pearl chrome powder, seal with glossy topcoat
Glittery French tips with thin gold outlines and tiny pearl accents… the almond shape gives the gold details room to follow the natural curve.
It’s fancy but not over-the-top fancy, if that makes sense. Like something you’d wear to a nice dinner but wouldn’t feel weird about at the grocery store the next day.
Clear base, fine glitter tips, then trace the shape with metallic gel and add a few pearls while everything’s still workable.
Sheer nude base with tiny colored pearls and gems scattered around… it’s playful without being childish, and the short almond shape keeps everything comfortable.
The different colors add visual interest, but because they’re small and spaced out, it doesn’t feel overwhelming or busy.
Light nude polish, let it cure completely, then place small dots of clear gel where you want each pearl to sit.
Champagne nails with pearl and gold detailing concentrated at the tips instead of spread everywhere… the almond shape helps the drip effect look intentional.
It’s a nice compromise between dramatic and wearable — you get the luxury effect without the maintenance nightmare.
Shimmering nude base, let it cure, then paint delicate gold outline around tips and add small pearl clusters randomly.
A curved row of micro pearls right at the cuticle line… it’s such a small detail but it makes the whole manicure look more expensive.
The almond shape helps the pearls follow the natural curve, and because they’re at the cuticle instead of the tips, you don’t have to worry about them constantly getting in your way.
Apply a sheer beige base, add a light pearl chrome layer, then press the tiny pearls into a thin line of clear gel at the cuticle.
Sometimes the simplest version is the best version. This subtle pearl finish on short almond nails is clean enough for work but still feels special.
The chrome powder gives you that glow without being too obvious about it, and over a sheer pink base, it warms up your skin tone instead of washing it out.
Two thin coats of natural base, rub in pearl chrome powder, seal with glossy topcoat
Glittery French tips with thin gold outlines and tiny pearl accents… the almond shape gives the gold details room to follow the natural curve.
It’s fancy but not over-the-top fancy, if that makes sense. Like something you’d wear to a nice dinner but wouldn’t feel weird about at the grocery store the next day.
Clear base, fine glitter tips, then trace the shape with metallic gel and add a few pearls while everything’s still workable.
Sheer nude base with tiny colored pearls and gems scattered around… it’s playful without being childish, and the short almond shape keeps everything comfortable.
The different colors add visual interest, but because they’re small and spaced out, it doesn’t feel overwhelming or busy.
Light nude polish, let it cure completely, then place small dots of clear gel where you want each pearl to sit.
Champagne nails with pearl and gold detailing concentrated at the tips instead of spread everywhere… the almond shape helps the drip effect look intentional.
It’s a nice compromise between dramatic and wearable — you get the luxury effect without the maintenance nightmare.
Shimmering nude base, let it cure, then paint delicate gold outline around tips and add small pearl clusters randomly.
Chrome nails with scattered pearls and crystals in the center instead of at the edges… it’s a small change that makes a huge difference in how wearable this feels.
The long almond shape keeps everything balanced, and honestly, the chrome base does most of the work here — the pearls are just the finishing touch.
Start with your silver-pearl chrome base, place the embellishments while the gel is tacky, and space them evenly so it doesn’t look random.
The ombré base on these coffin nails is pretty, but what I really like is how the pearls are placed toward the center instead of loaded at the tips.
It keeps the design from looking top-heavy, and frankly, it’s way more practical — you’re not constantly worrying about catching the embellishments on everything.
Blend your milky nude with white, cure it, then add different sized pearls while the gel is slightly sticky for better adhesion.
Pink nails with tiny pearls and pastel hearts are exactly as sweet as they sound, and on short almond nails, they don’t feel juvenile.
Start with a nude-pink base, paint the little hearts in different spots so it looks organic, then fill the gaps with micro pearls to balance everything out.
The whole design stays smooth and snag-free, which is honestly my main requirement for any nail art these days.
A curved row of micro pearls right at the cuticle line… it’s such a small detail but it makes the whole manicure look more expensive.
The almond shape helps the pearls follow the natural curve, and because they’re at the cuticle instead of the tips, you don’t have to worry about them constantly getting in your way.
Apply a sheer beige base, add a light pearl chrome layer, then press the tiny pearls into a thin line of clear gel at the cuticle.
Sometimes the simplest version is the best version. This subtle pearl finish on short almond nails is clean enough for work but still feels special.
The chrome powder gives you that glow without being too obvious about it, and over a sheer pink base, it warms up your skin tone instead of washing it out.
Two thin coats of natural base, rub in pearl chrome powder, seal with glossy topcoat
Glittery French tips with thin gold outlines and tiny pearl accents… the almond shape gives the gold details room to follow the natural curve.
It’s fancy but not over-the-top fancy, if that makes sense. Like something you’d wear to a nice dinner but wouldn’t feel weird about at the grocery store the next day.
Clear base, fine glitter tips, then trace the shape with metallic gel and add a few pearls while everything’s still workable.
Sheer nude base with tiny colored pearls and gems scattered around… it’s playful without being childish, and the short almond shape keeps everything comfortable.
The different colors add visual interest, but because they’re small and spaced out, it doesn’t feel overwhelming or busy.
Light nude polish, let it cure completely, then place small dots of clear gel where you want each pearl to sit.
Champagne nails with pearl and gold detailing concentrated at the tips instead of spread everywhere… the almond shape helps the drip effect look intentional.
It’s a nice compromise between dramatic and wearable — you get the luxury effect without the maintenance nightmare.
Shimmering nude base, let it cure, then paint delicate gold outline around tips and add small pearl clusters randomly.
I’ve been staring at pearl nail inspiration photos for weeks now, and honestly? I keep getting stuck on the same questions everyone else seems to have. The pearls look gorgeous in photos, but will they actually stay put when I’m loading the dishwasher or wrestling with Jake’s soccer cleats?
And then there’s the whole base color thing. Half the tutorials I’ve watched use completely different shades and swear theirs is “the only way” to make pearls look right.
So I did what I always do when I can’t decide — I researched everything, tried a few versions myself, and put together 28 ideas that actually work in real life.
Here’s what I figured out.
What nail shape looks best with pearl?
Short square or short squoval shapes are your safest bet if you want something that won’t drive you crazy within three days.
The pearls sit close to the nail surface, so you’re not constantly snagging them on everything. Almond nails work beautifully too, especially if you like the way small pearl accents follow that natural curve.
Coffin nails give you the most real estate for dramatic designs, but I’m going to be honest — if you’re doing school pickup and grocery runs, longer shapes with heavy pearl work get annoying fast.
Save this article for later! 👇👇
What colors look best as pearly nails?
Soft, clean base colors make pearl nails look expensive instead of craft-store DIY. Milky white, sheer pink, or a good neutral nude are your classics for a reason.
These colors let the pearl finish be the star without competing for attention. Ivory and cream work too, especially if you want something warmer than straight white.
You can absolutely use darker colors like black or navy, but keep the pearl elements simple — too much contrast can look busy instead of elegant (and trust me, I learned this the hard way).
Gold Pearl Clusters
This is exactly what I’d get for a wedding — clean white square nails that feel structured but still have that glamorous edge.
The pearls and gold beads add depth without making your hands look too busy, and honestly, the French tip base makes the whole thing feel more wearable than full-coverage glitter.
To recreate this, start with a milky base, paint clean French tips, then add the pearl clusters to just two accent nails (any more and it gets overwhelming).
The raised gel waves on these almond nails look like actual oyster shells, which is either really cool or completely over the top depending on your mood that day.
I love how the length gives you room for the texture work, but I’d be lying if I said this wouldn’t get old fast during my usual Tuesday routine of coffee with Donna and Target runs.
To get this effect, build each textured layer slowly so the waves stay smooth, then add the pearls while the gel is still tacky.
The nude and white combination feels romantic without being too sweet, and the almond shape lets you do those little heart outlines without cramming them in.
This is probably my favorite from the “cute but not trying too hard” category — it’s the kind of design that looks thoughtful but doesn’t scream for attention.
Paint the heart shapes first with a fine brush, then press micro pearls along the edges while the gel is still slightly wet so they actually stick.
Long almond nails with that frosty white base look expensive, and the curved pearl lines add just enough detail without making everything feel cluttered.
The raised gel texture gives the whole thing a soft, almost matte finish that photographs beautifully (which matters if you’re planning to post this).
Keep the base sheer, draw your swirl patterns first, then place the pearls along the curves while the gel is still workable
Chrome nails with scattered pearls and crystals in the center instead of at the edges… it’s a small change that makes a huge difference in how wearable this feels.
The long almond shape keeps everything balanced, and honestly, the chrome base does most of the work here — the pearls are just the finishing touch.
Start with your silver-pearl chrome base, place the embellishments while the gel is tacky, and space them evenly so it doesn’t look random.
The ombré base on these coffin nails is pretty, but what I really like is how the pearls are placed toward the center instead of loaded at the tips.
It keeps the design from looking top-heavy, and frankly, it’s way more practical — you’re not constantly worrying about catching the embellishments on everything.
Blend your milky nude with white, cure it, then add different sized pearls while the gel is slightly sticky for better adhesion.
Pink nails with tiny pearls and pastel hearts are exactly as sweet as they sound, and on short almond nails, they don’t feel juvenile.
Start with a nude-pink base, paint the little hearts in different spots so it looks organic, then fill the gaps with micro pearls to balance everything out.
The whole design stays smooth and snag-free, which is honestly my main requirement for any nail art these days.
A curved row of micro pearls right at the cuticle line… it’s such a small detail but it makes the whole manicure look more expensive.
The almond shape helps the pearls follow the natural curve, and because they’re at the cuticle instead of the tips, you don’t have to worry about them constantly getting in your way.
Apply a sheer beige base, add a light pearl chrome layer, then press the tiny pearls into a thin line of clear gel at the cuticle.
Sometimes the simplest version is the best version. This subtle pearl finish on short almond nails is clean enough for work but still feels special.
The chrome powder gives you that glow without being too obvious about it, and over a sheer pink base, it warms up your skin tone instead of washing it out.
Two thin coats of natural base, rub in pearl chrome powder, seal with glossy topcoat
Glittery French tips with thin gold outlines and tiny pearl accents… the almond shape gives the gold details room to follow the natural curve.
It’s fancy but not over-the-top fancy, if that makes sense. Like something you’d wear to a nice dinner but wouldn’t feel weird about at the grocery store the next day.
Clear base, fine glitter tips, then trace the shape with metallic gel and add a few pearls while everything’s still workable.
Sheer nude base with tiny colored pearls and gems scattered around… it’s playful without being childish, and the short almond shape keeps everything comfortable.
The different colors add visual interest, but because they’re small and spaced out, it doesn’t feel overwhelming or busy.
Light nude polish, let it cure completely, then place small dots of clear gel where you want each pearl to sit.
Champagne nails with pearl and gold detailing concentrated at the tips instead of spread everywhere… the almond shape helps the drip effect look intentional.
It’s a nice compromise between dramatic and wearable — you get the luxury effect without the maintenance nightmare.
Shimmering nude base, let it cure, then paint delicate gold outline around tips and add small pearl clusters randomly.
A curved row of micro pearls right at the cuticle line… it’s such a small detail but it makes the whole manicure look more expensive.
The almond shape helps the pearls follow the natural curve, and because they’re at the cuticle instead of the tips, you don’t have to worry about them constantly getting in your way.
Apply a sheer beige base, add a light pearl chrome layer, then press the tiny pearls into a thin line of clear gel at the cuticle.
Sometimes the simplest version is the best version. This subtle pearl finish on short almond nails is clean enough for work but still feels special.
The chrome powder gives you that glow without being too obvious about it, and over a sheer pink base, it warms up your skin tone instead of washing it out.
Two thin coats of natural base, rub in pearl chrome powder, seal with glossy topcoat
Glittery French tips with thin gold outlines and tiny pearl accents… the almond shape gives the gold details room to follow the natural curve.
It’s fancy but not over-the-top fancy, if that makes sense. Like something you’d wear to a nice dinner but wouldn’t feel weird about at the grocery store the next day.
Clear base, fine glitter tips, then trace the shape with metallic gel and add a few pearls while everything’s still workable.
Sheer nude base with tiny colored pearls and gems scattered around… it’s playful without being childish, and the short almond shape keeps everything comfortable.
The different colors add visual interest, but because they’re small and spaced out, it doesn’t feel overwhelming or busy.
Light nude polish, let it cure completely, then place small dots of clear gel where you want each pearl to sit.
Champagne nails with pearl and gold detailing concentrated at the tips instead of spread everywhere… the almond shape helps the drip effect look intentional.
It’s a nice compromise between dramatic and wearable — you get the luxury effect without the maintenance nightmare.
Shimmering nude base, let it cure, then paint delicate gold outline around tips and add small pearl clusters randomly.
Chrome nails with scattered pearls and crystals in the center instead of at the edges… it’s a small change that makes a huge difference in how wearable this feels.
The long almond shape keeps everything balanced, and honestly, the chrome base does most of the work here — the pearls are just the finishing touch.
Start with your silver-pearl chrome base, place the embellishments while the gel is tacky, and space them evenly so it doesn’t look random.
The ombré base on these coffin nails is pretty, but what I really like is how the pearls are placed toward the center instead of loaded at the tips.
It keeps the design from looking top-heavy, and frankly, it’s way more practical — you’re not constantly worrying about catching the embellishments on everything.
Blend your milky nude with white, cure it, then add different sized pearls while the gel is slightly sticky for better adhesion.
Pink nails with tiny pearls and pastel hearts are exactly as sweet as they sound, and on short almond nails, they don’t feel juvenile.
Start with a nude-pink base, paint the little hearts in different spots so it looks organic, then fill the gaps with micro pearls to balance everything out.
The whole design stays smooth and snag-free, which is honestly my main requirement for any nail art these days.
A curved row of micro pearls right at the cuticle line… it’s such a small detail but it makes the whole manicure look more expensive.
The almond shape helps the pearls follow the natural curve, and because they’re at the cuticle instead of the tips, you don’t have to worry about them constantly getting in your way.
Apply a sheer beige base, add a light pearl chrome layer, then press the tiny pearls into a thin line of clear gel at the cuticle.
Sometimes the simplest version is the best version. This subtle pearl finish on short almond nails is clean enough for work but still feels special.
The chrome powder gives you that glow without being too obvious about it, and over a sheer pink base, it warms up your skin tone instead of washing it out.
Two thin coats of natural base, rub in pearl chrome powder, seal with glossy topcoat
Glittery French tips with thin gold outlines and tiny pearl accents… the almond shape gives the gold details room to follow the natural curve.
It’s fancy but not over-the-top fancy, if that makes sense. Like something you’d wear to a nice dinner but wouldn’t feel weird about at the grocery store the next day.
Clear base, fine glitter tips, then trace the shape with metallic gel and add a few pearls while everything’s still workable.
Sheer nude base with tiny colored pearls and gems scattered around… it’s playful without being childish, and the short almond shape keeps everything comfortable.
The different colors add visual interest, but because they’re small and spaced out, it doesn’t feel overwhelming or busy.
Light nude polish, let it cure completely, then place small dots of clear gel where you want each pearl to sit.
Champagne nails with pearl and gold detailing concentrated at the tips instead of spread everywhere… the almond shape helps the drip effect look intentional.
It’s a nice compromise between dramatic and wearable — you get the luxury effect without the maintenance nightmare.
Shimmering nude base, let it cure, then paint delicate gold outline around tips and add small pearl clusters randomly.
I’ve been staring at pearl nail inspiration photos for weeks now, and honestly? I keep getting stuck on the same questions everyone else seems to have. The pearls look gorgeous in photos, but will they actually stay put when I’m loading the dishwasher or wrestling with Jake’s soccer cleats?
And then there’s the whole base color thing. Half the tutorials I’ve watched use completely different shades and swear theirs is “the only way” to make pearls look right.
So I did what I always do when I can’t decide — I researched everything, tried a few versions myself, and put together 28 ideas that actually work in real life.
Here’s what I figured out.
What nail shape looks best with pearl?
Short square or short squoval shapes are your safest bet if you want something that won’t drive you crazy within three days.
The pearls sit close to the nail surface, so you’re not constantly snagging them on everything. Almond nails work beautifully too, especially if you like the way small pearl accents follow that natural curve.
Coffin nails give you the most real estate for dramatic designs, but I’m going to be honest — if you’re doing school pickup and grocery runs, longer shapes with heavy pearl work get annoying fast.
Save this article for later! 👇👇
What colors look best as pearly nails?
Soft, clean base colors make pearl nails look expensive instead of craft-store DIY. Milky white, sheer pink, or a good neutral nude are your classics for a reason.
These colors let the pearl finish be the star without competing for attention. Ivory and cream work too, especially if you want something warmer than straight white.
You can absolutely use darker colors like black or navy, but keep the pearl elements simple — too much contrast can look busy instead of elegant (and trust me, I learned this the hard way).
Gold Pearl Clusters
This is exactly what I’d get for a wedding — clean white square nails that feel structured but still have that glamorous edge.
The pearls and gold beads add depth without making your hands look too busy, and honestly, the French tip base makes the whole thing feel more wearable than full-coverage glitter.
To recreate this, start with a milky base, paint clean French tips, then add the pearl clusters to just two accent nails (any more and it gets overwhelming).
The raised gel waves on these almond nails look like actual oyster shells, which is either really cool or completely over the top depending on your mood that day.
I love how the length gives you room for the texture work, but I’d be lying if I said this wouldn’t get old fast during my usual Tuesday routine of coffee with Donna and Target runs.
To get this effect, build each textured layer slowly so the waves stay smooth, then add the pearls while the gel is still tacky.
The nude and white combination feels romantic without being too sweet, and the almond shape lets you do those little heart outlines without cramming them in.
This is probably my favorite from the “cute but not trying too hard” category — it’s the kind of design that looks thoughtful but doesn’t scream for attention.
Paint the heart shapes first with a fine brush, then press micro pearls along the edges while the gel is still slightly wet so they actually stick.
Long almond nails with that frosty white base look expensive, and the curved pearl lines add just enough detail without making everything feel cluttered.
The raised gel texture gives the whole thing a soft, almost matte finish that photographs beautifully (which matters if you’re planning to post this).
Keep the base sheer, draw your swirl patterns first, then place the pearls along the curves while the gel is still workable
Chrome nails with scattered pearls and crystals in the center instead of at the edges… it’s a small change that makes a huge difference in how wearable this feels.
The long almond shape keeps everything balanced, and honestly, the chrome base does most of the work here — the pearls are just the finishing touch.
Start with your silver-pearl chrome base, place the embellishments while the gel is tacky, and space them evenly so it doesn’t look random.
The ombré base on these coffin nails is pretty, but what I really like is how the pearls are placed toward the center instead of loaded at the tips.
It keeps the design from looking top-heavy, and frankly, it’s way more practical — you’re not constantly worrying about catching the embellishments on everything.
Blend your milky nude with white, cure it, then add different sized pearls while the gel is slightly sticky for better adhesion.
Pink nails with tiny pearls and pastel hearts are exactly as sweet as they sound, and on short almond nails, they don’t feel juvenile.
Start with a nude-pink base, paint the little hearts in different spots so it looks organic, then fill the gaps with micro pearls to balance everything out.
The whole design stays smooth and snag-free, which is honestly my main requirement for any nail art these days.
A curved row of micro pearls right at the cuticle line… it’s such a small detail but it makes the whole manicure look more expensive.
The almond shape helps the pearls follow the natural curve, and because they’re at the cuticle instead of the tips, you don’t have to worry about them constantly getting in your way.
Apply a sheer beige base, add a light pearl chrome layer, then press the tiny pearls into a thin line of clear gel at the cuticle.
Sometimes the simplest version is the best version. This subtle pearl finish on short almond nails is clean enough for work but still feels special.
The chrome powder gives you that glow without being too obvious about it, and over a sheer pink base, it warms up your skin tone instead of washing it out.
Two thin coats of natural base, rub in pearl chrome powder, seal with glossy topcoat
Glittery French tips with thin gold outlines and tiny pearl accents… the almond shape gives the gold details room to follow the natural curve.
It’s fancy but not over-the-top fancy, if that makes sense. Like something you’d wear to a nice dinner but wouldn’t feel weird about at the grocery store the next day.
Clear base, fine glitter tips, then trace the shape with metallic gel and add a few pearls while everything’s still workable.
Sheer nude base with tiny colored pearls and gems scattered around… it’s playful without being childish, and the short almond shape keeps everything comfortable.
The different colors add visual interest, but because they’re small and spaced out, it doesn’t feel overwhelming or busy.
Light nude polish, let it cure completely, then place small dots of clear gel where you want each pearl to sit.
Champagne nails with pearl and gold detailing concentrated at the tips instead of spread everywhere… the almond shape helps the drip effect look intentional.
It’s a nice compromise between dramatic and wearable — you get the luxury effect without the maintenance nightmare.
Shimmering nude base, let it cure, then paint delicate gold outline around tips and add small pearl clusters randomly.
Sometimes the simplest version is the best version. This subtle pearl finish on short almond nails is clean enough for work but still feels special.
The chrome powder gives you that glow without being too obvious about it, and over a sheer pink base, it warms up your skin tone instead of washing it out.
Two thin coats of natural base, rub in pearl chrome powder, seal with glossy topcoat
Glittery French tips with thin gold outlines and tiny pearl accents… the almond shape gives the gold details room to follow the natural curve.
It’s fancy but not over-the-top fancy, if that makes sense. Like something you’d wear to a nice dinner but wouldn’t feel weird about at the grocery store the next day.
Clear base, fine glitter tips, then trace the shape with metallic gel and add a few pearls while everything’s still workable.
Sheer nude base with tiny colored pearls and gems scattered around… it’s playful without being childish, and the short almond shape keeps everything comfortable.
The different colors add visual interest, but because they’re small and spaced out, it doesn’t feel overwhelming or busy.
Light nude polish, let it cure completely, then place small dots of clear gel where you want each pearl to sit.
Champagne nails with pearl and gold detailing concentrated at the tips instead of spread everywhere… the almond shape helps the drip effect look intentional.
It’s a nice compromise between dramatic and wearable — you get the luxury effect without the maintenance nightmare.
Shimmering nude base, let it cure, then paint delicate gold outline around tips and add small pearl clusters randomly.
A curved row of micro pearls right at the cuticle line… it’s such a small detail but it makes the whole manicure look more expensive.
The almond shape helps the pearls follow the natural curve, and because they’re at the cuticle instead of the tips, you don’t have to worry about them constantly getting in your way.
Apply a sheer beige base, add a light pearl chrome layer, then press the tiny pearls into a thin line of clear gel at the cuticle.
Sometimes the simplest version is the best version. This subtle pearl finish on short almond nails is clean enough for work but still feels special.
The chrome powder gives you that glow without being too obvious about it, and over a sheer pink base, it warms up your skin tone instead of washing it out.
Two thin coats of natural base, rub in pearl chrome powder, seal with glossy topcoat
Glittery French tips with thin gold outlines and tiny pearl accents… the almond shape gives the gold details room to follow the natural curve.
It’s fancy but not over-the-top fancy, if that makes sense. Like something you’d wear to a nice dinner but wouldn’t feel weird about at the grocery store the next day.
Clear base, fine glitter tips, then trace the shape with metallic gel and add a few pearls while everything’s still workable.
Sheer nude base with tiny colored pearls and gems scattered around… it’s playful without being childish, and the short almond shape keeps everything comfortable.
The different colors add visual interest, but because they’re small and spaced out, it doesn’t feel overwhelming or busy.
Light nude polish, let it cure completely, then place small dots of clear gel where you want each pearl to sit.
Champagne nails with pearl and gold detailing concentrated at the tips instead of spread everywhere… the almond shape helps the drip effect look intentional.
It’s a nice compromise between dramatic and wearable — you get the luxury effect without the maintenance nightmare.
Shimmering nude base, let it cure, then paint delicate gold outline around tips and add small pearl clusters randomly.
Chrome nails with scattered pearls and crystals in the center instead of at the edges… it’s a small change that makes a huge difference in how wearable this feels.
The long almond shape keeps everything balanced, and honestly, the chrome base does most of the work here — the pearls are just the finishing touch.
Start with your silver-pearl chrome base, place the embellishments while the gel is tacky, and space them evenly so it doesn’t look random.
The ombré base on these coffin nails is pretty, but what I really like is how the pearls are placed toward the center instead of loaded at the tips.
It keeps the design from looking top-heavy, and frankly, it’s way more practical — you’re not constantly worrying about catching the embellishments on everything.
Blend your milky nude with white, cure it, then add different sized pearls while the gel is slightly sticky for better adhesion.
Pink nails with tiny pearls and pastel hearts are exactly as sweet as they sound, and on short almond nails, they don’t feel juvenile.
Start with a nude-pink base, paint the little hearts in different spots so it looks organic, then fill the gaps with micro pearls to balance everything out.
The whole design stays smooth and snag-free, which is honestly my main requirement for any nail art these days.
A curved row of micro pearls right at the cuticle line… it’s such a small detail but it makes the whole manicure look more expensive.
The almond shape helps the pearls follow the natural curve, and because they’re at the cuticle instead of the tips, you don’t have to worry about them constantly getting in your way.
Apply a sheer beige base, add a light pearl chrome layer, then press the tiny pearls into a thin line of clear gel at the cuticle.
Sometimes the simplest version is the best version. This subtle pearl finish on short almond nails is clean enough for work but still feels special.
The chrome powder gives you that glow without being too obvious about it, and over a sheer pink base, it warms up your skin tone instead of washing it out.
Two thin coats of natural base, rub in pearl chrome powder, seal with glossy topcoat
Glittery French tips with thin gold outlines and tiny pearl accents… the almond shape gives the gold details room to follow the natural curve.
It’s fancy but not over-the-top fancy, if that makes sense. Like something you’d wear to a nice dinner but wouldn’t feel weird about at the grocery store the next day.
Clear base, fine glitter tips, then trace the shape with metallic gel and add a few pearls while everything’s still workable.
Sheer nude base with tiny colored pearls and gems scattered around… it’s playful without being childish, and the short almond shape keeps everything comfortable.
The different colors add visual interest, but because they’re small and spaced out, it doesn’t feel overwhelming or busy.
Light nude polish, let it cure completely, then place small dots of clear gel where you want each pearl to sit.
Champagne nails with pearl and gold detailing concentrated at the tips instead of spread everywhere… the almond shape helps the drip effect look intentional.
It’s a nice compromise between dramatic and wearable — you get the luxury effect without the maintenance nightmare.
Shimmering nude base, let it cure, then paint delicate gold outline around tips and add small pearl clusters randomly.
I’ve been staring at pearl nail inspiration photos for weeks now, and honestly? I keep getting stuck on the same questions everyone else seems to have. The pearls look gorgeous in photos, but will they actually stay put when I’m loading the dishwasher or wrestling with Jake’s soccer cleats?
And then there’s the whole base color thing. Half the tutorials I’ve watched use completely different shades and swear theirs is “the only way” to make pearls look right.
So I did what I always do when I can’t decide — I researched everything, tried a few versions myself, and put together 28 ideas that actually work in real life.
Here’s what I figured out.
What nail shape looks best with pearl?
Short square or short squoval shapes are your safest bet if you want something that won’t drive you crazy within three days.
The pearls sit close to the nail surface, so you’re not constantly snagging them on everything. Almond nails work beautifully too, especially if you like the way small pearl accents follow that natural curve.
Coffin nails give you the most real estate for dramatic designs, but I’m going to be honest — if you’re doing school pickup and grocery runs, longer shapes with heavy pearl work get annoying fast.
Save this article for later! 👇👇
What colors look best as pearly nails?
Soft, clean base colors make pearl nails look expensive instead of craft-store DIY. Milky white, sheer pink, or a good neutral nude are your classics for a reason.
These colors let the pearl finish be the star without competing for attention. Ivory and cream work too, especially if you want something warmer than straight white.
You can absolutely use darker colors like black or navy, but keep the pearl elements simple — too much contrast can look busy instead of elegant (and trust me, I learned this the hard way).
Gold Pearl Clusters
This is exactly what I’d get for a wedding — clean white square nails that feel structured but still have that glamorous edge.
The pearls and gold beads add depth without making your hands look too busy, and honestly, the French tip base makes the whole thing feel more wearable than full-coverage glitter.
To recreate this, start with a milky base, paint clean French tips, then add the pearl clusters to just two accent nails (any more and it gets overwhelming).
The raised gel waves on these almond nails look like actual oyster shells, which is either really cool or completely over the top depending on your mood that day.
I love how the length gives you room for the texture work, but I’d be lying if I said this wouldn’t get old fast during my usual Tuesday routine of coffee with Donna and Target runs.
To get this effect, build each textured layer slowly so the waves stay smooth, then add the pearls while the gel is still tacky.
The nude and white combination feels romantic without being too sweet, and the almond shape lets you do those little heart outlines without cramming them in.
This is probably my favorite from the “cute but not trying too hard” category — it’s the kind of design that looks thoughtful but doesn’t scream for attention.
Paint the heart shapes first with a fine brush, then press micro pearls along the edges while the gel is still slightly wet so they actually stick.
Long almond nails with that frosty white base look expensive, and the curved pearl lines add just enough detail without making everything feel cluttered.
The raised gel texture gives the whole thing a soft, almost matte finish that photographs beautifully (which matters if you’re planning to post this).
Keep the base sheer, draw your swirl patterns first, then place the pearls along the curves while the gel is still workable
Chrome nails with scattered pearls and crystals in the center instead of at the edges… it’s a small change that makes a huge difference in how wearable this feels.
The long almond shape keeps everything balanced, and honestly, the chrome base does most of the work here — the pearls are just the finishing touch.
Start with your silver-pearl chrome base, place the embellishments while the gel is tacky, and space them evenly so it doesn’t look random.
The ombré base on these coffin nails is pretty, but what I really like is how the pearls are placed toward the center instead of loaded at the tips.
It keeps the design from looking top-heavy, and frankly, it’s way more practical — you’re not constantly worrying about catching the embellishments on everything.
Blend your milky nude with white, cure it, then add different sized pearls while the gel is slightly sticky for better adhesion.
Pink nails with tiny pearls and pastel hearts are exactly as sweet as they sound, and on short almond nails, they don’t feel juvenile.
Start with a nude-pink base, paint the little hearts in different spots so it looks organic, then fill the gaps with micro pearls to balance everything out.
The whole design stays smooth and snag-free, which is honestly my main requirement for any nail art these days.
A curved row of micro pearls right at the cuticle line… it’s such a small detail but it makes the whole manicure look more expensive.
The almond shape helps the pearls follow the natural curve, and because they’re at the cuticle instead of the tips, you don’t have to worry about them constantly getting in your way.
Apply a sheer beige base, add a light pearl chrome layer, then press the tiny pearls into a thin line of clear gel at the cuticle.
Sometimes the simplest version is the best version. This subtle pearl finish on short almond nails is clean enough for work but still feels special.
The chrome powder gives you that glow without being too obvious about it, and over a sheer pink base, it warms up your skin tone instead of washing it out.
Two thin coats of natural base, rub in pearl chrome powder, seal with glossy topcoat
Glittery French tips with thin gold outlines and tiny pearl accents… the almond shape gives the gold details room to follow the natural curve.
It’s fancy but not over-the-top fancy, if that makes sense. Like something you’d wear to a nice dinner but wouldn’t feel weird about at the grocery store the next day.
Clear base, fine glitter tips, then trace the shape with metallic gel and add a few pearls while everything’s still workable.
Sheer nude base with tiny colored pearls and gems scattered around… it’s playful without being childish, and the short almond shape keeps everything comfortable.
The different colors add visual interest, but because they’re small and spaced out, it doesn’t feel overwhelming or busy.
Light nude polish, let it cure completely, then place small dots of clear gel where you want each pearl to sit.
Champagne nails with pearl and gold detailing concentrated at the tips instead of spread everywhere… the almond shape helps the drip effect look intentional.
It’s a nice compromise between dramatic and wearable — you get the luxury effect without the maintenance nightmare.
Shimmering nude base, let it cure, then paint delicate gold outline around tips and add small pearl clusters randomly.
Sometimes the simplest version is the best version. This subtle pearl finish on short almond nails is clean enough for work but still feels special.
The chrome powder gives you that glow without being too obvious about it, and over a sheer pink base, it warms up your skin tone instead of washing it out.
Two thin coats of natural base, rub in pearl chrome powder, seal with glossy topcoat
Glittery French tips with thin gold outlines and tiny pearl accents… the almond shape gives the gold details room to follow the natural curve.
It’s fancy but not over-the-top fancy, if that makes sense. Like something you’d wear to a nice dinner but wouldn’t feel weird about at the grocery store the next day.
Clear base, fine glitter tips, then trace the shape with metallic gel and add a few pearls while everything’s still workable.
Sheer nude base with tiny colored pearls and gems scattered around… it’s playful without being childish, and the short almond shape keeps everything comfortable.
The different colors add visual interest, but because they’re small and spaced out, it doesn’t feel overwhelming or busy.
Light nude polish, let it cure completely, then place small dots of clear gel where you want each pearl to sit.
Champagne nails with pearl and gold detailing concentrated at the tips instead of spread everywhere… the almond shape helps the drip effect look intentional.
It’s a nice compromise between dramatic and wearable — you get the luxury effect without the maintenance nightmare.
Shimmering nude base, let it cure, then paint delicate gold outline around tips and add small pearl clusters randomly.
A curved row of micro pearls right at the cuticle line… it’s such a small detail but it makes the whole manicure look more expensive.
The almond shape helps the pearls follow the natural curve, and because they’re at the cuticle instead of the tips, you don’t have to worry about them constantly getting in your way.
Apply a sheer beige base, add a light pearl chrome layer, then press the tiny pearls into a thin line of clear gel at the cuticle.
Sometimes the simplest version is the best version. This subtle pearl finish on short almond nails is clean enough for work but still feels special.
The chrome powder gives you that glow without being too obvious about it, and over a sheer pink base, it warms up your skin tone instead of washing it out.
Two thin coats of natural base, rub in pearl chrome powder, seal with glossy topcoat
Glittery French tips with thin gold outlines and tiny pearl accents… the almond shape gives the gold details room to follow the natural curve.
It’s fancy but not over-the-top fancy, if that makes sense. Like something you’d wear to a nice dinner but wouldn’t feel weird about at the grocery store the next day.
Clear base, fine glitter tips, then trace the shape with metallic gel and add a few pearls while everything’s still workable.
Sheer nude base with tiny colored pearls and gems scattered around… it’s playful without being childish, and the short almond shape keeps everything comfortable.
The different colors add visual interest, but because they’re small and spaced out, it doesn’t feel overwhelming or busy.
Light nude polish, let it cure completely, then place small dots of clear gel where you want each pearl to sit.
Champagne nails with pearl and gold detailing concentrated at the tips instead of spread everywhere… the almond shape helps the drip effect look intentional.
It’s a nice compromise between dramatic and wearable — you get the luxury effect without the maintenance nightmare.
Shimmering nude base, let it cure, then paint delicate gold outline around tips and add small pearl clusters randomly.
Chrome nails with scattered pearls and crystals in the center instead of at the edges… it’s a small change that makes a huge difference in how wearable this feels.
The long almond shape keeps everything balanced, and honestly, the chrome base does most of the work here — the pearls are just the finishing touch.
Start with your silver-pearl chrome base, place the embellishments while the gel is tacky, and space them evenly so it doesn’t look random.
The ombré base on these coffin nails is pretty, but what I really like is how the pearls are placed toward the center instead of loaded at the tips.
It keeps the design from looking top-heavy, and frankly, it’s way more practical — you’re not constantly worrying about catching the embellishments on everything.
Blend your milky nude with white, cure it, then add different sized pearls while the gel is slightly sticky for better adhesion.
Pink nails with tiny pearls and pastel hearts are exactly as sweet as they sound, and on short almond nails, they don’t feel juvenile.
Start with a nude-pink base, paint the little hearts in different spots so it looks organic, then fill the gaps with micro pearls to balance everything out.
The whole design stays smooth and snag-free, which is honestly my main requirement for any nail art these days.
A curved row of micro pearls right at the cuticle line… it’s such a small detail but it makes the whole manicure look more expensive.
The almond shape helps the pearls follow the natural curve, and because they’re at the cuticle instead of the tips, you don’t have to worry about them constantly getting in your way.
Apply a sheer beige base, add a light pearl chrome layer, then press the tiny pearls into a thin line of clear gel at the cuticle.
Sometimes the simplest version is the best version. This subtle pearl finish on short almond nails is clean enough for work but still feels special.
The chrome powder gives you that glow without being too obvious about it, and over a sheer pink base, it warms up your skin tone instead of washing it out.
Two thin coats of natural base, rub in pearl chrome powder, seal with glossy topcoat
Glittery French tips with thin gold outlines and tiny pearl accents… the almond shape gives the gold details room to follow the natural curve.
It’s fancy but not over-the-top fancy, if that makes sense. Like something you’d wear to a nice dinner but wouldn’t feel weird about at the grocery store the next day.
Clear base, fine glitter tips, then trace the shape with metallic gel and add a few pearls while everything’s still workable.
Sheer nude base with tiny colored pearls and gems scattered around… it’s playful without being childish, and the short almond shape keeps everything comfortable.
The different colors add visual interest, but because they’re small and spaced out, it doesn’t feel overwhelming or busy.
Light nude polish, let it cure completely, then place small dots of clear gel where you want each pearl to sit.
Champagne nails with pearl and gold detailing concentrated at the tips instead of spread everywhere… the almond shape helps the drip effect look intentional.
It’s a nice compromise between dramatic and wearable — you get the luxury effect without the maintenance nightmare.
Shimmering nude base, let it cure, then paint delicate gold outline around tips and add small pearl clusters randomly.
I’ve been staring at pearl nail inspiration photos for weeks now, and honestly? I keep getting stuck on the same questions everyone else seems to have. The pearls look gorgeous in photos, but will they actually stay put when I’m loading the dishwasher or wrestling with Jake’s soccer cleats?
And then there’s the whole base color thing. Half the tutorials I’ve watched use completely different shades and swear theirs is “the only way” to make pearls look right.
So I did what I always do when I can’t decide — I researched everything, tried a few versions myself, and put together 28 ideas that actually work in real life.
Here’s what I figured out.
What nail shape looks best with pearl?
Short square or short squoval shapes are your safest bet if you want something that won’t drive you crazy within three days.
The pearls sit close to the nail surface, so you’re not constantly snagging them on everything. Almond nails work beautifully too, especially if you like the way small pearl accents follow that natural curve.
Coffin nails give you the most real estate for dramatic designs, but I’m going to be honest — if you’re doing school pickup and grocery runs, longer shapes with heavy pearl work get annoying fast.
Save this article for later! 👇👇
What colors look best as pearly nails?
Soft, clean base colors make pearl nails look expensive instead of craft-store DIY. Milky white, sheer pink, or a good neutral nude are your classics for a reason.
These colors let the pearl finish be the star without competing for attention. Ivory and cream work too, especially if you want something warmer than straight white.
You can absolutely use darker colors like black or navy, but keep the pearl elements simple — too much contrast can look busy instead of elegant (and trust me, I learned this the hard way).
Gold Pearl Clusters
This is exactly what I’d get for a wedding — clean white square nails that feel structured but still have that glamorous edge.
The pearls and gold beads add depth without making your hands look too busy, and honestly, the French tip base makes the whole thing feel more wearable than full-coverage glitter.
To recreate this, start with a milky base, paint clean French tips, then add the pearl clusters to just two accent nails (any more and it gets overwhelming).
The raised gel waves on these almond nails look like actual oyster shells, which is either really cool or completely over the top depending on your mood that day.
I love how the length gives you room for the texture work, but I’d be lying if I said this wouldn’t get old fast during my usual Tuesday routine of coffee with Donna and Target runs.
To get this effect, build each textured layer slowly so the waves stay smooth, then add the pearls while the gel is still tacky.
The nude and white combination feels romantic without being too sweet, and the almond shape lets you do those little heart outlines without cramming them in.
This is probably my favorite from the “cute but not trying too hard” category — it’s the kind of design that looks thoughtful but doesn’t scream for attention.
Paint the heart shapes first with a fine brush, then press micro pearls along the edges while the gel is still slightly wet so they actually stick.
Long almond nails with that frosty white base look expensive, and the curved pearl lines add just enough detail without making everything feel cluttered.
The raised gel texture gives the whole thing a soft, almost matte finish that photographs beautifully (which matters if you’re planning to post this).
Keep the base sheer, draw your swirl patterns first, then place the pearls along the curves while the gel is still workable
Chrome nails with scattered pearls and crystals in the center instead of at the edges… it’s a small change that makes a huge difference in how wearable this feels.
The long almond shape keeps everything balanced, and honestly, the chrome base does most of the work here — the pearls are just the finishing touch.
Start with your silver-pearl chrome base, place the embellishments while the gel is tacky, and space them evenly so it doesn’t look random.
The ombré base on these coffin nails is pretty, but what I really like is how the pearls are placed toward the center instead of loaded at the tips.
It keeps the design from looking top-heavy, and frankly, it’s way more practical — you’re not constantly worrying about catching the embellishments on everything.
Blend your milky nude with white, cure it, then add different sized pearls while the gel is slightly sticky for better adhesion.
Pink nails with tiny pearls and pastel hearts are exactly as sweet as they sound, and on short almond nails, they don’t feel juvenile.
Start with a nude-pink base, paint the little hearts in different spots so it looks organic, then fill the gaps with micro pearls to balance everything out.
The whole design stays smooth and snag-free, which is honestly my main requirement for any nail art these days.
A curved row of micro pearls right at the cuticle line… it’s such a small detail but it makes the whole manicure look more expensive.
The almond shape helps the pearls follow the natural curve, and because they’re at the cuticle instead of the tips, you don’t have to worry about them constantly getting in your way.
Apply a sheer beige base, add a light pearl chrome layer, then press the tiny pearls into a thin line of clear gel at the cuticle.
Sometimes the simplest version is the best version. This subtle pearl finish on short almond nails is clean enough for work but still feels special.
The chrome powder gives you that glow without being too obvious about it, and over a sheer pink base, it warms up your skin tone instead of washing it out.
Two thin coats of natural base, rub in pearl chrome powder, seal with glossy topcoat
Glittery French tips with thin gold outlines and tiny pearl accents… the almond shape gives the gold details room to follow the natural curve.
It’s fancy but not over-the-top fancy, if that makes sense. Like something you’d wear to a nice dinner but wouldn’t feel weird about at the grocery store the next day.
Clear base, fine glitter tips, then trace the shape with metallic gel and add a few pearls while everything’s still workable.
Sheer nude base with tiny colored pearls and gems scattered around… it’s playful without being childish, and the short almond shape keeps everything comfortable.
The different colors add visual interest, but because they’re small and spaced out, it doesn’t feel overwhelming or busy.
Light nude polish, let it cure completely, then place small dots of clear gel where you want each pearl to sit.
Champagne nails with pearl and gold detailing concentrated at the tips instead of spread everywhere… the almond shape helps the drip effect look intentional.
It’s a nice compromise between dramatic and wearable — you get the luxury effect without the maintenance nightmare.
Shimmering nude base, let it cure, then paint delicate gold outline around tips and add small pearl clusters randomly.
Sometimes the simplest version is the best version. This subtle pearl finish on short almond nails is clean enough for work but still feels special.
The chrome powder gives you that glow without being too obvious about it, and over a sheer pink base, it warms up your skin tone instead of washing it out.
Two thin coats of natural base, rub in pearl chrome powder, seal with glossy topcoat
Glittery French tips with thin gold outlines and tiny pearl accents… the almond shape gives the gold details room to follow the natural curve.
It’s fancy but not over-the-top fancy, if that makes sense. Like something you’d wear to a nice dinner but wouldn’t feel weird about at the grocery store the next day.
Clear base, fine glitter tips, then trace the shape with metallic gel and add a few pearls while everything’s still workable.
Sheer nude base with tiny colored pearls and gems scattered around… it’s playful without being childish, and the short almond shape keeps everything comfortable.
The different colors add visual interest, but because they’re small and spaced out, it doesn’t feel overwhelming or busy.
Light nude polish, let it cure completely, then place small dots of clear gel where you want each pearl to sit.
Champagne nails with pearl and gold detailing concentrated at the tips instead of spread everywhere… the almond shape helps the drip effect look intentional.
It’s a nice compromise between dramatic and wearable — you get the luxury effect without the maintenance nightmare.
Shimmering nude base, let it cure, then paint delicate gold outline around tips and add small pearl clusters randomly.
A curved row of micro pearls right at the cuticle line… it’s such a small detail but it makes the whole manicure look more expensive.
The almond shape helps the pearls follow the natural curve, and because they’re at the cuticle instead of the tips, you don’t have to worry about them constantly getting in your way.
Apply a sheer beige base, add a light pearl chrome layer, then press the tiny pearls into a thin line of clear gel at the cuticle.
Sometimes the simplest version is the best version. This subtle pearl finish on short almond nails is clean enough for work but still feels special.
The chrome powder gives you that glow without being too obvious about it, and over a sheer pink base, it warms up your skin tone instead of washing it out.
Two thin coats of natural base, rub in pearl chrome powder, seal with glossy topcoat
Glittery French tips with thin gold outlines and tiny pearl accents… the almond shape gives the gold details room to follow the natural curve.
It’s fancy but not over-the-top fancy, if that makes sense. Like something you’d wear to a nice dinner but wouldn’t feel weird about at the grocery store the next day.
Clear base, fine glitter tips, then trace the shape with metallic gel and add a few pearls while everything’s still workable.
Sheer nude base with tiny colored pearls and gems scattered around… it’s playful without being childish, and the short almond shape keeps everything comfortable.
The different colors add visual interest, but because they’re small and spaced out, it doesn’t feel overwhelming or busy.
Light nude polish, let it cure completely, then place small dots of clear gel where you want each pearl to sit.
Champagne nails with pearl and gold detailing concentrated at the tips instead of spread everywhere… the almond shape helps the drip effect look intentional.
It’s a nice compromise between dramatic and wearable — you get the luxury effect without the maintenance nightmare.
Shimmering nude base, let it cure, then paint delicate gold outline around tips and add small pearl clusters randomly.
Chrome nails with scattered pearls and crystals in the center instead of at the edges… it’s a small change that makes a huge difference in how wearable this feels.
The long almond shape keeps everything balanced, and honestly, the chrome base does most of the work here — the pearls are just the finishing touch.
Start with your silver-pearl chrome base, place the embellishments while the gel is tacky, and space them evenly so it doesn’t look random.
The ombré base on these coffin nails is pretty, but what I really like is how the pearls are placed toward the center instead of loaded at the tips.
It keeps the design from looking top-heavy, and frankly, it’s way more practical — you’re not constantly worrying about catching the embellishments on everything.
Blend your milky nude with white, cure it, then add different sized pearls while the gel is slightly sticky for better adhesion.
Pink nails with tiny pearls and pastel hearts are exactly as sweet as they sound, and on short almond nails, they don’t feel juvenile.
Start with a nude-pink base, paint the little hearts in different spots so it looks organic, then fill the gaps with micro pearls to balance everything out.
The whole design stays smooth and snag-free, which is honestly my main requirement for any nail art these days.
A curved row of micro pearls right at the cuticle line… it’s such a small detail but it makes the whole manicure look more expensive.
The almond shape helps the pearls follow the natural curve, and because they’re at the cuticle instead of the tips, you don’t have to worry about them constantly getting in your way.
Apply a sheer beige base, add a light pearl chrome layer, then press the tiny pearls into a thin line of clear gel at the cuticle.
Sometimes the simplest version is the best version. This subtle pearl finish on short almond nails is clean enough for work but still feels special.
The chrome powder gives you that glow without being too obvious about it, and over a sheer pink base, it warms up your skin tone instead of washing it out.
Two thin coats of natural base, rub in pearl chrome powder, seal with glossy topcoat
Glittery French tips with thin gold outlines and tiny pearl accents… the almond shape gives the gold details room to follow the natural curve.
It’s fancy but not over-the-top fancy, if that makes sense. Like something you’d wear to a nice dinner but wouldn’t feel weird about at the grocery store the next day.
Clear base, fine glitter tips, then trace the shape with metallic gel and add a few pearls while everything’s still workable.
Sheer nude base with tiny colored pearls and gems scattered around… it’s playful without being childish, and the short almond shape keeps everything comfortable.
The different colors add visual interest, but because they’re small and spaced out, it doesn’t feel overwhelming or busy.
Light nude polish, let it cure completely, then place small dots of clear gel where you want each pearl to sit.
Champagne nails with pearl and gold detailing concentrated at the tips instead of spread everywhere… the almond shape helps the drip effect look intentional.
It’s a nice compromise between dramatic and wearable — you get the luxury effect without the maintenance nightmare.
Shimmering nude base, let it cure, then paint delicate gold outline around tips and add small pearl clusters randomly.
I’ve been staring at pearl nail inspiration photos for weeks now, and honestly? I keep getting stuck on the same questions everyone else seems to have. The pearls look gorgeous in photos, but will they actually stay put when I’m loading the dishwasher or wrestling with Jake’s soccer cleats?
And then there’s the whole base color thing. Half the tutorials I’ve watched use completely different shades and swear theirs is “the only way” to make pearls look right.
So I did what I always do when I can’t decide — I researched everything, tried a few versions myself, and put together 28 ideas that actually work in real life.
Here’s what I figured out.
What nail shape looks best with pearl?
Short square or short squoval shapes are your safest bet if you want something that won’t drive you crazy within three days.
The pearls sit close to the nail surface, so you’re not constantly snagging them on everything. Almond nails work beautifully too, especially if you like the way small pearl accents follow that natural curve.
Coffin nails give you the most real estate for dramatic designs, but I’m going to be honest — if you’re doing school pickup and grocery runs, longer shapes with heavy pearl work get annoying fast.
Save this article for later! 👇👇
What colors look best as pearly nails?
Soft, clean base colors make pearl nails look expensive instead of craft-store DIY. Milky white, sheer pink, or a good neutral nude are your classics for a reason.
These colors let the pearl finish be the star without competing for attention. Ivory and cream work too, especially if you want something warmer than straight white.
You can absolutely use darker colors like black or navy, but keep the pearl elements simple — too much contrast can look busy instead of elegant (and trust me, I learned this the hard way).
Gold Pearl Clusters
This is exactly what I’d get for a wedding — clean white square nails that feel structured but still have that glamorous edge.
The pearls and gold beads add depth without making your hands look too busy, and honestly, the French tip base makes the whole thing feel more wearable than full-coverage glitter.
To recreate this, start with a milky base, paint clean French tips, then add the pearl clusters to just two accent nails (any more and it gets overwhelming).
The raised gel waves on these almond nails look like actual oyster shells, which is either really cool or completely over the top depending on your mood that day.
I love how the length gives you room for the texture work, but I’d be lying if I said this wouldn’t get old fast during my usual Tuesday routine of coffee with Donna and Target runs.
To get this effect, build each textured layer slowly so the waves stay smooth, then add the pearls while the gel is still tacky.
The nude and white combination feels romantic without being too sweet, and the almond shape lets you do those little heart outlines without cramming them in.
This is probably my favorite from the “cute but not trying too hard” category — it’s the kind of design that looks thoughtful but doesn’t scream for attention.
Paint the heart shapes first with a fine brush, then press micro pearls along the edges while the gel is still slightly wet so they actually stick.
Long almond nails with that frosty white base look expensive, and the curved pearl lines add just enough detail without making everything feel cluttered.
The raised gel texture gives the whole thing a soft, almost matte finish that photographs beautifully (which matters if you’re planning to post this).
Keep the base sheer, draw your swirl patterns first, then place the pearls along the curves while the gel is still workable
Chrome nails with scattered pearls and crystals in the center instead of at the edges… it’s a small change that makes a huge difference in how wearable this feels.
The long almond shape keeps everything balanced, and honestly, the chrome base does most of the work here — the pearls are just the finishing touch.
Start with your silver-pearl chrome base, place the embellishments while the gel is tacky, and space them evenly so it doesn’t look random.
The ombré base on these coffin nails is pretty, but what I really like is how the pearls are placed toward the center instead of loaded at the tips.
It keeps the design from looking top-heavy, and frankly, it’s way more practical — you’re not constantly worrying about catching the embellishments on everything.
Blend your milky nude with white, cure it, then add different sized pearls while the gel is slightly sticky for better adhesion.
Pink nails with tiny pearls and pastel hearts are exactly as sweet as they sound, and on short almond nails, they don’t feel juvenile.
Start with a nude-pink base, paint the little hearts in different spots so it looks organic, then fill the gaps with micro pearls to balance everything out.
The whole design stays smooth and snag-free, which is honestly my main requirement for any nail art these days.
A curved row of micro pearls right at the cuticle line… it’s such a small detail but it makes the whole manicure look more expensive.
The almond shape helps the pearls follow the natural curve, and because they’re at the cuticle instead of the tips, you don’t have to worry about them constantly getting in your way.
Apply a sheer beige base, add a light pearl chrome layer, then press the tiny pearls into a thin line of clear gel at the cuticle.
Sometimes the simplest version is the best version. This subtle pearl finish on short almond nails is clean enough for work but still feels special.
The chrome powder gives you that glow without being too obvious about it, and over a sheer pink base, it warms up your skin tone instead of washing it out.
Two thin coats of natural base, rub in pearl chrome powder, seal with glossy topcoat
Glittery French tips with thin gold outlines and tiny pearl accents… the almond shape gives the gold details room to follow the natural curve.
It’s fancy but not over-the-top fancy, if that makes sense. Like something you’d wear to a nice dinner but wouldn’t feel weird about at the grocery store the next day.
Clear base, fine glitter tips, then trace the shape with metallic gel and add a few pearls while everything’s still workable.
Sheer nude base with tiny colored pearls and gems scattered around… it’s playful without being childish, and the short almond shape keeps everything comfortable.
The different colors add visual interest, but because they’re small and spaced out, it doesn’t feel overwhelming or busy.
Light nude polish, let it cure completely, then place small dots of clear gel where you want each pearl to sit.
Champagne nails with pearl and gold detailing concentrated at the tips instead of spread everywhere… the almond shape helps the drip effect look intentional.
It’s a nice compromise between dramatic and wearable — you get the luxury effect without the maintenance nightmare.
Shimmering nude base, let it cure, then paint delicate gold outline around tips and add small pearl clusters randomly.
Glittery French tips with thin gold outlines and tiny pearl accents… the almond shape gives the gold details room to follow the natural curve.
It’s fancy but not over-the-top fancy, if that makes sense. Like something you’d wear to a nice dinner but wouldn’t feel weird about at the grocery store the next day.
Clear base, fine glitter tips, then trace the shape with metallic gel and add a few pearls while everything’s still workable.
Sheer nude base with tiny colored pearls and gems scattered around… it’s playful without being childish, and the short almond shape keeps everything comfortable.
The different colors add visual interest, but because they’re small and spaced out, it doesn’t feel overwhelming or busy.
Light nude polish, let it cure completely, then place small dots of clear gel where you want each pearl to sit.
Champagne nails with pearl and gold detailing concentrated at the tips instead of spread everywhere… the almond shape helps the drip effect look intentional.
It’s a nice compromise between dramatic and wearable — you get the luxury effect without the maintenance nightmare.
Shimmering nude base, let it cure, then paint delicate gold outline around tips and add small pearl clusters randomly.
Sometimes the simplest version is the best version. This subtle pearl finish on short almond nails is clean enough for work but still feels special.
The chrome powder gives you that glow without being too obvious about it, and over a sheer pink base, it warms up your skin tone instead of washing it out.
Two thin coats of natural base, rub in pearl chrome powder, seal with glossy topcoat
Glittery French tips with thin gold outlines and tiny pearl accents… the almond shape gives the gold details room to follow the natural curve.
It’s fancy but not over-the-top fancy, if that makes sense. Like something you’d wear to a nice dinner but wouldn’t feel weird about at the grocery store the next day.
Clear base, fine glitter tips, then trace the shape with metallic gel and add a few pearls while everything’s still workable.
Sheer nude base with tiny colored pearls and gems scattered around… it’s playful without being childish, and the short almond shape keeps everything comfortable.
The different colors add visual interest, but because they’re small and spaced out, it doesn’t feel overwhelming or busy.
Light nude polish, let it cure completely, then place small dots of clear gel where you want each pearl to sit.
Champagne nails with pearl and gold detailing concentrated at the tips instead of spread everywhere… the almond shape helps the drip effect look intentional.
It’s a nice compromise between dramatic and wearable — you get the luxury effect without the maintenance nightmare.
Shimmering nude base, let it cure, then paint delicate gold outline around tips and add small pearl clusters randomly.
A curved row of micro pearls right at the cuticle line… it’s such a small detail but it makes the whole manicure look more expensive.
The almond shape helps the pearls follow the natural curve, and because they’re at the cuticle instead of the tips, you don’t have to worry about them constantly getting in your way.
Apply a sheer beige base, add a light pearl chrome layer, then press the tiny pearls into a thin line of clear gel at the cuticle.
Sometimes the simplest version is the best version. This subtle pearl finish on short almond nails is clean enough for work but still feels special.
The chrome powder gives you that glow without being too obvious about it, and over a sheer pink base, it warms up your skin tone instead of washing it out.
Two thin coats of natural base, rub in pearl chrome powder, seal with glossy topcoat
Glittery French tips with thin gold outlines and tiny pearl accents… the almond shape gives the gold details room to follow the natural curve.
It’s fancy but not over-the-top fancy, if that makes sense. Like something you’d wear to a nice dinner but wouldn’t feel weird about at the grocery store the next day.
Clear base, fine glitter tips, then trace the shape with metallic gel and add a few pearls while everything’s still workable.
Sheer nude base with tiny colored pearls and gems scattered around… it’s playful without being childish, and the short almond shape keeps everything comfortable.
The different colors add visual interest, but because they’re small and spaced out, it doesn’t feel overwhelming or busy.
Light nude polish, let it cure completely, then place small dots of clear gel where you want each pearl to sit.
Champagne nails with pearl and gold detailing concentrated at the tips instead of spread everywhere… the almond shape helps the drip effect look intentional.
It’s a nice compromise between dramatic and wearable — you get the luxury effect without the maintenance nightmare.
Shimmering nude base, let it cure, then paint delicate gold outline around tips and add small pearl clusters randomly.
Chrome nails with scattered pearls and crystals in the center instead of at the edges… it’s a small change that makes a huge difference in how wearable this feels.
The long almond shape keeps everything balanced, and honestly, the chrome base does most of the work here — the pearls are just the finishing touch.
Start with your silver-pearl chrome base, place the embellishments while the gel is tacky, and space them evenly so it doesn’t look random.
The ombré base on these coffin nails is pretty, but what I really like is how the pearls are placed toward the center instead of loaded at the tips.
It keeps the design from looking top-heavy, and frankly, it’s way more practical — you’re not constantly worrying about catching the embellishments on everything.
Blend your milky nude with white, cure it, then add different sized pearls while the gel is slightly sticky for better adhesion.
Pink nails with tiny pearls and pastel hearts are exactly as sweet as they sound, and on short almond nails, they don’t feel juvenile.
Start with a nude-pink base, paint the little hearts in different spots so it looks organic, then fill the gaps with micro pearls to balance everything out.
The whole design stays smooth and snag-free, which is honestly my main requirement for any nail art these days.
A curved row of micro pearls right at the cuticle line… it’s such a small detail but it makes the whole manicure look more expensive.
The almond shape helps the pearls follow the natural curve, and because they’re at the cuticle instead of the tips, you don’t have to worry about them constantly getting in your way.
Apply a sheer beige base, add a light pearl chrome layer, then press the tiny pearls into a thin line of clear gel at the cuticle.
Sometimes the simplest version is the best version. This subtle pearl finish on short almond nails is clean enough for work but still feels special.
The chrome powder gives you that glow without being too obvious about it, and over a sheer pink base, it warms up your skin tone instead of washing it out.
Two thin coats of natural base, rub in pearl chrome powder, seal with glossy topcoat
Glittery French tips with thin gold outlines and tiny pearl accents… the almond shape gives the gold details room to follow the natural curve.
It’s fancy but not over-the-top fancy, if that makes sense. Like something you’d wear to a nice dinner but wouldn’t feel weird about at the grocery store the next day.
Clear base, fine glitter tips, then trace the shape with metallic gel and add a few pearls while everything’s still workable.
Sheer nude base with tiny colored pearls and gems scattered around… it’s playful without being childish, and the short almond shape keeps everything comfortable.
The different colors add visual interest, but because they’re small and spaced out, it doesn’t feel overwhelming or busy.
Light nude polish, let it cure completely, then place small dots of clear gel where you want each pearl to sit.
Champagne nails with pearl and gold detailing concentrated at the tips instead of spread everywhere… the almond shape helps the drip effect look intentional.
It’s a nice compromise between dramatic and wearable — you get the luxury effect without the maintenance nightmare.
Shimmering nude base, let it cure, then paint delicate gold outline around tips and add small pearl clusters randomly.
I’ve been staring at pearl nail inspiration photos for weeks now, and honestly? I keep getting stuck on the same questions everyone else seems to have. The pearls look gorgeous in photos, but will they actually stay put when I’m loading the dishwasher or wrestling with Jake’s soccer cleats?
And then there’s the whole base color thing. Half the tutorials I’ve watched use completely different shades and swear theirs is “the only way” to make pearls look right.
So I did what I always do when I can’t decide — I researched everything, tried a few versions myself, and put together 28 ideas that actually work in real life.
Here’s what I figured out.
What nail shape looks best with pearl?
Short square or short squoval shapes are your safest bet if you want something that won’t drive you crazy within three days.
The pearls sit close to the nail surface, so you’re not constantly snagging them on everything. Almond nails work beautifully too, especially if you like the way small pearl accents follow that natural curve.
Coffin nails give you the most real estate for dramatic designs, but I’m going to be honest — if you’re doing school pickup and grocery runs, longer shapes with heavy pearl work get annoying fast.
Save this article for later! 👇👇
What colors look best as pearly nails?
Soft, clean base colors make pearl nails look expensive instead of craft-store DIY. Milky white, sheer pink, or a good neutral nude are your classics for a reason.
These colors let the pearl finish be the star without competing for attention. Ivory and cream work too, especially if you want something warmer than straight white.
You can absolutely use darker colors like black or navy, but keep the pearl elements simple — too much contrast can look busy instead of elegant (and trust me, I learned this the hard way).
Gold Pearl Clusters
This is exactly what I’d get for a wedding — clean white square nails that feel structured but still have that glamorous edge.
The pearls and gold beads add depth without making your hands look too busy, and honestly, the French tip base makes the whole thing feel more wearable than full-coverage glitter.
To recreate this, start with a milky base, paint clean French tips, then add the pearl clusters to just two accent nails (any more and it gets overwhelming).
The raised gel waves on these almond nails look like actual oyster shells, which is either really cool or completely over the top depending on your mood that day.
I love how the length gives you room for the texture work, but I’d be lying if I said this wouldn’t get old fast during my usual Tuesday routine of coffee with Donna and Target runs.
To get this effect, build each textured layer slowly so the waves stay smooth, then add the pearls while the gel is still tacky.
The nude and white combination feels romantic without being too sweet, and the almond shape lets you do those little heart outlines without cramming them in.
This is probably my favorite from the “cute but not trying too hard” category — it’s the kind of design that looks thoughtful but doesn’t scream for attention.
Paint the heart shapes first with a fine brush, then press micro pearls along the edges while the gel is still slightly wet so they actually stick.
Long almond nails with that frosty white base look expensive, and the curved pearl lines add just enough detail without making everything feel cluttered.
The raised gel texture gives the whole thing a soft, almost matte finish that photographs beautifully (which matters if you’re planning to post this).
Keep the base sheer, draw your swirl patterns first, then place the pearls along the curves while the gel is still workable
Chrome nails with scattered pearls and crystals in the center instead of at the edges… it’s a small change that makes a huge difference in how wearable this feels.
The long almond shape keeps everything balanced, and honestly, the chrome base does most of the work here — the pearls are just the finishing touch.
Start with your silver-pearl chrome base, place the embellishments while the gel is tacky, and space them evenly so it doesn’t look random.
The ombré base on these coffin nails is pretty, but what I really like is how the pearls are placed toward the center instead of loaded at the tips.
It keeps the design from looking top-heavy, and frankly, it’s way more practical — you’re not constantly worrying about catching the embellishments on everything.
Blend your milky nude with white, cure it, then add different sized pearls while the gel is slightly sticky for better adhesion.
Pink nails with tiny pearls and pastel hearts are exactly as sweet as they sound, and on short almond nails, they don’t feel juvenile.
Start with a nude-pink base, paint the little hearts in different spots so it looks organic, then fill the gaps with micro pearls to balance everything out.
The whole design stays smooth and snag-free, which is honestly my main requirement for any nail art these days.
A curved row of micro pearls right at the cuticle line… it’s such a small detail but it makes the whole manicure look more expensive.
The almond shape helps the pearls follow the natural curve, and because they’re at the cuticle instead of the tips, you don’t have to worry about them constantly getting in your way.
Apply a sheer beige base, add a light pearl chrome layer, then press the tiny pearls into a thin line of clear gel at the cuticle.
Sometimes the simplest version is the best version. This subtle pearl finish on short almond nails is clean enough for work but still feels special.
The chrome powder gives you that glow without being too obvious about it, and over a sheer pink base, it warms up your skin tone instead of washing it out.
Two thin coats of natural base, rub in pearl chrome powder, seal with glossy topcoat
Glittery French tips with thin gold outlines and tiny pearl accents… the almond shape gives the gold details room to follow the natural curve.
It’s fancy but not over-the-top fancy, if that makes sense. Like something you’d wear to a nice dinner but wouldn’t feel weird about at the grocery store the next day.
Clear base, fine glitter tips, then trace the shape with metallic gel and add a few pearls while everything’s still workable.
Sheer nude base with tiny colored pearls and gems scattered around… it’s playful without being childish, and the short almond shape keeps everything comfortable.
The different colors add visual interest, but because they’re small and spaced out, it doesn’t feel overwhelming or busy.
Light nude polish, let it cure completely, then place small dots of clear gel where you want each pearl to sit.
Champagne nails with pearl and gold detailing concentrated at the tips instead of spread everywhere… the almond shape helps the drip effect look intentional.
It’s a nice compromise between dramatic and wearable — you get the luxury effect without the maintenance nightmare.
Shimmering nude base, let it cure, then paint delicate gold outline around tips and add small pearl clusters randomly.
Glittery French tips with thin gold outlines and tiny pearl accents… the almond shape gives the gold details room to follow the natural curve.
It’s fancy but not over-the-top fancy, if that makes sense. Like something you’d wear to a nice dinner but wouldn’t feel weird about at the grocery store the next day.
Clear base, fine glitter tips, then trace the shape with metallic gel and add a few pearls while everything’s still workable.
Sheer nude base with tiny colored pearls and gems scattered around… it’s playful without being childish, and the short almond shape keeps everything comfortable.
The different colors add visual interest, but because they’re small and spaced out, it doesn’t feel overwhelming or busy.
Light nude polish, let it cure completely, then place small dots of clear gel where you want each pearl to sit.
Champagne nails with pearl and gold detailing concentrated at the tips instead of spread everywhere… the almond shape helps the drip effect look intentional.
It’s a nice compromise between dramatic and wearable — you get the luxury effect without the maintenance nightmare.
Shimmering nude base, let it cure, then paint delicate gold outline around tips and add small pearl clusters randomly.
Sometimes the simplest version is the best version. This subtle pearl finish on short almond nails is clean enough for work but still feels special.
The chrome powder gives you that glow without being too obvious about it, and over a sheer pink base, it warms up your skin tone instead of washing it out.
Two thin coats of natural base, rub in pearl chrome powder, seal with glossy topcoat
Glittery French tips with thin gold outlines and tiny pearl accents… the almond shape gives the gold details room to follow the natural curve.
It’s fancy but not over-the-top fancy, if that makes sense. Like something you’d wear to a nice dinner but wouldn’t feel weird about at the grocery store the next day.
Clear base, fine glitter tips, then trace the shape with metallic gel and add a few pearls while everything’s still workable.
Sheer nude base with tiny colored pearls and gems scattered around… it’s playful without being childish, and the short almond shape keeps everything comfortable.
The different colors add visual interest, but because they’re small and spaced out, it doesn’t feel overwhelming or busy.
Light nude polish, let it cure completely, then place small dots of clear gel where you want each pearl to sit.
Champagne nails with pearl and gold detailing concentrated at the tips instead of spread everywhere… the almond shape helps the drip effect look intentional.
It’s a nice compromise between dramatic and wearable — you get the luxury effect without the maintenance nightmare.
Shimmering nude base, let it cure, then paint delicate gold outline around tips and add small pearl clusters randomly.
A curved row of micro pearls right at the cuticle line… it’s such a small detail but it makes the whole manicure look more expensive.
The almond shape helps the pearls follow the natural curve, and because they’re at the cuticle instead of the tips, you don’t have to worry about them constantly getting in your way.
Apply a sheer beige base, add a light pearl chrome layer, then press the tiny pearls into a thin line of clear gel at the cuticle.
Sometimes the simplest version is the best version. This subtle pearl finish on short almond nails is clean enough for work but still feels special.
The chrome powder gives you that glow without being too obvious about it, and over a sheer pink base, it warms up your skin tone instead of washing it out.
Two thin coats of natural base, rub in pearl chrome powder, seal with glossy topcoat
Glittery French tips with thin gold outlines and tiny pearl accents… the almond shape gives the gold details room to follow the natural curve.
It’s fancy but not over-the-top fancy, if that makes sense. Like something you’d wear to a nice dinner but wouldn’t feel weird about at the grocery store the next day.
Clear base, fine glitter tips, then trace the shape with metallic gel and add a few pearls while everything’s still workable.
Sheer nude base with tiny colored pearls and gems scattered around… it’s playful without being childish, and the short almond shape keeps everything comfortable.
The different colors add visual interest, but because they’re small and spaced out, it doesn’t feel overwhelming or busy.
Light nude polish, let it cure completely, then place small dots of clear gel where you want each pearl to sit.
Champagne nails with pearl and gold detailing concentrated at the tips instead of spread everywhere… the almond shape helps the drip effect look intentional.
It’s a nice compromise between dramatic and wearable — you get the luxury effect without the maintenance nightmare.
Shimmering nude base, let it cure, then paint delicate gold outline around tips and add small pearl clusters randomly.
Chrome nails with scattered pearls and crystals in the center instead of at the edges… it’s a small change that makes a huge difference in how wearable this feels.
The long almond shape keeps everything balanced, and honestly, the chrome base does most of the work here — the pearls are just the finishing touch.
Start with your silver-pearl chrome base, place the embellishments while the gel is tacky, and space them evenly so it doesn’t look random.
The ombré base on these coffin nails is pretty, but what I really like is how the pearls are placed toward the center instead of loaded at the tips.
It keeps the design from looking top-heavy, and frankly, it’s way more practical — you’re not constantly worrying about catching the embellishments on everything.
Blend your milky nude with white, cure it, then add different sized pearls while the gel is slightly sticky for better adhesion.
Pink nails with tiny pearls and pastel hearts are exactly as sweet as they sound, and on short almond nails, they don’t feel juvenile.
Start with a nude-pink base, paint the little hearts in different spots so it looks organic, then fill the gaps with micro pearls to balance everything out.
The whole design stays smooth and snag-free, which is honestly my main requirement for any nail art these days.
A curved row of micro pearls right at the cuticle line… it’s such a small detail but it makes the whole manicure look more expensive.
The almond shape helps the pearls follow the natural curve, and because they’re at the cuticle instead of the tips, you don’t have to worry about them constantly getting in your way.
Apply a sheer beige base, add a light pearl chrome layer, then press the tiny pearls into a thin line of clear gel at the cuticle.
Sometimes the simplest version is the best version. This subtle pearl finish on short almond nails is clean enough for work but still feels special.
The chrome powder gives you that glow without being too obvious about it, and over a sheer pink base, it warms up your skin tone instead of washing it out.
Two thin coats of natural base, rub in pearl chrome powder, seal with glossy topcoat
Glittery French tips with thin gold outlines and tiny pearl accents… the almond shape gives the gold details room to follow the natural curve.
It’s fancy but not over-the-top fancy, if that makes sense. Like something you’d wear to a nice dinner but wouldn’t feel weird about at the grocery store the next day.
Clear base, fine glitter tips, then trace the shape with metallic gel and add a few pearls while everything’s still workable.
Sheer nude base with tiny colored pearls and gems scattered around… it’s playful without being childish, and the short almond shape keeps everything comfortable.
The different colors add visual interest, but because they’re small and spaced out, it doesn’t feel overwhelming or busy.
Light nude polish, let it cure completely, then place small dots of clear gel where you want each pearl to sit.
Champagne nails with pearl and gold detailing concentrated at the tips instead of spread everywhere… the almond shape helps the drip effect look intentional.
It’s a nice compromise between dramatic and wearable — you get the luxury effect without the maintenance nightmare.
Shimmering nude base, let it cure, then paint delicate gold outline around tips and add small pearl clusters randomly.
I’ve been staring at pearl nail inspiration photos for weeks now, and honestly? I keep getting stuck on the same questions everyone else seems to have. The pearls look gorgeous in photos, but will they actually stay put when I’m loading the dishwasher or wrestling with Jake’s soccer cleats?
And then there’s the whole base color thing. Half the tutorials I’ve watched use completely different shades and swear theirs is “the only way” to make pearls look right.
So I did what I always do when I can’t decide — I researched everything, tried a few versions myself, and put together 28 ideas that actually work in real life.
Here’s what I figured out.
What nail shape looks best with pearl?
Short square or short squoval shapes are your safest bet if you want something that won’t drive you crazy within three days.
The pearls sit close to the nail surface, so you’re not constantly snagging them on everything. Almond nails work beautifully too, especially if you like the way small pearl accents follow that natural curve.
Coffin nails give you the most real estate for dramatic designs, but I’m going to be honest — if you’re doing school pickup and grocery runs, longer shapes with heavy pearl work get annoying fast.
Save this article for later! 👇👇
What colors look best as pearly nails?
Soft, clean base colors make pearl nails look expensive instead of craft-store DIY. Milky white, sheer pink, or a good neutral nude are your classics for a reason.
These colors let the pearl finish be the star without competing for attention. Ivory and cream work too, especially if you want something warmer than straight white.
You can absolutely use darker colors like black or navy, but keep the pearl elements simple — too much contrast can look busy instead of elegant (and trust me, I learned this the hard way).
Gold Pearl Clusters
This is exactly what I’d get for a wedding — clean white square nails that feel structured but still have that glamorous edge.
The pearls and gold beads add depth without making your hands look too busy, and honestly, the French tip base makes the whole thing feel more wearable than full-coverage glitter.
To recreate this, start with a milky base, paint clean French tips, then add the pearl clusters to just two accent nails (any more and it gets overwhelming).
The raised gel waves on these almond nails look like actual oyster shells, which is either really cool or completely over the top depending on your mood that day.
I love how the length gives you room for the texture work, but I’d be lying if I said this wouldn’t get old fast during my usual Tuesday routine of coffee with Donna and Target runs.
To get this effect, build each textured layer slowly so the waves stay smooth, then add the pearls while the gel is still tacky.
The nude and white combination feels romantic without being too sweet, and the almond shape lets you do those little heart outlines without cramming them in.
This is probably my favorite from the “cute but not trying too hard” category — it’s the kind of design that looks thoughtful but doesn’t scream for attention.
Paint the heart shapes first with a fine brush, then press micro pearls along the edges while the gel is still slightly wet so they actually stick.
Long almond nails with that frosty white base look expensive, and the curved pearl lines add just enough detail without making everything feel cluttered.
The raised gel texture gives the whole thing a soft, almost matte finish that photographs beautifully (which matters if you’re planning to post this).
Keep the base sheer, draw your swirl patterns first, then place the pearls along the curves while the gel is still workable
Chrome nails with scattered pearls and crystals in the center instead of at the edges… it’s a small change that makes a huge difference in how wearable this feels.
The long almond shape keeps everything balanced, and honestly, the chrome base does most of the work here — the pearls are just the finishing touch.
Start with your silver-pearl chrome base, place the embellishments while the gel is tacky, and space them evenly so it doesn’t look random.
The ombré base on these coffin nails is pretty, but what I really like is how the pearls are placed toward the center instead of loaded at the tips.
It keeps the design from looking top-heavy, and frankly, it’s way more practical — you’re not constantly worrying about catching the embellishments on everything.
Blend your milky nude with white, cure it, then add different sized pearls while the gel is slightly sticky for better adhesion.
Pink nails with tiny pearls and pastel hearts are exactly as sweet as they sound, and on short almond nails, they don’t feel juvenile.
Start with a nude-pink base, paint the little hearts in different spots so it looks organic, then fill the gaps with micro pearls to balance everything out.
The whole design stays smooth and snag-free, which is honestly my main requirement for any nail art these days.
A curved row of micro pearls right at the cuticle line… it’s such a small detail but it makes the whole manicure look more expensive.
The almond shape helps the pearls follow the natural curve, and because they’re at the cuticle instead of the tips, you don’t have to worry about them constantly getting in your way.
Apply a sheer beige base, add a light pearl chrome layer, then press the tiny pearls into a thin line of clear gel at the cuticle.
Sometimes the simplest version is the best version. This subtle pearl finish on short almond nails is clean enough for work but still feels special.
The chrome powder gives you that glow without being too obvious about it, and over a sheer pink base, it warms up your skin tone instead of washing it out.
Two thin coats of natural base, rub in pearl chrome powder, seal with glossy topcoat
Glittery French tips with thin gold outlines and tiny pearl accents… the almond shape gives the gold details room to follow the natural curve.
It’s fancy but not over-the-top fancy, if that makes sense. Like something you’d wear to a nice dinner but wouldn’t feel weird about at the grocery store the next day.
Clear base, fine glitter tips, then trace the shape with metallic gel and add a few pearls while everything’s still workable.
Sheer nude base with tiny colored pearls and gems scattered around… it’s playful without being childish, and the short almond shape keeps everything comfortable.
The different colors add visual interest, but because they’re small and spaced out, it doesn’t feel overwhelming or busy.
Light nude polish, let it cure completely, then place small dots of clear gel where you want each pearl to sit.
Champagne nails with pearl and gold detailing concentrated at the tips instead of spread everywhere… the almond shape helps the drip effect look intentional.
It’s a nice compromise between dramatic and wearable — you get the luxury effect without the maintenance nightmare.
Shimmering nude base, let it cure, then paint delicate gold outline around tips and add small pearl clusters randomly.
Sometimes the simplest version is the best version. This subtle pearl finish on short almond nails is clean enough for work but still feels special.
The chrome powder gives you that glow without being too obvious about it, and over a sheer pink base, it warms up your skin tone instead of washing it out.
Two thin coats of natural base, rub in pearl chrome powder, seal with glossy topcoat
Glittery French tips with thin gold outlines and tiny pearl accents… the almond shape gives the gold details room to follow the natural curve.
It’s fancy but not over-the-top fancy, if that makes sense. Like something you’d wear to a nice dinner but wouldn’t feel weird about at the grocery store the next day.
Clear base, fine glitter tips, then trace the shape with metallic gel and add a few pearls while everything’s still workable.
Sheer nude base with tiny colored pearls and gems scattered around… it’s playful without being childish, and the short almond shape keeps everything comfortable.
The different colors add visual interest, but because they’re small and spaced out, it doesn’t feel overwhelming or busy.
Light nude polish, let it cure completely, then place small dots of clear gel where you want each pearl to sit.
Champagne nails with pearl and gold detailing concentrated at the tips instead of spread everywhere… the almond shape helps the drip effect look intentional.
It’s a nice compromise between dramatic and wearable — you get the luxury effect without the maintenance nightmare.
Shimmering nude base, let it cure, then paint delicate gold outline around tips and add small pearl clusters randomly.
A curved row of micro pearls right at the cuticle line… it’s such a small detail but it makes the whole manicure look more expensive.
The almond shape helps the pearls follow the natural curve, and because they’re at the cuticle instead of the tips, you don’t have to worry about them constantly getting in your way.
Apply a sheer beige base, add a light pearl chrome layer, then press the tiny pearls into a thin line of clear gel at the cuticle.
Sometimes the simplest version is the best version. This subtle pearl finish on short almond nails is clean enough for work but still feels special.
The chrome powder gives you that glow without being too obvious about it, and over a sheer pink base, it warms up your skin tone instead of washing it out.
Two thin coats of natural base, rub in pearl chrome powder, seal with glossy topcoat
Glittery French tips with thin gold outlines and tiny pearl accents… the almond shape gives the gold details room to follow the natural curve.
It’s fancy but not over-the-top fancy, if that makes sense. Like something you’d wear to a nice dinner but wouldn’t feel weird about at the grocery store the next day.
Clear base, fine glitter tips, then trace the shape with metallic gel and add a few pearls while everything’s still workable.
Sheer nude base with tiny colored pearls and gems scattered around… it’s playful without being childish, and the short almond shape keeps everything comfortable.
The different colors add visual interest, but because they’re small and spaced out, it doesn’t feel overwhelming or busy.
Light nude polish, let it cure completely, then place small dots of clear gel where you want each pearl to sit.
Champagne nails with pearl and gold detailing concentrated at the tips instead of spread everywhere… the almond shape helps the drip effect look intentional.
It’s a nice compromise between dramatic and wearable — you get the luxury effect without the maintenance nightmare.
Shimmering nude base, let it cure, then paint delicate gold outline around tips and add small pearl clusters randomly.
Chrome nails with scattered pearls and crystals in the center instead of at the edges… it’s a small change that makes a huge difference in how wearable this feels.
The long almond shape keeps everything balanced, and honestly, the chrome base does most of the work here — the pearls are just the finishing touch.
Start with your silver-pearl chrome base, place the embellishments while the gel is tacky, and space them evenly so it doesn’t look random.
The ombré base on these coffin nails is pretty, but what I really like is how the pearls are placed toward the center instead of loaded at the tips.
It keeps the design from looking top-heavy, and frankly, it’s way more practical — you’re not constantly worrying about catching the embellishments on everything.
Blend your milky nude with white, cure it, then add different sized pearls while the gel is slightly sticky for better adhesion.
Pink nails with tiny pearls and pastel hearts are exactly as sweet as they sound, and on short almond nails, they don’t feel juvenile.
Start with a nude-pink base, paint the little hearts in different spots so it looks organic, then fill the gaps with micro pearls to balance everything out.
The whole design stays smooth and snag-free, which is honestly my main requirement for any nail art these days.
A curved row of micro pearls right at the cuticle line… it’s such a small detail but it makes the whole manicure look more expensive.
The almond shape helps the pearls follow the natural curve, and because they’re at the cuticle instead of the tips, you don’t have to worry about them constantly getting in your way.
Apply a sheer beige base, add a light pearl chrome layer, then press the tiny pearls into a thin line of clear gel at the cuticle.
Sometimes the simplest version is the best version. This subtle pearl finish on short almond nails is clean enough for work but still feels special.
The chrome powder gives you that glow without being too obvious about it, and over a sheer pink base, it warms up your skin tone instead of washing it out.
Two thin coats of natural base, rub in pearl chrome powder, seal with glossy topcoat
Glittery French tips with thin gold outlines and tiny pearl accents… the almond shape gives the gold details room to follow the natural curve.
It’s fancy but not over-the-top fancy, if that makes sense. Like something you’d wear to a nice dinner but wouldn’t feel weird about at the grocery store the next day.
Clear base, fine glitter tips, then trace the shape with metallic gel and add a few pearls while everything’s still workable.
Sheer nude base with tiny colored pearls and gems scattered around… it’s playful without being childish, and the short almond shape keeps everything comfortable.
The different colors add visual interest, but because they’re small and spaced out, it doesn’t feel overwhelming or busy.
Light nude polish, let it cure completely, then place small dots of clear gel where you want each pearl to sit.
Champagne nails with pearl and gold detailing concentrated at the tips instead of spread everywhere… the almond shape helps the drip effect look intentional.
It’s a nice compromise between dramatic and wearable — you get the luxury effect without the maintenance nightmare.
Shimmering nude base, let it cure, then paint delicate gold outline around tips and add small pearl clusters randomly.
I’ve been staring at pearl nail inspiration photos for weeks now, and honestly? I keep getting stuck on the same questions everyone else seems to have. The pearls look gorgeous in photos, but will they actually stay put when I’m loading the dishwasher or wrestling with Jake’s soccer cleats?
And then there’s the whole base color thing. Half the tutorials I’ve watched use completely different shades and swear theirs is “the only way” to make pearls look right.
So I did what I always do when I can’t decide — I researched everything, tried a few versions myself, and put together 28 ideas that actually work in real life.
Here’s what I figured out.
What nail shape looks best with pearl?
Short square or short squoval shapes are your safest bet if you want something that won’t drive you crazy within three days.
The pearls sit close to the nail surface, so you’re not constantly snagging them on everything. Almond nails work beautifully too, especially if you like the way small pearl accents follow that natural curve.
Coffin nails give you the most real estate for dramatic designs, but I’m going to be honest — if you’re doing school pickup and grocery runs, longer shapes with heavy pearl work get annoying fast.
Save this article for later! 👇👇
What colors look best as pearly nails?
Soft, clean base colors make pearl nails look expensive instead of craft-store DIY. Milky white, sheer pink, or a good neutral nude are your classics for a reason.
These colors let the pearl finish be the star without competing for attention. Ivory and cream work too, especially if you want something warmer than straight white.
You can absolutely use darker colors like black or navy, but keep the pearl elements simple — too much contrast can look busy instead of elegant (and trust me, I learned this the hard way).
Gold Pearl Clusters
This is exactly what I’d get for a wedding — clean white square nails that feel structured but still have that glamorous edge.
The pearls and gold beads add depth without making your hands look too busy, and honestly, the French tip base makes the whole thing feel more wearable than full-coverage glitter.
To recreate this, start with a milky base, paint clean French tips, then add the pearl clusters to just two accent nails (any more and it gets overwhelming).
The raised gel waves on these almond nails look like actual oyster shells, which is either really cool or completely over the top depending on your mood that day.
I love how the length gives you room for the texture work, but I’d be lying if I said this wouldn’t get old fast during my usual Tuesday routine of coffee with Donna and Target runs.
To get this effect, build each textured layer slowly so the waves stay smooth, then add the pearls while the gel is still tacky.
The nude and white combination feels romantic without being too sweet, and the almond shape lets you do those little heart outlines without cramming them in.
This is probably my favorite from the “cute but not trying too hard” category — it’s the kind of design that looks thoughtful but doesn’t scream for attention.
Paint the heart shapes first with a fine brush, then press micro pearls along the edges while the gel is still slightly wet so they actually stick.
Long almond nails with that frosty white base look expensive, and the curved pearl lines add just enough detail without making everything feel cluttered.
The raised gel texture gives the whole thing a soft, almost matte finish that photographs beautifully (which matters if you’re planning to post this).
Keep the base sheer, draw your swirl patterns first, then place the pearls along the curves while the gel is still workable
Chrome nails with scattered pearls and crystals in the center instead of at the edges… it’s a small change that makes a huge difference in how wearable this feels.
The long almond shape keeps everything balanced, and honestly, the chrome base does most of the work here — the pearls are just the finishing touch.
Start with your silver-pearl chrome base, place the embellishments while the gel is tacky, and space them evenly so it doesn’t look random.
The ombré base on these coffin nails is pretty, but what I really like is how the pearls are placed toward the center instead of loaded at the tips.
It keeps the design from looking top-heavy, and frankly, it’s way more practical — you’re not constantly worrying about catching the embellishments on everything.
Blend your milky nude with white, cure it, then add different sized pearls while the gel is slightly sticky for better adhesion.
Pink nails with tiny pearls and pastel hearts are exactly as sweet as they sound, and on short almond nails, they don’t feel juvenile.
Start with a nude-pink base, paint the little hearts in different spots so it looks organic, then fill the gaps with micro pearls to balance everything out.
The whole design stays smooth and snag-free, which is honestly my main requirement for any nail art these days.
A curved row of micro pearls right at the cuticle line… it’s such a small detail but it makes the whole manicure look more expensive.
The almond shape helps the pearls follow the natural curve, and because they’re at the cuticle instead of the tips, you don’t have to worry about them constantly getting in your way.
Apply a sheer beige base, add a light pearl chrome layer, then press the tiny pearls into a thin line of clear gel at the cuticle.
Sometimes the simplest version is the best version. This subtle pearl finish on short almond nails is clean enough for work but still feels special.
The chrome powder gives you that glow without being too obvious about it, and over a sheer pink base, it warms up your skin tone instead of washing it out.
Two thin coats of natural base, rub in pearl chrome powder, seal with glossy topcoat
Glittery French tips with thin gold outlines and tiny pearl accents… the almond shape gives the gold details room to follow the natural curve.
It’s fancy but not over-the-top fancy, if that makes sense. Like something you’d wear to a nice dinner but wouldn’t feel weird about at the grocery store the next day.
Clear base, fine glitter tips, then trace the shape with metallic gel and add a few pearls while everything’s still workable.
Sheer nude base with tiny colored pearls and gems scattered around… it’s playful without being childish, and the short almond shape keeps everything comfortable.
The different colors add visual interest, but because they’re small and spaced out, it doesn’t feel overwhelming or busy.
Light nude polish, let it cure completely, then place small dots of clear gel where you want each pearl to sit.
Champagne nails with pearl and gold detailing concentrated at the tips instead of spread everywhere… the almond shape helps the drip effect look intentional.
It’s a nice compromise between dramatic and wearable — you get the luxury effect without the maintenance nightmare.
Shimmering nude base, let it cure, then paint delicate gold outline around tips and add small pearl clusters randomly.
Glittery French tips with thin gold outlines and tiny pearl accents… the almond shape gives the gold details room to follow the natural curve.
It’s fancy but not over-the-top fancy, if that makes sense. Like something you’d wear to a nice dinner but wouldn’t feel weird about at the grocery store the next day.
Clear base, fine glitter tips, then trace the shape with metallic gel and add a few pearls while everything’s still workable.
Sheer nude base with tiny colored pearls and gems scattered around… it’s playful without being childish, and the short almond shape keeps everything comfortable.
The different colors add visual interest, but because they’re small and spaced out, it doesn’t feel overwhelming or busy.
Light nude polish, let it cure completely, then place small dots of clear gel where you want each pearl to sit.
Champagne nails with pearl and gold detailing concentrated at the tips instead of spread everywhere… the almond shape helps the drip effect look intentional.
It’s a nice compromise between dramatic and wearable — you get the luxury effect without the maintenance nightmare.
Shimmering nude base, let it cure, then paint delicate gold outline around tips and add small pearl clusters randomly.
Sometimes the simplest version is the best version. This subtle pearl finish on short almond nails is clean enough for work but still feels special.
The chrome powder gives you that glow without being too obvious about it, and over a sheer pink base, it warms up your skin tone instead of washing it out.
Two thin coats of natural base, rub in pearl chrome powder, seal with glossy topcoat
Glittery French tips with thin gold outlines and tiny pearl accents… the almond shape gives the gold details room to follow the natural curve.
It’s fancy but not over-the-top fancy, if that makes sense. Like something you’d wear to a nice dinner but wouldn’t feel weird about at the grocery store the next day.
Clear base, fine glitter tips, then trace the shape with metallic gel and add a few pearls while everything’s still workable.
Sheer nude base with tiny colored pearls and gems scattered around… it’s playful without being childish, and the short almond shape keeps everything comfortable.
The different colors add visual interest, but because they’re small and spaced out, it doesn’t feel overwhelming or busy.
Light nude polish, let it cure completely, then place small dots of clear gel where you want each pearl to sit.
Champagne nails with pearl and gold detailing concentrated at the tips instead of spread everywhere… the almond shape helps the drip effect look intentional.
It’s a nice compromise between dramatic and wearable — you get the luxury effect without the maintenance nightmare.
Shimmering nude base, let it cure, then paint delicate gold outline around tips and add small pearl clusters randomly.
A curved row of micro pearls right at the cuticle line… it’s such a small detail but it makes the whole manicure look more expensive.
The almond shape helps the pearls follow the natural curve, and because they’re at the cuticle instead of the tips, you don’t have to worry about them constantly getting in your way.
Apply a sheer beige base, add a light pearl chrome layer, then press the tiny pearls into a thin line of clear gel at the cuticle.
Sometimes the simplest version is the best version. This subtle pearl finish on short almond nails is clean enough for work but still feels special.
The chrome powder gives you that glow without being too obvious about it, and over a sheer pink base, it warms up your skin tone instead of washing it out.
Two thin coats of natural base, rub in pearl chrome powder, seal with glossy topcoat
Glittery French tips with thin gold outlines and tiny pearl accents… the almond shape gives the gold details room to follow the natural curve.
It’s fancy but not over-the-top fancy, if that makes sense. Like something you’d wear to a nice dinner but wouldn’t feel weird about at the grocery store the next day.
Clear base, fine glitter tips, then trace the shape with metallic gel and add a few pearls while everything’s still workable.
Sheer nude base with tiny colored pearls and gems scattered around… it’s playful without being childish, and the short almond shape keeps everything comfortable.
The different colors add visual interest, but because they’re small and spaced out, it doesn’t feel overwhelming or busy.
Light nude polish, let it cure completely, then place small dots of clear gel where you want each pearl to sit.
Champagne nails with pearl and gold detailing concentrated at the tips instead of spread everywhere… the almond shape helps the drip effect look intentional.
It’s a nice compromise between dramatic and wearable — you get the luxury effect without the maintenance nightmare.
Shimmering nude base, let it cure, then paint delicate gold outline around tips and add small pearl clusters randomly.
Chrome nails with scattered pearls and crystals in the center instead of at the edges… it’s a small change that makes a huge difference in how wearable this feels.
The long almond shape keeps everything balanced, and honestly, the chrome base does most of the work here — the pearls are just the finishing touch.
Start with your silver-pearl chrome base, place the embellishments while the gel is tacky, and space them evenly so it doesn’t look random.
The ombré base on these coffin nails is pretty, but what I really like is how the pearls are placed toward the center instead of loaded at the tips.
It keeps the design from looking top-heavy, and frankly, it’s way more practical — you’re not constantly worrying about catching the embellishments on everything.
Blend your milky nude with white, cure it, then add different sized pearls while the gel is slightly sticky for better adhesion.
Pink nails with tiny pearls and pastel hearts are exactly as sweet as they sound, and on short almond nails, they don’t feel juvenile.
Start with a nude-pink base, paint the little hearts in different spots so it looks organic, then fill the gaps with micro pearls to balance everything out.
The whole design stays smooth and snag-free, which is honestly my main requirement for any nail art these days.
A curved row of micro pearls right at the cuticle line… it’s such a small detail but it makes the whole manicure look more expensive.
The almond shape helps the pearls follow the natural curve, and because they’re at the cuticle instead of the tips, you don’t have to worry about them constantly getting in your way.
Apply a sheer beige base, add a light pearl chrome layer, then press the tiny pearls into a thin line of clear gel at the cuticle.
Sometimes the simplest version is the best version. This subtle pearl finish on short almond nails is clean enough for work but still feels special.
The chrome powder gives you that glow without being too obvious about it, and over a sheer pink base, it warms up your skin tone instead of washing it out.
Two thin coats of natural base, rub in pearl chrome powder, seal with glossy topcoat
Glittery French tips with thin gold outlines and tiny pearl accents… the almond shape gives the gold details room to follow the natural curve.
It’s fancy but not over-the-top fancy, if that makes sense. Like something you’d wear to a nice dinner but wouldn’t feel weird about at the grocery store the next day.
Clear base, fine glitter tips, then trace the shape with metallic gel and add a few pearls while everything’s still workable.
Sheer nude base with tiny colored pearls and gems scattered around… it’s playful without being childish, and the short almond shape keeps everything comfortable.
The different colors add visual interest, but because they’re small and spaced out, it doesn’t feel overwhelming or busy.
Light nude polish, let it cure completely, then place small dots of clear gel where you want each pearl to sit.
Champagne nails with pearl and gold detailing concentrated at the tips instead of spread everywhere… the almond shape helps the drip effect look intentional.
It’s a nice compromise between dramatic and wearable — you get the luxury effect without the maintenance nightmare.
Shimmering nude base, let it cure, then paint delicate gold outline around tips and add small pearl clusters randomly.
I’ve been staring at pearl nail inspiration photos for weeks now, and honestly? I keep getting stuck on the same questions everyone else seems to have. The pearls look gorgeous in photos, but will they actually stay put when I’m loading the dishwasher or wrestling with Jake’s soccer cleats?
And then there’s the whole base color thing. Half the tutorials I’ve watched use completely different shades and swear theirs is “the only way” to make pearls look right.
So I did what I always do when I can’t decide — I researched everything, tried a few versions myself, and put together 28 ideas that actually work in real life.
Here’s what I figured out.
What nail shape looks best with pearl?
Short square or short squoval shapes are your safest bet if you want something that won’t drive you crazy within three days.
The pearls sit close to the nail surface, so you’re not constantly snagging them on everything. Almond nails work beautifully too, especially if you like the way small pearl accents follow that natural curve.
Coffin nails give you the most real estate for dramatic designs, but I’m going to be honest — if you’re doing school pickup and grocery runs, longer shapes with heavy pearl work get annoying fast.
Save this article for later! 👇👇
What colors look best as pearly nails?
Soft, clean base colors make pearl nails look expensive instead of craft-store DIY. Milky white, sheer pink, or a good neutral nude are your classics for a reason.
These colors let the pearl finish be the star without competing for attention. Ivory and cream work too, especially if you want something warmer than straight white.
You can absolutely use darker colors like black or navy, but keep the pearl elements simple — too much contrast can look busy instead of elegant (and trust me, I learned this the hard way).
Gold Pearl Clusters
This is exactly what I’d get for a wedding — clean white square nails that feel structured but still have that glamorous edge.
The pearls and gold beads add depth without making your hands look too busy, and honestly, the French tip base makes the whole thing feel more wearable than full-coverage glitter.
To recreate this, start with a milky base, paint clean French tips, then add the pearl clusters to just two accent nails (any more and it gets overwhelming).
The raised gel waves on these almond nails look like actual oyster shells, which is either really cool or completely over the top depending on your mood that day.
I love how the length gives you room for the texture work, but I’d be lying if I said this wouldn’t get old fast during my usual Tuesday routine of coffee with Donna and Target runs.
To get this effect, build each textured layer slowly so the waves stay smooth, then add the pearls while the gel is still tacky.
The nude and white combination feels romantic without being too sweet, and the almond shape lets you do those little heart outlines without cramming them in.
This is probably my favorite from the “cute but not trying too hard” category — it’s the kind of design that looks thoughtful but doesn’t scream for attention.
Paint the heart shapes first with a fine brush, then press micro pearls along the edges while the gel is still slightly wet so they actually stick.
Long almond nails with that frosty white base look expensive, and the curved pearl lines add just enough detail without making everything feel cluttered.
The raised gel texture gives the whole thing a soft, almost matte finish that photographs beautifully (which matters if you’re planning to post this).
Keep the base sheer, draw your swirl patterns first, then place the pearls along the curves while the gel is still workable
Chrome nails with scattered pearls and crystals in the center instead of at the edges… it’s a small change that makes a huge difference in how wearable this feels.
The long almond shape keeps everything balanced, and honestly, the chrome base does most of the work here — the pearls are just the finishing touch.
Start with your silver-pearl chrome base, place the embellishments while the gel is tacky, and space them evenly so it doesn’t look random.
The ombré base on these coffin nails is pretty, but what I really like is how the pearls are placed toward the center instead of loaded at the tips.
It keeps the design from looking top-heavy, and frankly, it’s way more practical — you’re not constantly worrying about catching the embellishments on everything.
Blend your milky nude with white, cure it, then add different sized pearls while the gel is slightly sticky for better adhesion.
Pink nails with tiny pearls and pastel hearts are exactly as sweet as they sound, and on short almond nails, they don’t feel juvenile.
Start with a nude-pink base, paint the little hearts in different spots so it looks organic, then fill the gaps with micro pearls to balance everything out.
The whole design stays smooth and snag-free, which is honestly my main requirement for any nail art these days.
A curved row of micro pearls right at the cuticle line… it’s such a small detail but it makes the whole manicure look more expensive.
The almond shape helps the pearls follow the natural curve, and because they’re at the cuticle instead of the tips, you don’t have to worry about them constantly getting in your way.
Apply a sheer beige base, add a light pearl chrome layer, then press the tiny pearls into a thin line of clear gel at the cuticle.
Sometimes the simplest version is the best version. This subtle pearl finish on short almond nails is clean enough for work but still feels special.
The chrome powder gives you that glow without being too obvious about it, and over a sheer pink base, it warms up your skin tone instead of washing it out.
Two thin coats of natural base, rub in pearl chrome powder, seal with glossy topcoat
Glittery French tips with thin gold outlines and tiny pearl accents… the almond shape gives the gold details room to follow the natural curve.
It’s fancy but not over-the-top fancy, if that makes sense. Like something you’d wear to a nice dinner but wouldn’t feel weird about at the grocery store the next day.
Clear base, fine glitter tips, then trace the shape with metallic gel and add a few pearls while everything’s still workable.
Sheer nude base with tiny colored pearls and gems scattered around… it’s playful without being childish, and the short almond shape keeps everything comfortable.
The different colors add visual interest, but because they’re small and spaced out, it doesn’t feel overwhelming or busy.
Light nude polish, let it cure completely, then place small dots of clear gel where you want each pearl to sit.
Champagne nails with pearl and gold detailing concentrated at the tips instead of spread everywhere… the almond shape helps the drip effect look intentional.
It’s a nice compromise between dramatic and wearable — you get the luxury effect without the maintenance nightmare.
Shimmering nude base, let it cure, then paint delicate gold outline around tips and add small pearl clusters randomly.
Glittery French tips with thin gold outlines and tiny pearl accents… the almond shape gives the gold details room to follow the natural curve.
It’s fancy but not over-the-top fancy, if that makes sense. Like something you’d wear to a nice dinner but wouldn’t feel weird about at the grocery store the next day.
Clear base, fine glitter tips, then trace the shape with metallic gel and add a few pearls while everything’s still workable.
Sheer nude base with tiny colored pearls and gems scattered around… it’s playful without being childish, and the short almond shape keeps everything comfortable.
The different colors add visual interest, but because they’re small and spaced out, it doesn’t feel overwhelming or busy.
Light nude polish, let it cure completely, then place small dots of clear gel where you want each pearl to sit.
Champagne nails with pearl and gold detailing concentrated at the tips instead of spread everywhere… the almond shape helps the drip effect look intentional.
It’s a nice compromise between dramatic and wearable — you get the luxury effect without the maintenance nightmare.
Shimmering nude base, let it cure, then paint delicate gold outline around tips and add small pearl clusters randomly.
Sometimes the simplest version is the best version. This subtle pearl finish on short almond nails is clean enough for work but still feels special.
The chrome powder gives you that glow without being too obvious about it, and over a sheer pink base, it warms up your skin tone instead of washing it out.
Two thin coats of natural base, rub in pearl chrome powder, seal with glossy topcoat
Glittery French tips with thin gold outlines and tiny pearl accents… the almond shape gives the gold details room to follow the natural curve.
It’s fancy but not over-the-top fancy, if that makes sense. Like something you’d wear to a nice dinner but wouldn’t feel weird about at the grocery store the next day.
Clear base, fine glitter tips, then trace the shape with metallic gel and add a few pearls while everything’s still workable.
Sheer nude base with tiny colored pearls and gems scattered around… it’s playful without being childish, and the short almond shape keeps everything comfortable.
The different colors add visual interest, but because they’re small and spaced out, it doesn’t feel overwhelming or busy.
Light nude polish, let it cure completely, then place small dots of clear gel where you want each pearl to sit.
Champagne nails with pearl and gold detailing concentrated at the tips instead of spread everywhere… the almond shape helps the drip effect look intentional.
It’s a nice compromise between dramatic and wearable — you get the luxury effect without the maintenance nightmare.
Shimmering nude base, let it cure, then paint delicate gold outline around tips and add small pearl clusters randomly.
A curved row of micro pearls right at the cuticle line… it’s such a small detail but it makes the whole manicure look more expensive.
The almond shape helps the pearls follow the natural curve, and because they’re at the cuticle instead of the tips, you don’t have to worry about them constantly getting in your way.
Apply a sheer beige base, add a light pearl chrome layer, then press the tiny pearls into a thin line of clear gel at the cuticle.
Sometimes the simplest version is the best version. This subtle pearl finish on short almond nails is clean enough for work but still feels special.
The chrome powder gives you that glow without being too obvious about it, and over a sheer pink base, it warms up your skin tone instead of washing it out.
Two thin coats of natural base, rub in pearl chrome powder, seal with glossy topcoat
Glittery French tips with thin gold outlines and tiny pearl accents… the almond shape gives the gold details room to follow the natural curve.
It’s fancy but not over-the-top fancy, if that makes sense. Like something you’d wear to a nice dinner but wouldn’t feel weird about at the grocery store the next day.
Clear base, fine glitter tips, then trace the shape with metallic gel and add a few pearls while everything’s still workable.
Sheer nude base with tiny colored pearls and gems scattered around… it’s playful without being childish, and the short almond shape keeps everything comfortable.
The different colors add visual interest, but because they’re small and spaced out, it doesn’t feel overwhelming or busy.
Light nude polish, let it cure completely, then place small dots of clear gel where you want each pearl to sit.
Champagne nails with pearl and gold detailing concentrated at the tips instead of spread everywhere… the almond shape helps the drip effect look intentional.
It’s a nice compromise between dramatic and wearable — you get the luxury effect without the maintenance nightmare.
Shimmering nude base, let it cure, then paint delicate gold outline around tips and add small pearl clusters randomly.
Chrome nails with scattered pearls and crystals in the center instead of at the edges… it’s a small change that makes a huge difference in how wearable this feels.
The long almond shape keeps everything balanced, and honestly, the chrome base does most of the work here — the pearls are just the finishing touch.
Start with your silver-pearl chrome base, place the embellishments while the gel is tacky, and space them evenly so it doesn’t look random.
The ombré base on these coffin nails is pretty, but what I really like is how the pearls are placed toward the center instead of loaded at the tips.
It keeps the design from looking top-heavy, and frankly, it’s way more practical — you’re not constantly worrying about catching the embellishments on everything.
Blend your milky nude with white, cure it, then add different sized pearls while the gel is slightly sticky for better adhesion.
Pink nails with tiny pearls and pastel hearts are exactly as sweet as they sound, and on short almond nails, they don’t feel juvenile.
Start with a nude-pink base, paint the little hearts in different spots so it looks organic, then fill the gaps with micro pearls to balance everything out.
The whole design stays smooth and snag-free, which is honestly my main requirement for any nail art these days.
A curved row of micro pearls right at the cuticle line… it’s such a small detail but it makes the whole manicure look more expensive.
The almond shape helps the pearls follow the natural curve, and because they’re at the cuticle instead of the tips, you don’t have to worry about them constantly getting in your way.
Apply a sheer beige base, add a light pearl chrome layer, then press the tiny pearls into a thin line of clear gel at the cuticle.
Sometimes the simplest version is the best version. This subtle pearl finish on short almond nails is clean enough for work but still feels special.
The chrome powder gives you that glow without being too obvious about it, and over a sheer pink base, it warms up your skin tone instead of washing it out.
Two thin coats of natural base, rub in pearl chrome powder, seal with glossy topcoat
Glittery French tips with thin gold outlines and tiny pearl accents… the almond shape gives the gold details room to follow the natural curve.
It’s fancy but not over-the-top fancy, if that makes sense. Like something you’d wear to a nice dinner but wouldn’t feel weird about at the grocery store the next day.
Clear base, fine glitter tips, then trace the shape with metallic gel and add a few pearls while everything’s still workable.
Sheer nude base with tiny colored pearls and gems scattered around… it’s playful without being childish, and the short almond shape keeps everything comfortable.
The different colors add visual interest, but because they’re small and spaced out, it doesn’t feel overwhelming or busy.
Light nude polish, let it cure completely, then place small dots of clear gel where you want each pearl to sit.
Champagne nails with pearl and gold detailing concentrated at the tips instead of spread everywhere… the almond shape helps the drip effect look intentional.
It’s a nice compromise between dramatic and wearable — you get the luxury effect without the maintenance nightmare.
Shimmering nude base, let it cure, then paint delicate gold outline around tips and add small pearl clusters randomly.
I’ve been staring at pearl nail inspiration photos for weeks now, and honestly? I keep getting stuck on the same questions everyone else seems to have. The pearls look gorgeous in photos, but will they actually stay put when I’m loading the dishwasher or wrestling with Jake’s soccer cleats?
And then there’s the whole base color thing. Half the tutorials I’ve watched use completely different shades and swear theirs is “the only way” to make pearls look right.
So I did what I always do when I can’t decide — I researched everything, tried a few versions myself, and put together 28 ideas that actually work in real life.
Here’s what I figured out.
What nail shape looks best with pearl?
Short square or short squoval shapes are your safest bet if you want something that won’t drive you crazy within three days.
The pearls sit close to the nail surface, so you’re not constantly snagging them on everything. Almond nails work beautifully too, especially if you like the way small pearl accents follow that natural curve.
Coffin nails give you the most real estate for dramatic designs, but I’m going to be honest — if you’re doing school pickup and grocery runs, longer shapes with heavy pearl work get annoying fast.
Save this article for later! 👇👇
What colors look best as pearly nails?
Soft, clean base colors make pearl nails look expensive instead of craft-store DIY. Milky white, sheer pink, or a good neutral nude are your classics for a reason.
These colors let the pearl finish be the star without competing for attention. Ivory and cream work too, especially if you want something warmer than straight white.
You can absolutely use darker colors like black or navy, but keep the pearl elements simple — too much contrast can look busy instead of elegant (and trust me, I learned this the hard way).
Gold Pearl Clusters
This is exactly what I’d get for a wedding — clean white square nails that feel structured but still have that glamorous edge.
The pearls and gold beads add depth without making your hands look too busy, and honestly, the French tip base makes the whole thing feel more wearable than full-coverage glitter.
To recreate this, start with a milky base, paint clean French tips, then add the pearl clusters to just two accent nails (any more and it gets overwhelming).
The raised gel waves on these almond nails look like actual oyster shells, which is either really cool or completely over the top depending on your mood that day.
I love how the length gives you room for the texture work, but I’d be lying if I said this wouldn’t get old fast during my usual Tuesday routine of coffee with Donna and Target runs.
To get this effect, build each textured layer slowly so the waves stay smooth, then add the pearls while the gel is still tacky.
The nude and white combination feels romantic without being too sweet, and the almond shape lets you do those little heart outlines without cramming them in.
This is probably my favorite from the “cute but not trying too hard” category — it’s the kind of design that looks thoughtful but doesn’t scream for attention.
Paint the heart shapes first with a fine brush, then press micro pearls along the edges while the gel is still slightly wet so they actually stick.
Long almond nails with that frosty white base look expensive, and the curved pearl lines add just enough detail without making everything feel cluttered.
The raised gel texture gives the whole thing a soft, almost matte finish that photographs beautifully (which matters if you’re planning to post this).
Keep the base sheer, draw your swirl patterns first, then place the pearls along the curves while the gel is still workable
Chrome nails with scattered pearls and crystals in the center instead of at the edges… it’s a small change that makes a huge difference in how wearable this feels.
The long almond shape keeps everything balanced, and honestly, the chrome base does most of the work here — the pearls are just the finishing touch.
Start with your silver-pearl chrome base, place the embellishments while the gel is tacky, and space them evenly so it doesn’t look random.
The ombré base on these coffin nails is pretty, but what I really like is how the pearls are placed toward the center instead of loaded at the tips.
It keeps the design from looking top-heavy, and frankly, it’s way more practical — you’re not constantly worrying about catching the embellishments on everything.
Blend your milky nude with white, cure it, then add different sized pearls while the gel is slightly sticky for better adhesion.
Pink nails with tiny pearls and pastel hearts are exactly as sweet as they sound, and on short almond nails, they don’t feel juvenile.
Start with a nude-pink base, paint the little hearts in different spots so it looks organic, then fill the gaps with micro pearls to balance everything out.
The whole design stays smooth and snag-free, which is honestly my main requirement for any nail art these days.
A curved row of micro pearls right at the cuticle line… it’s such a small detail but it makes the whole manicure look more expensive.
The almond shape helps the pearls follow the natural curve, and because they’re at the cuticle instead of the tips, you don’t have to worry about them constantly getting in your way.
Apply a sheer beige base, add a light pearl chrome layer, then press the tiny pearls into a thin line of clear gel at the cuticle.
Sometimes the simplest version is the best version. This subtle pearl finish on short almond nails is clean enough for work but still feels special.
The chrome powder gives you that glow without being too obvious about it, and over a sheer pink base, it warms up your skin tone instead of washing it out.
Two thin coats of natural base, rub in pearl chrome powder, seal with glossy topcoat
Glittery French tips with thin gold outlines and tiny pearl accents… the almond shape gives the gold details room to follow the natural curve.
It’s fancy but not over-the-top fancy, if that makes sense. Like something you’d wear to a nice dinner but wouldn’t feel weird about at the grocery store the next day.
Clear base, fine glitter tips, then trace the shape with metallic gel and add a few pearls while everything’s still workable.
Sheer nude base with tiny colored pearls and gems scattered around… it’s playful without being childish, and the short almond shape keeps everything comfortable.
The different colors add visual interest, but because they’re small and spaced out, it doesn’t feel overwhelming or busy.
Light nude polish, let it cure completely, then place small dots of clear gel where you want each pearl to sit.
Champagne nails with pearl and gold detailing concentrated at the tips instead of spread everywhere… the almond shape helps the drip effect look intentional.
It’s a nice compromise between dramatic and wearable — you get the luxury effect without the maintenance nightmare.
Shimmering nude base, let it cure, then paint delicate gold outline around tips and add small pearl clusters randomly.
Sheer nude base with tiny colored pearls and gems scattered around… it’s playful without being childish, and the short almond shape keeps everything comfortable.
The different colors add visual interest, but because they’re small and spaced out, it doesn’t feel overwhelming or busy.
Light nude polish, let it cure completely, then place small dots of clear gel where you want each pearl to sit.
Champagne nails with pearl and gold detailing concentrated at the tips instead of spread everywhere… the almond shape helps the drip effect look intentional.
It’s a nice compromise between dramatic and wearable — you get the luxury effect without the maintenance nightmare.
Shimmering nude base, let it cure, then paint delicate gold outline around tips and add small pearl clusters randomly.
Glittery French tips with thin gold outlines and tiny pearl accents… the almond shape gives the gold details room to follow the natural curve.
It’s fancy but not over-the-top fancy, if that makes sense. Like something you’d wear to a nice dinner but wouldn’t feel weird about at the grocery store the next day.
Clear base, fine glitter tips, then trace the shape with metallic gel and add a few pearls while everything’s still workable.
Sheer nude base with tiny colored pearls and gems scattered around… it’s playful without being childish, and the short almond shape keeps everything comfortable.
The different colors add visual interest, but because they’re small and spaced out, it doesn’t feel overwhelming or busy.
Light nude polish, let it cure completely, then place small dots of clear gel where you want each pearl to sit.
Champagne nails with pearl and gold detailing concentrated at the tips instead of spread everywhere… the almond shape helps the drip effect look intentional.
It’s a nice compromise between dramatic and wearable — you get the luxury effect without the maintenance nightmare.
Shimmering nude base, let it cure, then paint delicate gold outline around tips and add small pearl clusters randomly.
Sometimes the simplest version is the best version. This subtle pearl finish on short almond nails is clean enough for work but still feels special.
The chrome powder gives you that glow without being too obvious about it, and over a sheer pink base, it warms up your skin tone instead of washing it out.
Two thin coats of natural base, rub in pearl chrome powder, seal with glossy topcoat
Glittery French tips with thin gold outlines and tiny pearl accents… the almond shape gives the gold details room to follow the natural curve.
It’s fancy but not over-the-top fancy, if that makes sense. Like something you’d wear to a nice dinner but wouldn’t feel weird about at the grocery store the next day.
Clear base, fine glitter tips, then trace the shape with metallic gel and add a few pearls while everything’s still workable.
Sheer nude base with tiny colored pearls and gems scattered around… it’s playful without being childish, and the short almond shape keeps everything comfortable.
The different colors add visual interest, but because they’re small and spaced out, it doesn’t feel overwhelming or busy.
Light nude polish, let it cure completely, then place small dots of clear gel where you want each pearl to sit.
Champagne nails with pearl and gold detailing concentrated at the tips instead of spread everywhere… the almond shape helps the drip effect look intentional.
It’s a nice compromise between dramatic and wearable — you get the luxury effect without the maintenance nightmare.
Shimmering nude base, let it cure, then paint delicate gold outline around tips and add small pearl clusters randomly.
A curved row of micro pearls right at the cuticle line… it’s such a small detail but it makes the whole manicure look more expensive.
The almond shape helps the pearls follow the natural curve, and because they’re at the cuticle instead of the tips, you don’t have to worry about them constantly getting in your way.
Apply a sheer beige base, add a light pearl chrome layer, then press the tiny pearls into a thin line of clear gel at the cuticle.
Sometimes the simplest version is the best version. This subtle pearl finish on short almond nails is clean enough for work but still feels special.
The chrome powder gives you that glow without being too obvious about it, and over a sheer pink base, it warms up your skin tone instead of washing it out.
Two thin coats of natural base, rub in pearl chrome powder, seal with glossy topcoat
Glittery French tips with thin gold outlines and tiny pearl accents… the almond shape gives the gold details room to follow the natural curve.
It’s fancy but not over-the-top fancy, if that makes sense. Like something you’d wear to a nice dinner but wouldn’t feel weird about at the grocery store the next day.
Clear base, fine glitter tips, then trace the shape with metallic gel and add a few pearls while everything’s still workable.
Sheer nude base with tiny colored pearls and gems scattered around… it’s playful without being childish, and the short almond shape keeps everything comfortable.
The different colors add visual interest, but because they’re small and spaced out, it doesn’t feel overwhelming or busy.
Light nude polish, let it cure completely, then place small dots of clear gel where you want each pearl to sit.
Champagne nails with pearl and gold detailing concentrated at the tips instead of spread everywhere… the almond shape helps the drip effect look intentional.
It’s a nice compromise between dramatic and wearable — you get the luxury effect without the maintenance nightmare.
Shimmering nude base, let it cure, then paint delicate gold outline around tips and add small pearl clusters randomly.
Chrome nails with scattered pearls and crystals in the center instead of at the edges… it’s a small change that makes a huge difference in how wearable this feels.
The long almond shape keeps everything balanced, and honestly, the chrome base does most of the work here — the pearls are just the finishing touch.
Start with your silver-pearl chrome base, place the embellishments while the gel is tacky, and space them evenly so it doesn’t look random.
The ombré base on these coffin nails is pretty, but what I really like is how the pearls are placed toward the center instead of loaded at the tips.
It keeps the design from looking top-heavy, and frankly, it’s way more practical — you’re not constantly worrying about catching the embellishments on everything.
Blend your milky nude with white, cure it, then add different sized pearls while the gel is slightly sticky for better adhesion.
Pink nails with tiny pearls and pastel hearts are exactly as sweet as they sound, and on short almond nails, they don’t feel juvenile.
Start with a nude-pink base, paint the little hearts in different spots so it looks organic, then fill the gaps with micro pearls to balance everything out.
The whole design stays smooth and snag-free, which is honestly my main requirement for any nail art these days.
A curved row of micro pearls right at the cuticle line… it’s such a small detail but it makes the whole manicure look more expensive.
The almond shape helps the pearls follow the natural curve, and because they’re at the cuticle instead of the tips, you don’t have to worry about them constantly getting in your way.
Apply a sheer beige base, add a light pearl chrome layer, then press the tiny pearls into a thin line of clear gel at the cuticle.
Sometimes the simplest version is the best version. This subtle pearl finish on short almond nails is clean enough for work but still feels special.
The chrome powder gives you that glow without being too obvious about it, and over a sheer pink base, it warms up your skin tone instead of washing it out.
Two thin coats of natural base, rub in pearl chrome powder, seal with glossy topcoat
Glittery French tips with thin gold outlines and tiny pearl accents… the almond shape gives the gold details room to follow the natural curve.
It’s fancy but not over-the-top fancy, if that makes sense. Like something you’d wear to a nice dinner but wouldn’t feel weird about at the grocery store the next day.
Clear base, fine glitter tips, then trace the shape with metallic gel and add a few pearls while everything’s still workable.
Sheer nude base with tiny colored pearls and gems scattered around… it’s playful without being childish, and the short almond shape keeps everything comfortable.
The different colors add visual interest, but because they’re small and spaced out, it doesn’t feel overwhelming or busy.
Light nude polish, let it cure completely, then place small dots of clear gel where you want each pearl to sit.
Champagne nails with pearl and gold detailing concentrated at the tips instead of spread everywhere… the almond shape helps the drip effect look intentional.
It’s a nice compromise between dramatic and wearable — you get the luxury effect without the maintenance nightmare.
Shimmering nude base, let it cure, then paint delicate gold outline around tips and add small pearl clusters randomly.
I’ve been staring at pearl nail inspiration photos for weeks now, and honestly? I keep getting stuck on the same questions everyone else seems to have. The pearls look gorgeous in photos, but will they actually stay put when I’m loading the dishwasher or wrestling with Jake’s soccer cleats?
And then there’s the whole base color thing. Half the tutorials I’ve watched use completely different shades and swear theirs is “the only way” to make pearls look right.
So I did what I always do when I can’t decide — I researched everything, tried a few versions myself, and put together 28 ideas that actually work in real life.
Here’s what I figured out.
What nail shape looks best with pearl?
Short square or short squoval shapes are your safest bet if you want something that won’t drive you crazy within three days.
The pearls sit close to the nail surface, so you’re not constantly snagging them on everything. Almond nails work beautifully too, especially if you like the way small pearl accents follow that natural curve.
Coffin nails give you the most real estate for dramatic designs, but I’m going to be honest — if you’re doing school pickup and grocery runs, longer shapes with heavy pearl work get annoying fast.
Save this article for later! 👇👇
What colors look best as pearly nails?
Soft, clean base colors make pearl nails look expensive instead of craft-store DIY. Milky white, sheer pink, or a good neutral nude are your classics for a reason.
These colors let the pearl finish be the star without competing for attention. Ivory and cream work too, especially if you want something warmer than straight white.
You can absolutely use darker colors like black or navy, but keep the pearl elements simple — too much contrast can look busy instead of elegant (and trust me, I learned this the hard way).
Gold Pearl Clusters
This is exactly what I’d get for a wedding — clean white square nails that feel structured but still have that glamorous edge.
The pearls and gold beads add depth without making your hands look too busy, and honestly, the French tip base makes the whole thing feel more wearable than full-coverage glitter.
To recreate this, start with a milky base, paint clean French tips, then add the pearl clusters to just two accent nails (any more and it gets overwhelming).
The raised gel waves on these almond nails look like actual oyster shells, which is either really cool or completely over the top depending on your mood that day.
I love how the length gives you room for the texture work, but I’d be lying if I said this wouldn’t get old fast during my usual Tuesday routine of coffee with Donna and Target runs.
To get this effect, build each textured layer slowly so the waves stay smooth, then add the pearls while the gel is still tacky.
The nude and white combination feels romantic without being too sweet, and the almond shape lets you do those little heart outlines without cramming them in.
This is probably my favorite from the “cute but not trying too hard” category — it’s the kind of design that looks thoughtful but doesn’t scream for attention.
Paint the heart shapes first with a fine brush, then press micro pearls along the edges while the gel is still slightly wet so they actually stick.
Long almond nails with that frosty white base look expensive, and the curved pearl lines add just enough detail without making everything feel cluttered.
The raised gel texture gives the whole thing a soft, almost matte finish that photographs beautifully (which matters if you’re planning to post this).
Keep the base sheer, draw your swirl patterns first, then place the pearls along the curves while the gel is still workable
Chrome nails with scattered pearls and crystals in the center instead of at the edges… it’s a small change that makes a huge difference in how wearable this feels.
The long almond shape keeps everything balanced, and honestly, the chrome base does most of the work here — the pearls are just the finishing touch.
Start with your silver-pearl chrome base, place the embellishments while the gel is tacky, and space them evenly so it doesn’t look random.
The ombré base on these coffin nails is pretty, but what I really like is how the pearls are placed toward the center instead of loaded at the tips.
It keeps the design from looking top-heavy, and frankly, it’s way more practical — you’re not constantly worrying about catching the embellishments on everything.
Blend your milky nude with white, cure it, then add different sized pearls while the gel is slightly sticky for better adhesion.
Pink nails with tiny pearls and pastel hearts are exactly as sweet as they sound, and on short almond nails, they don’t feel juvenile.
Start with a nude-pink base, paint the little hearts in different spots so it looks organic, then fill the gaps with micro pearls to balance everything out.
The whole design stays smooth and snag-free, which is honestly my main requirement for any nail art these days.
A curved row of micro pearls right at the cuticle line… it’s such a small detail but it makes the whole manicure look more expensive.
The almond shape helps the pearls follow the natural curve, and because they’re at the cuticle instead of the tips, you don’t have to worry about them constantly getting in your way.
Apply a sheer beige base, add a light pearl chrome layer, then press the tiny pearls into a thin line of clear gel at the cuticle.
Sometimes the simplest version is the best version. This subtle pearl finish on short almond nails is clean enough for work but still feels special.
The chrome powder gives you that glow without being too obvious about it, and over a sheer pink base, it warms up your skin tone instead of washing it out.
Two thin coats of natural base, rub in pearl chrome powder, seal with glossy topcoat
Glittery French tips with thin gold outlines and tiny pearl accents… the almond shape gives the gold details room to follow the natural curve.
It’s fancy but not over-the-top fancy, if that makes sense. Like something you’d wear to a nice dinner but wouldn’t feel weird about at the grocery store the next day.
Clear base, fine glitter tips, then trace the shape with metallic gel and add a few pearls while everything’s still workable.
Sheer nude base with tiny colored pearls and gems scattered around… it’s playful without being childish, and the short almond shape keeps everything comfortable.
The different colors add visual interest, but because they’re small and spaced out, it doesn’t feel overwhelming or busy.
Light nude polish, let it cure completely, then place small dots of clear gel where you want each pearl to sit.
Champagne nails with pearl and gold detailing concentrated at the tips instead of spread everywhere… the almond shape helps the drip effect look intentional.
It’s a nice compromise between dramatic and wearable — you get the luxury effect without the maintenance nightmare.
Shimmering nude base, let it cure, then paint delicate gold outline around tips and add small pearl clusters randomly.
Glittery French tips with thin gold outlines and tiny pearl accents… the almond shape gives the gold details room to follow the natural curve.
It’s fancy but not over-the-top fancy, if that makes sense. Like something you’d wear to a nice dinner but wouldn’t feel weird about at the grocery store the next day.
Clear base, fine glitter tips, then trace the shape with metallic gel and add a few pearls while everything’s still workable.
Sheer nude base with tiny colored pearls and gems scattered around… it’s playful without being childish, and the short almond shape keeps everything comfortable.
The different colors add visual interest, but because they’re small and spaced out, it doesn’t feel overwhelming or busy.
Light nude polish, let it cure completely, then place small dots of clear gel where you want each pearl to sit.
Champagne nails with pearl and gold detailing concentrated at the tips instead of spread everywhere… the almond shape helps the drip effect look intentional.
It’s a nice compromise between dramatic and wearable — you get the luxury effect without the maintenance nightmare.
Shimmering nude base, let it cure, then paint delicate gold outline around tips and add small pearl clusters randomly.
Sometimes the simplest version is the best version. This subtle pearl finish on short almond nails is clean enough for work but still feels special.
The chrome powder gives you that glow without being too obvious about it, and over a sheer pink base, it warms up your skin tone instead of washing it out.
Two thin coats of natural base, rub in pearl chrome powder, seal with glossy topcoat
Glittery French tips with thin gold outlines and tiny pearl accents… the almond shape gives the gold details room to follow the natural curve.
It’s fancy but not over-the-top fancy, if that makes sense. Like something you’d wear to a nice dinner but wouldn’t feel weird about at the grocery store the next day.
Clear base, fine glitter tips, then trace the shape with metallic gel and add a few pearls while everything’s still workable.
Sheer nude base with tiny colored pearls and gems scattered around… it’s playful without being childish, and the short almond shape keeps everything comfortable.
The different colors add visual interest, but because they’re small and spaced out, it doesn’t feel overwhelming or busy.
Light nude polish, let it cure completely, then place small dots of clear gel where you want each pearl to sit.
Champagne nails with pearl and gold detailing concentrated at the tips instead of spread everywhere… the almond shape helps the drip effect look intentional.
It’s a nice compromise between dramatic and wearable — you get the luxury effect without the maintenance nightmare.
Shimmering nude base, let it cure, then paint delicate gold outline around tips and add small pearl clusters randomly.
A curved row of micro pearls right at the cuticle line… it’s such a small detail but it makes the whole manicure look more expensive.
The almond shape helps the pearls follow the natural curve, and because they’re at the cuticle instead of the tips, you don’t have to worry about them constantly getting in your way.
Apply a sheer beige base, add a light pearl chrome layer, then press the tiny pearls into a thin line of clear gel at the cuticle.
Sometimes the simplest version is the best version. This subtle pearl finish on short almond nails is clean enough for work but still feels special.
The chrome powder gives you that glow without being too obvious about it, and over a sheer pink base, it warms up your skin tone instead of washing it out.
Two thin coats of natural base, rub in pearl chrome powder, seal with glossy topcoat
Glittery French tips with thin gold outlines and tiny pearl accents… the almond shape gives the gold details room to follow the natural curve.
It’s fancy but not over-the-top fancy, if that makes sense. Like something you’d wear to a nice dinner but wouldn’t feel weird about at the grocery store the next day.
Clear base, fine glitter tips, then trace the shape with metallic gel and add a few pearls while everything’s still workable.
Sheer nude base with tiny colored pearls and gems scattered around… it’s playful without being childish, and the short almond shape keeps everything comfortable.
The different colors add visual interest, but because they’re small and spaced out, it doesn’t feel overwhelming or busy.
Light nude polish, let it cure completely, then place small dots of clear gel where you want each pearl to sit.
Champagne nails with pearl and gold detailing concentrated at the tips instead of spread everywhere… the almond shape helps the drip effect look intentional.
It’s a nice compromise between dramatic and wearable — you get the luxury effect without the maintenance nightmare.
Shimmering nude base, let it cure, then paint delicate gold outline around tips and add small pearl clusters randomly.
Chrome nails with scattered pearls and crystals in the center instead of at the edges… it’s a small change that makes a huge difference in how wearable this feels.
The long almond shape keeps everything balanced, and honestly, the chrome base does most of the work here — the pearls are just the finishing touch.
Start with your silver-pearl chrome base, place the embellishments while the gel is tacky, and space them evenly so it doesn’t look random.
The ombré base on these coffin nails is pretty, but what I really like is how the pearls are placed toward the center instead of loaded at the tips.
It keeps the design from looking top-heavy, and frankly, it’s way more practical — you’re not constantly worrying about catching the embellishments on everything.
Blend your milky nude with white, cure it, then add different sized pearls while the gel is slightly sticky for better adhesion.
Pink nails with tiny pearls and pastel hearts are exactly as sweet as they sound, and on short almond nails, they don’t feel juvenile.
Start with a nude-pink base, paint the little hearts in different spots so it looks organic, then fill the gaps with micro pearls to balance everything out.
The whole design stays smooth and snag-free, which is honestly my main requirement for any nail art these days.
A curved row of micro pearls right at the cuticle line… it’s such a small detail but it makes the whole manicure look more expensive.
The almond shape helps the pearls follow the natural curve, and because they’re at the cuticle instead of the tips, you don’t have to worry about them constantly getting in your way.
Apply a sheer beige base, add a light pearl chrome layer, then press the tiny pearls into a thin line of clear gel at the cuticle.
Sometimes the simplest version is the best version. This subtle pearl finish on short almond nails is clean enough for work but still feels special.
The chrome powder gives you that glow without being too obvious about it, and over a sheer pink base, it warms up your skin tone instead of washing it out.
Two thin coats of natural base, rub in pearl chrome powder, seal with glossy topcoat
Glittery French tips with thin gold outlines and tiny pearl accents… the almond shape gives the gold details room to follow the natural curve.
It’s fancy but not over-the-top fancy, if that makes sense. Like something you’d wear to a nice dinner but wouldn’t feel weird about at the grocery store the next day.
Clear base, fine glitter tips, then trace the shape with metallic gel and add a few pearls while everything’s still workable.
Sheer nude base with tiny colored pearls and gems scattered around… it’s playful without being childish, and the short almond shape keeps everything comfortable.
The different colors add visual interest, but because they’re small and spaced out, it doesn’t feel overwhelming or busy.
Light nude polish, let it cure completely, then place small dots of clear gel where you want each pearl to sit.
Champagne nails with pearl and gold detailing concentrated at the tips instead of spread everywhere… the almond shape helps the drip effect look intentional.
It’s a nice compromise between dramatic and wearable — you get the luxury effect without the maintenance nightmare.
Shimmering nude base, let it cure, then paint delicate gold outline around tips and add small pearl clusters randomly.
I’ve been staring at pearl nail inspiration photos for weeks now, and honestly? I keep getting stuck on the same questions everyone else seems to have. The pearls look gorgeous in photos, but will they actually stay put when I’m loading the dishwasher or wrestling with Jake’s soccer cleats?
And then there’s the whole base color thing. Half the tutorials I’ve watched use completely different shades and swear theirs is “the only way” to make pearls look right.
So I did what I always do when I can’t decide — I researched everything, tried a few versions myself, and put together 28 ideas that actually work in real life.
Here’s what I figured out.
What nail shape looks best with pearl?
Short square or short squoval shapes are your safest bet if you want something that won’t drive you crazy within three days.
The pearls sit close to the nail surface, so you’re not constantly snagging them on everything. Almond nails work beautifully too, especially if you like the way small pearl accents follow that natural curve.
Coffin nails give you the most real estate for dramatic designs, but I’m going to be honest — if you’re doing school pickup and grocery runs, longer shapes with heavy pearl work get annoying fast.
Save this article for later! 👇👇
What colors look best as pearly nails?
Soft, clean base colors make pearl nails look expensive instead of craft-store DIY. Milky white, sheer pink, or a good neutral nude are your classics for a reason.
These colors let the pearl finish be the star without competing for attention. Ivory and cream work too, especially if you want something warmer than straight white.
You can absolutely use darker colors like black or navy, but keep the pearl elements simple — too much contrast can look busy instead of elegant (and trust me, I learned this the hard way).
Gold Pearl Clusters
This is exactly what I’d get for a wedding — clean white square nails that feel structured but still have that glamorous edge.
The pearls and gold beads add depth without making your hands look too busy, and honestly, the French tip base makes the whole thing feel more wearable than full-coverage glitter.
To recreate this, start with a milky base, paint clean French tips, then add the pearl clusters to just two accent nails (any more and it gets overwhelming).
The raised gel waves on these almond nails look like actual oyster shells, which is either really cool or completely over the top depending on your mood that day.
I love how the length gives you room for the texture work, but I’d be lying if I said this wouldn’t get old fast during my usual Tuesday routine of coffee with Donna and Target runs.
To get this effect, build each textured layer slowly so the waves stay smooth, then add the pearls while the gel is still tacky.
The nude and white combination feels romantic without being too sweet, and the almond shape lets you do those little heart outlines without cramming them in.
This is probably my favorite from the “cute but not trying too hard” category — it’s the kind of design that looks thoughtful but doesn’t scream for attention.
Paint the heart shapes first with a fine brush, then press micro pearls along the edges while the gel is still slightly wet so they actually stick.
Long almond nails with that frosty white base look expensive, and the curved pearl lines add just enough detail without making everything feel cluttered.
The raised gel texture gives the whole thing a soft, almost matte finish that photographs beautifully (which matters if you’re planning to post this).
Keep the base sheer, draw your swirl patterns first, then place the pearls along the curves while the gel is still workable
Chrome nails with scattered pearls and crystals in the center instead of at the edges… it’s a small change that makes a huge difference in how wearable this feels.
The long almond shape keeps everything balanced, and honestly, the chrome base does most of the work here — the pearls are just the finishing touch.
Start with your silver-pearl chrome base, place the embellishments while the gel is tacky, and space them evenly so it doesn’t look random.
The ombré base on these coffin nails is pretty, but what I really like is how the pearls are placed toward the center instead of loaded at the tips.
It keeps the design from looking top-heavy, and frankly, it’s way more practical — you’re not constantly worrying about catching the embellishments on everything.
Blend your milky nude with white, cure it, then add different sized pearls while the gel is slightly sticky for better adhesion.
Pink nails with tiny pearls and pastel hearts are exactly as sweet as they sound, and on short almond nails, they don’t feel juvenile.
Start with a nude-pink base, paint the little hearts in different spots so it looks organic, then fill the gaps with micro pearls to balance everything out.
The whole design stays smooth and snag-free, which is honestly my main requirement for any nail art these days.
A curved row of micro pearls right at the cuticle line… it’s such a small detail but it makes the whole manicure look more expensive.
The almond shape helps the pearls follow the natural curve, and because they’re at the cuticle instead of the tips, you don’t have to worry about them constantly getting in your way.
Apply a sheer beige base, add a light pearl chrome layer, then press the tiny pearls into a thin line of clear gel at the cuticle.
Sometimes the simplest version is the best version. This subtle pearl finish on short almond nails is clean enough for work but still feels special.
The chrome powder gives you that glow without being too obvious about it, and over a sheer pink base, it warms up your skin tone instead of washing it out.
Two thin coats of natural base, rub in pearl chrome powder, seal with glossy topcoat
Glittery French tips with thin gold outlines and tiny pearl accents… the almond shape gives the gold details room to follow the natural curve.
It’s fancy but not over-the-top fancy, if that makes sense. Like something you’d wear to a nice dinner but wouldn’t feel weird about at the grocery store the next day.
Clear base, fine glitter tips, then trace the shape with metallic gel and add a few pearls while everything’s still workable.
Sheer nude base with tiny colored pearls and gems scattered around… it’s playful without being childish, and the short almond shape keeps everything comfortable.
The different colors add visual interest, but because they’re small and spaced out, it doesn’t feel overwhelming or busy.
Light nude polish, let it cure completely, then place small dots of clear gel where you want each pearl to sit.
Champagne nails with pearl and gold detailing concentrated at the tips instead of spread everywhere… the almond shape helps the drip effect look intentional.
It’s a nice compromise between dramatic and wearable — you get the luxury effect without the maintenance nightmare.
Shimmering nude base, let it cure, then paint delicate gold outline around tips and add small pearl clusters randomly.
Sheer nude base with tiny colored pearls and gems scattered around… it’s playful without being childish, and the short almond shape keeps everything comfortable.
The different colors add visual interest, but because they’re small and spaced out, it doesn’t feel overwhelming or busy.
Light nude polish, let it cure completely, then place small dots of clear gel where you want each pearl to sit.
Champagne nails with pearl and gold detailing concentrated at the tips instead of spread everywhere… the almond shape helps the drip effect look intentional.
It’s a nice compromise between dramatic and wearable — you get the luxury effect without the maintenance nightmare.
Shimmering nude base, let it cure, then paint delicate gold outline around tips and add small pearl clusters randomly.
Glittery French tips with thin gold outlines and tiny pearl accents… the almond shape gives the gold details room to follow the natural curve.
It’s fancy but not over-the-top fancy, if that makes sense. Like something you’d wear to a nice dinner but wouldn’t feel weird about at the grocery store the next day.
Clear base, fine glitter tips, then trace the shape with metallic gel and add a few pearls while everything’s still workable.
Sheer nude base with tiny colored pearls and gems scattered around… it’s playful without being childish, and the short almond shape keeps everything comfortable.
The different colors add visual interest, but because they’re small and spaced out, it doesn’t feel overwhelming or busy.
Light nude polish, let it cure completely, then place small dots of clear gel where you want each pearl to sit.
Champagne nails with pearl and gold detailing concentrated at the tips instead of spread everywhere… the almond shape helps the drip effect look intentional.
It’s a nice compromise between dramatic and wearable — you get the luxury effect without the maintenance nightmare.
Shimmering nude base, let it cure, then paint delicate gold outline around tips and add small pearl clusters randomly.
Sometimes the simplest version is the best version. This subtle pearl finish on short almond nails is clean enough for work but still feels special.
The chrome powder gives you that glow without being too obvious about it, and over a sheer pink base, it warms up your skin tone instead of washing it out.
Two thin coats of natural base, rub in pearl chrome powder, seal with glossy topcoat
Glittery French tips with thin gold outlines and tiny pearl accents… the almond shape gives the gold details room to follow the natural curve.
It’s fancy but not over-the-top fancy, if that makes sense. Like something you’d wear to a nice dinner but wouldn’t feel weird about at the grocery store the next day.
Clear base, fine glitter tips, then trace the shape with metallic gel and add a few pearls while everything’s still workable.
Sheer nude base with tiny colored pearls and gems scattered around… it’s playful without being childish, and the short almond shape keeps everything comfortable.
The different colors add visual interest, but because they’re small and spaced out, it doesn’t feel overwhelming or busy.
Light nude polish, let it cure completely, then place small dots of clear gel where you want each pearl to sit.
Champagne nails with pearl and gold detailing concentrated at the tips instead of spread everywhere… the almond shape helps the drip effect look intentional.
It’s a nice compromise between dramatic and wearable — you get the luxury effect without the maintenance nightmare.
Shimmering nude base, let it cure, then paint delicate gold outline around tips and add small pearl clusters randomly.
A curved row of micro pearls right at the cuticle line… it’s such a small detail but it makes the whole manicure look more expensive.
The almond shape helps the pearls follow the natural curve, and because they’re at the cuticle instead of the tips, you don’t have to worry about them constantly getting in your way.
Apply a sheer beige base, add a light pearl chrome layer, then press the tiny pearls into a thin line of clear gel at the cuticle.
Sometimes the simplest version is the best version. This subtle pearl finish on short almond nails is clean enough for work but still feels special.
The chrome powder gives you that glow without being too obvious about it, and over a sheer pink base, it warms up your skin tone instead of washing it out.
Two thin coats of natural base, rub in pearl chrome powder, seal with glossy topcoat
Glittery French tips with thin gold outlines and tiny pearl accents… the almond shape gives the gold details room to follow the natural curve.
It’s fancy but not over-the-top fancy, if that makes sense. Like something you’d wear to a nice dinner but wouldn’t feel weird about at the grocery store the next day.
Clear base, fine glitter tips, then trace the shape with metallic gel and add a few pearls while everything’s still workable.
Sheer nude base with tiny colored pearls and gems scattered around… it’s playful without being childish, and the short almond shape keeps everything comfortable.
The different colors add visual interest, but because they’re small and spaced out, it doesn’t feel overwhelming or busy.
Light nude polish, let it cure completely, then place small dots of clear gel where you want each pearl to sit.
Champagne nails with pearl and gold detailing concentrated at the tips instead of spread everywhere… the almond shape helps the drip effect look intentional.
It’s a nice compromise between dramatic and wearable — you get the luxury effect without the maintenance nightmare.
Shimmering nude base, let it cure, then paint delicate gold outline around tips and add small pearl clusters randomly.
Chrome nails with scattered pearls and crystals in the center instead of at the edges… it’s a small change that makes a huge difference in how wearable this feels.
The long almond shape keeps everything balanced, and honestly, the chrome base does most of the work here — the pearls are just the finishing touch.
Start with your silver-pearl chrome base, place the embellishments while the gel is tacky, and space them evenly so it doesn’t look random.
The ombré base on these coffin nails is pretty, but what I really like is how the pearls are placed toward the center instead of loaded at the tips.
It keeps the design from looking top-heavy, and frankly, it’s way more practical — you’re not constantly worrying about catching the embellishments on everything.
Blend your milky nude with white, cure it, then add different sized pearls while the gel is slightly sticky for better adhesion.
Pink nails with tiny pearls and pastel hearts are exactly as sweet as they sound, and on short almond nails, they don’t feel juvenile.
Start with a nude-pink base, paint the little hearts in different spots so it looks organic, then fill the gaps with micro pearls to balance everything out.
The whole design stays smooth and snag-free, which is honestly my main requirement for any nail art these days.
A curved row of micro pearls right at the cuticle line… it’s such a small detail but it makes the whole manicure look more expensive.
The almond shape helps the pearls follow the natural curve, and because they’re at the cuticle instead of the tips, you don’t have to worry about them constantly getting in your way.
Apply a sheer beige base, add a light pearl chrome layer, then press the tiny pearls into a thin line of clear gel at the cuticle.
Sometimes the simplest version is the best version. This subtle pearl finish on short almond nails is clean enough for work but still feels special.
The chrome powder gives you that glow without being too obvious about it, and over a sheer pink base, it warms up your skin tone instead of washing it out.
Two thin coats of natural base, rub in pearl chrome powder, seal with glossy topcoat
Glittery French tips with thin gold outlines and tiny pearl accents… the almond shape gives the gold details room to follow the natural curve.
It’s fancy but not over-the-top fancy, if that makes sense. Like something you’d wear to a nice dinner but wouldn’t feel weird about at the grocery store the next day.
Clear base, fine glitter tips, then trace the shape with metallic gel and add a few pearls while everything’s still workable.
Sheer nude base with tiny colored pearls and gems scattered around… it’s playful without being childish, and the short almond shape keeps everything comfortable.
The different colors add visual interest, but because they’re small and spaced out, it doesn’t feel overwhelming or busy.
Light nude polish, let it cure completely, then place small dots of clear gel where you want each pearl to sit.
Champagne nails with pearl and gold detailing concentrated at the tips instead of spread everywhere… the almond shape helps the drip effect look intentional.
It’s a nice compromise between dramatic and wearable — you get the luxury effect without the maintenance nightmare.
Shimmering nude base, let it cure, then paint delicate gold outline around tips and add small pearl clusters randomly.
I’ve been staring at pearl nail inspiration photos for weeks now, and honestly? I keep getting stuck on the same questions everyone else seems to have. The pearls look gorgeous in photos, but will they actually stay put when I’m loading the dishwasher or wrestling with Jake’s soccer cleats?
And then there’s the whole base color thing. Half the tutorials I’ve watched use completely different shades and swear theirs is “the only way” to make pearls look right.
So I did what I always do when I can’t decide — I researched everything, tried a few versions myself, and put together 28 ideas that actually work in real life.
Here’s what I figured out.
What nail shape looks best with pearl?
Short square or short squoval shapes are your safest bet if you want something that won’t drive you crazy within three days.
The pearls sit close to the nail surface, so you’re not constantly snagging them on everything. Almond nails work beautifully too, especially if you like the way small pearl accents follow that natural curve.
Coffin nails give you the most real estate for dramatic designs, but I’m going to be honest — if you’re doing school pickup and grocery runs, longer shapes with heavy pearl work get annoying fast.
Save this article for later! 👇👇
What colors look best as pearly nails?
Soft, clean base colors make pearl nails look expensive instead of craft-store DIY. Milky white, sheer pink, or a good neutral nude are your classics for a reason.
These colors let the pearl finish be the star without competing for attention. Ivory and cream work too, especially if you want something warmer than straight white.
You can absolutely use darker colors like black or navy, but keep the pearl elements simple — too much contrast can look busy instead of elegant (and trust me, I learned this the hard way).
Gold Pearl Clusters
This is exactly what I’d get for a wedding — clean white square nails that feel structured but still have that glamorous edge.
The pearls and gold beads add depth without making your hands look too busy, and honestly, the French tip base makes the whole thing feel more wearable than full-coverage glitter.
To recreate this, start with a milky base, paint clean French tips, then add the pearl clusters to just two accent nails (any more and it gets overwhelming).
The raised gel waves on these almond nails look like actual oyster shells, which is either really cool or completely over the top depending on your mood that day.
I love how the length gives you room for the texture work, but I’d be lying if I said this wouldn’t get old fast during my usual Tuesday routine of coffee with Donna and Target runs.
To get this effect, build each textured layer slowly so the waves stay smooth, then add the pearls while the gel is still tacky.
The nude and white combination feels romantic without being too sweet, and the almond shape lets you do those little heart outlines without cramming them in.
This is probably my favorite from the “cute but not trying too hard” category — it’s the kind of design that looks thoughtful but doesn’t scream for attention.
Paint the heart shapes first with a fine brush, then press micro pearls along the edges while the gel is still slightly wet so they actually stick.
Long almond nails with that frosty white base look expensive, and the curved pearl lines add just enough detail without making everything feel cluttered.
The raised gel texture gives the whole thing a soft, almost matte finish that photographs beautifully (which matters if you’re planning to post this).
Keep the base sheer, draw your swirl patterns first, then place the pearls along the curves while the gel is still workable
Chrome nails with scattered pearls and crystals in the center instead of at the edges… it’s a small change that makes a huge difference in how wearable this feels.
The long almond shape keeps everything balanced, and honestly, the chrome base does most of the work here — the pearls are just the finishing touch.
Start with your silver-pearl chrome base, place the embellishments while the gel is tacky, and space them evenly so it doesn’t look random.
The ombré base on these coffin nails is pretty, but what I really like is how the pearls are placed toward the center instead of loaded at the tips.
It keeps the design from looking top-heavy, and frankly, it’s way more practical — you’re not constantly worrying about catching the embellishments on everything.
Blend your milky nude with white, cure it, then add different sized pearls while the gel is slightly sticky for better adhesion.
Pink nails with tiny pearls and pastel hearts are exactly as sweet as they sound, and on short almond nails, they don’t feel juvenile.
Start with a nude-pink base, paint the little hearts in different spots so it looks organic, then fill the gaps with micro pearls to balance everything out.
The whole design stays smooth and snag-free, which is honestly my main requirement for any nail art these days.
A curved row of micro pearls right at the cuticle line… it’s such a small detail but it makes the whole manicure look more expensive.
The almond shape helps the pearls follow the natural curve, and because they’re at the cuticle instead of the tips, you don’t have to worry about them constantly getting in your way.
Apply a sheer beige base, add a light pearl chrome layer, then press the tiny pearls into a thin line of clear gel at the cuticle.
Sometimes the simplest version is the best version. This subtle pearl finish on short almond nails is clean enough for work but still feels special.
The chrome powder gives you that glow without being too obvious about it, and over a sheer pink base, it warms up your skin tone instead of washing it out.
Two thin coats of natural base, rub in pearl chrome powder, seal with glossy topcoat
Glittery French tips with thin gold outlines and tiny pearl accents… the almond shape gives the gold details room to follow the natural curve.
It’s fancy but not over-the-top fancy, if that makes sense. Like something you’d wear to a nice dinner but wouldn’t feel weird about at the grocery store the next day.
Clear base, fine glitter tips, then trace the shape with metallic gel and add a few pearls while everything’s still workable.
Sheer nude base with tiny colored pearls and gems scattered around… it’s playful without being childish, and the short almond shape keeps everything comfortable.
The different colors add visual interest, but because they’re small and spaced out, it doesn’t feel overwhelming or busy.
Light nude polish, let it cure completely, then place small dots of clear gel where you want each pearl to sit.
Champagne nails with pearl and gold detailing concentrated at the tips instead of spread everywhere… the almond shape helps the drip effect look intentional.
It’s a nice compromise between dramatic and wearable — you get the luxury effect without the maintenance nightmare.
Shimmering nude base, let it cure, then paint delicate gold outline around tips and add small pearl clusters randomly.
Champagne nails with pearl and gold detailing concentrated at the tips instead of spread everywhere… the almond shape helps the drip effect look intentional.
It’s a nice compromise between dramatic and wearable — you get the luxury effect without the maintenance nightmare.
Shimmering nude base, let it cure, then paint delicate gold outline around tips and add small pearl clusters randomly.
Sheer nude base with tiny colored pearls and gems scattered around… it’s playful without being childish, and the short almond shape keeps everything comfortable.
The different colors add visual interest, but because they’re small and spaced out, it doesn’t feel overwhelming or busy.
Light nude polish, let it cure completely, then place small dots of clear gel where you want each pearl to sit.
Champagne nails with pearl and gold detailing concentrated at the tips instead of spread everywhere… the almond shape helps the drip effect look intentional.
It’s a nice compromise between dramatic and wearable — you get the luxury effect without the maintenance nightmare.
Shimmering nude base, let it cure, then paint delicate gold outline around tips and add small pearl clusters randomly.
Glittery French tips with thin gold outlines and tiny pearl accents… the almond shape gives the gold details room to follow the natural curve.
It’s fancy but not over-the-top fancy, if that makes sense. Like something you’d wear to a nice dinner but wouldn’t feel weird about at the grocery store the next day.
Clear base, fine glitter tips, then trace the shape with metallic gel and add a few pearls while everything’s still workable.
Sheer nude base with tiny colored pearls and gems scattered around… it’s playful without being childish, and the short almond shape keeps everything comfortable.
The different colors add visual interest, but because they’re small and spaced out, it doesn’t feel overwhelming or busy.
Light nude polish, let it cure completely, then place small dots of clear gel where you want each pearl to sit.
Champagne nails with pearl and gold detailing concentrated at the tips instead of spread everywhere… the almond shape helps the drip effect look intentional.
It’s a nice compromise between dramatic and wearable — you get the luxury effect without the maintenance nightmare.
Shimmering nude base, let it cure, then paint delicate gold outline around tips and add small pearl clusters randomly.
Sometimes the simplest version is the best version. This subtle pearl finish on short almond nails is clean enough for work but still feels special.
The chrome powder gives you that glow without being too obvious about it, and over a sheer pink base, it warms up your skin tone instead of washing it out.
Two thin coats of natural base, rub in pearl chrome powder, seal with glossy topcoat
Glittery French tips with thin gold outlines and tiny pearl accents… the almond shape gives the gold details room to follow the natural curve.
It’s fancy but not over-the-top fancy, if that makes sense. Like something you’d wear to a nice dinner but wouldn’t feel weird about at the grocery store the next day.
Clear base, fine glitter tips, then trace the shape with metallic gel and add a few pearls while everything’s still workable.
Sheer nude base with tiny colored pearls and gems scattered around… it’s playful without being childish, and the short almond shape keeps everything comfortable.
The different colors add visual interest, but because they’re small and spaced out, it doesn’t feel overwhelming or busy.
Light nude polish, let it cure completely, then place small dots of clear gel where you want each pearl to sit.
Champagne nails with pearl and gold detailing concentrated at the tips instead of spread everywhere… the almond shape helps the drip effect look intentional.
It’s a nice compromise between dramatic and wearable — you get the luxury effect without the maintenance nightmare.
Shimmering nude base, let it cure, then paint delicate gold outline around tips and add small pearl clusters randomly.
A curved row of micro pearls right at the cuticle line… it’s such a small detail but it makes the whole manicure look more expensive.
The almond shape helps the pearls follow the natural curve, and because they’re at the cuticle instead of the tips, you don’t have to worry about them constantly getting in your way.
Apply a sheer beige base, add a light pearl chrome layer, then press the tiny pearls into a thin line of clear gel at the cuticle.
Sometimes the simplest version is the best version. This subtle pearl finish on short almond nails is clean enough for work but still feels special.
The chrome powder gives you that glow without being too obvious about it, and over a sheer pink base, it warms up your skin tone instead of washing it out.
Two thin coats of natural base, rub in pearl chrome powder, seal with glossy topcoat
Glittery French tips with thin gold outlines and tiny pearl accents… the almond shape gives the gold details room to follow the natural curve.
It’s fancy but not over-the-top fancy, if that makes sense. Like something you’d wear to a nice dinner but wouldn’t feel weird about at the grocery store the next day.
Clear base, fine glitter tips, then trace the shape with metallic gel and add a few pearls while everything’s still workable.
Sheer nude base with tiny colored pearls and gems scattered around… it’s playful without being childish, and the short almond shape keeps everything comfortable.
The different colors add visual interest, but because they’re small and spaced out, it doesn’t feel overwhelming or busy.
Light nude polish, let it cure completely, then place small dots of clear gel where you want each pearl to sit.
Champagne nails with pearl and gold detailing concentrated at the tips instead of spread everywhere… the almond shape helps the drip effect look intentional.
It’s a nice compromise between dramatic and wearable — you get the luxury effect without the maintenance nightmare.
Shimmering nude base, let it cure, then paint delicate gold outline around tips and add small pearl clusters randomly.
Chrome nails with scattered pearls and crystals in the center instead of at the edges… it’s a small change that makes a huge difference in how wearable this feels.
The long almond shape keeps everything balanced, and honestly, the chrome base does most of the work here — the pearls are just the finishing touch.
Start with your silver-pearl chrome base, place the embellishments while the gel is tacky, and space them evenly so it doesn’t look random.
The ombré base on these coffin nails is pretty, but what I really like is how the pearls are placed toward the center instead of loaded at the tips.
It keeps the design from looking top-heavy, and frankly, it’s way more practical — you’re not constantly worrying about catching the embellishments on everything.
Blend your milky nude with white, cure it, then add different sized pearls while the gel is slightly sticky for better adhesion.
Pink nails with tiny pearls and pastel hearts are exactly as sweet as they sound, and on short almond nails, they don’t feel juvenile.
Start with a nude-pink base, paint the little hearts in different spots so it looks organic, then fill the gaps with micro pearls to balance everything out.
The whole design stays smooth and snag-free, which is honestly my main requirement for any nail art these days.
A curved row of micro pearls right at the cuticle line… it’s such a small detail but it makes the whole manicure look more expensive.
The almond shape helps the pearls follow the natural curve, and because they’re at the cuticle instead of the tips, you don’t have to worry about them constantly getting in your way.
Apply a sheer beige base, add a light pearl chrome layer, then press the tiny pearls into a thin line of clear gel at the cuticle.
Sometimes the simplest version is the best version. This subtle pearl finish on short almond nails is clean enough for work but still feels special.
The chrome powder gives you that glow without being too obvious about it, and over a sheer pink base, it warms up your skin tone instead of washing it out.
Two thin coats of natural base, rub in pearl chrome powder, seal with glossy topcoat
Glittery French tips with thin gold outlines and tiny pearl accents… the almond shape gives the gold details room to follow the natural curve.
It’s fancy but not over-the-top fancy, if that makes sense. Like something you’d wear to a nice dinner but wouldn’t feel weird about at the grocery store the next day.
Clear base, fine glitter tips, then trace the shape with metallic gel and add a few pearls while everything’s still workable.
Sheer nude base with tiny colored pearls and gems scattered around… it’s playful without being childish, and the short almond shape keeps everything comfortable.
The different colors add visual interest, but because they’re small and spaced out, it doesn’t feel overwhelming or busy.
Light nude polish, let it cure completely, then place small dots of clear gel where you want each pearl to sit.
Champagne nails with pearl and gold detailing concentrated at the tips instead of spread everywhere… the almond shape helps the drip effect look intentional.
It’s a nice compromise between dramatic and wearable — you get the luxury effect without the maintenance nightmare.
Shimmering nude base, let it cure, then paint delicate gold outline around tips and add small pearl clusters randomly.
I’ve been staring at pearl nail inspiration photos for weeks now, and honestly? I keep getting stuck on the same questions everyone else seems to have. The pearls look gorgeous in photos, but will they actually stay put when I’m loading the dishwasher or wrestling with Jake’s soccer cleats?
And then there’s the whole base color thing. Half the tutorials I’ve watched use completely different shades and swear theirs is “the only way” to make pearls look right.
So I did what I always do when I can’t decide — I researched everything, tried a few versions myself, and put together 28 ideas that actually work in real life.
Here’s what I figured out.
What nail shape looks best with pearl?
Short square or short squoval shapes are your safest bet if you want something that won’t drive you crazy within three days.
The pearls sit close to the nail surface, so you’re not constantly snagging them on everything. Almond nails work beautifully too, especially if you like the way small pearl accents follow that natural curve.
Coffin nails give you the most real estate for dramatic designs, but I’m going to be honest — if you’re doing school pickup and grocery runs, longer shapes with heavy pearl work get annoying fast.
Save this article for later! 👇👇
What colors look best as pearly nails?
Soft, clean base colors make pearl nails look expensive instead of craft-store DIY. Milky white, sheer pink, or a good neutral nude are your classics for a reason.
These colors let the pearl finish be the star without competing for attention. Ivory and cream work too, especially if you want something warmer than straight white.
You can absolutely use darker colors like black or navy, but keep the pearl elements simple — too much contrast can look busy instead of elegant (and trust me, I learned this the hard way).
Gold Pearl Clusters
This is exactly what I’d get for a wedding — clean white square nails that feel structured but still have that glamorous edge.
The pearls and gold beads add depth without making your hands look too busy, and honestly, the French tip base makes the whole thing feel more wearable than full-coverage glitter.
To recreate this, start with a milky base, paint clean French tips, then add the pearl clusters to just two accent nails (any more and it gets overwhelming).
The raised gel waves on these almond nails look like actual oyster shells, which is either really cool or completely over the top depending on your mood that day.
I love how the length gives you room for the texture work, but I’d be lying if I said this wouldn’t get old fast during my usual Tuesday routine of coffee with Donna and Target runs.
To get this effect, build each textured layer slowly so the waves stay smooth, then add the pearls while the gel is still tacky.
The nude and white combination feels romantic without being too sweet, and the almond shape lets you do those little heart outlines without cramming them in.
This is probably my favorite from the “cute but not trying too hard” category — it’s the kind of design that looks thoughtful but doesn’t scream for attention.
Paint the heart shapes first with a fine brush, then press micro pearls along the edges while the gel is still slightly wet so they actually stick.
Long almond nails with that frosty white base look expensive, and the curved pearl lines add just enough detail without making everything feel cluttered.
The raised gel texture gives the whole thing a soft, almost matte finish that photographs beautifully (which matters if you’re planning to post this).
Keep the base sheer, draw your swirl patterns first, then place the pearls along the curves while the gel is still workable
Chrome nails with scattered pearls and crystals in the center instead of at the edges… it’s a small change that makes a huge difference in how wearable this feels.
The long almond shape keeps everything balanced, and honestly, the chrome base does most of the work here — the pearls are just the finishing touch.
Start with your silver-pearl chrome base, place the embellishments while the gel is tacky, and space them evenly so it doesn’t look random.
The ombré base on these coffin nails is pretty, but what I really like is how the pearls are placed toward the center instead of loaded at the tips.
It keeps the design from looking top-heavy, and frankly, it’s way more practical — you’re not constantly worrying about catching the embellishments on everything.
Blend your milky nude with white, cure it, then add different sized pearls while the gel is slightly sticky for better adhesion.
Pink nails with tiny pearls and pastel hearts are exactly as sweet as they sound, and on short almond nails, they don’t feel juvenile.
Start with a nude-pink base, paint the little hearts in different spots so it looks organic, then fill the gaps with micro pearls to balance everything out.
The whole design stays smooth and snag-free, which is honestly my main requirement for any nail art these days.
A curved row of micro pearls right at the cuticle line… it’s such a small detail but it makes the whole manicure look more expensive.
The almond shape helps the pearls follow the natural curve, and because they’re at the cuticle instead of the tips, you don’t have to worry about them constantly getting in your way.
Apply a sheer beige base, add a light pearl chrome layer, then press the tiny pearls into a thin line of clear gel at the cuticle.
Sometimes the simplest version is the best version. This subtle pearl finish on short almond nails is clean enough for work but still feels special.
The chrome powder gives you that glow without being too obvious about it, and over a sheer pink base, it warms up your skin tone instead of washing it out.
Two thin coats of natural base, rub in pearl chrome powder, seal with glossy topcoat
Glittery French tips with thin gold outlines and tiny pearl accents… the almond shape gives the gold details room to follow the natural curve.
It’s fancy but not over-the-top fancy, if that makes sense. Like something you’d wear to a nice dinner but wouldn’t feel weird about at the grocery store the next day.
Clear base, fine glitter tips, then trace the shape with metallic gel and add a few pearls while everything’s still workable.
Sheer nude base with tiny colored pearls and gems scattered around… it’s playful without being childish, and the short almond shape keeps everything comfortable.
The different colors add visual interest, but because they’re small and spaced out, it doesn’t feel overwhelming or busy.
Light nude polish, let it cure completely, then place small dots of clear gel where you want each pearl to sit.
Champagne nails with pearl and gold detailing concentrated at the tips instead of spread everywhere… the almond shape helps the drip effect look intentional.
It’s a nice compromise between dramatic and wearable — you get the luxury effect without the maintenance nightmare.
Shimmering nude base, let it cure, then paint delicate gold outline around tips and add small pearl clusters randomly.
Champagne nails with pearl and gold detailing concentrated at the tips instead of spread everywhere… the almond shape helps the drip effect look intentional.
It’s a nice compromise between dramatic and wearable — you get the luxury effect without the maintenance nightmare.
Shimmering nude base, let it cure, then paint delicate gold outline around tips and add small pearl clusters randomly.
Champagne nails with pearl and gold detailing concentrated at the tips instead of spread everywhere… the almond shape helps the drip effect look intentional.
It’s a nice compromise between dramatic and wearable — you get the luxury effect without the maintenance nightmare.
Shimmering nude base, let it cure, then paint delicate gold outline around tips and add small pearl clusters randomly.
Sheer nude base with tiny colored pearls and gems scattered around… it’s playful without being childish, and the short almond shape keeps everything comfortable.
The different colors add visual interest, but because they’re small and spaced out, it doesn’t feel overwhelming or busy.
Light nude polish, let it cure completely, then place small dots of clear gel where you want each pearl to sit.
Champagne nails with pearl and gold detailing concentrated at the tips instead of spread everywhere… the almond shape helps the drip effect look intentional.
It’s a nice compromise between dramatic and wearable — you get the luxury effect without the maintenance nightmare.
Shimmering nude base, let it cure, then paint delicate gold outline around tips and add small pearl clusters randomly.
Glittery French tips with thin gold outlines and tiny pearl accents… the almond shape gives the gold details room to follow the natural curve.
It’s fancy but not over-the-top fancy, if that makes sense. Like something you’d wear to a nice dinner but wouldn’t feel weird about at the grocery store the next day.
Clear base, fine glitter tips, then trace the shape with metallic gel and add a few pearls while everything’s still workable.
Sheer nude base with tiny colored pearls and gems scattered around… it’s playful without being childish, and the short almond shape keeps everything comfortable.
The different colors add visual interest, but because they’re small and spaced out, it doesn’t feel overwhelming or busy.
Light nude polish, let it cure completely, then place small dots of clear gel where you want each pearl to sit.
Champagne nails with pearl and gold detailing concentrated at the tips instead of spread everywhere… the almond shape helps the drip effect look intentional.
It’s a nice compromise between dramatic and wearable — you get the luxury effect without the maintenance nightmare.
Shimmering nude base, let it cure, then paint delicate gold outline around tips and add small pearl clusters randomly.
Sometimes the simplest version is the best version. This subtle pearl finish on short almond nails is clean enough for work but still feels special.
The chrome powder gives you that glow without being too obvious about it, and over a sheer pink base, it warms up your skin tone instead of washing it out.
Two thin coats of natural base, rub in pearl chrome powder, seal with glossy topcoat
Glittery French tips with thin gold outlines and tiny pearl accents… the almond shape gives the gold details room to follow the natural curve.
It’s fancy but not over-the-top fancy, if that makes sense. Like something you’d wear to a nice dinner but wouldn’t feel weird about at the grocery store the next day.
Clear base, fine glitter tips, then trace the shape with metallic gel and add a few pearls while everything’s still workable.
Sheer nude base with tiny colored pearls and gems scattered around… it’s playful without being childish, and the short almond shape keeps everything comfortable.
The different colors add visual interest, but because they’re small and spaced out, it doesn’t feel overwhelming or busy.
Light nude polish, let it cure completely, then place small dots of clear gel where you want each pearl to sit.
Champagne nails with pearl and gold detailing concentrated at the tips instead of spread everywhere… the almond shape helps the drip effect look intentional.
It’s a nice compromise between dramatic and wearable — you get the luxury effect without the maintenance nightmare.
Shimmering nude base, let it cure, then paint delicate gold outline around tips and add small pearl clusters randomly.
A curved row of micro pearls right at the cuticle line… it’s such a small detail but it makes the whole manicure look more expensive.
The almond shape helps the pearls follow the natural curve, and because they’re at the cuticle instead of the tips, you don’t have to worry about them constantly getting in your way.
Apply a sheer beige base, add a light pearl chrome layer, then press the tiny pearls into a thin line of clear gel at the cuticle.
Sometimes the simplest version is the best version. This subtle pearl finish on short almond nails is clean enough for work but still feels special.
The chrome powder gives you that glow without being too obvious about it, and over a sheer pink base, it warms up your skin tone instead of washing it out.
Two thin coats of natural base, rub in pearl chrome powder, seal with glossy topcoat
Glittery French tips with thin gold outlines and tiny pearl accents… the almond shape gives the gold details room to follow the natural curve.
It’s fancy but not over-the-top fancy, if that makes sense. Like something you’d wear to a nice dinner but wouldn’t feel weird about at the grocery store the next day.
Clear base, fine glitter tips, then trace the shape with metallic gel and add a few pearls while everything’s still workable.
Sheer nude base with tiny colored pearls and gems scattered around… it’s playful without being childish, and the short almond shape keeps everything comfortable.
The different colors add visual interest, but because they’re small and spaced out, it doesn’t feel overwhelming or busy.
Light nude polish, let it cure completely, then place small dots of clear gel where you want each pearl to sit.
Champagne nails with pearl and gold detailing concentrated at the tips instead of spread everywhere… the almond shape helps the drip effect look intentional.
It’s a nice compromise between dramatic and wearable — you get the luxury effect without the maintenance nightmare.
Shimmering nude base, let it cure, then paint delicate gold outline around tips and add small pearl clusters randomly.
Chrome nails with scattered pearls and crystals in the center instead of at the edges… it’s a small change that makes a huge difference in how wearable this feels.
The long almond shape keeps everything balanced, and honestly, the chrome base does most of the work here — the pearls are just the finishing touch.
Start with your silver-pearl chrome base, place the embellishments while the gel is tacky, and space them evenly so it doesn’t look random.
The ombré base on these coffin nails is pretty, but what I really like is how the pearls are placed toward the center instead of loaded at the tips.
It keeps the design from looking top-heavy, and frankly, it’s way more practical — you’re not constantly worrying about catching the embellishments on everything.
Blend your milky nude with white, cure it, then add different sized pearls while the gel is slightly sticky for better adhesion.
Pink nails with tiny pearls and pastel hearts are exactly as sweet as they sound, and on short almond nails, they don’t feel juvenile.
Start with a nude-pink base, paint the little hearts in different spots so it looks organic, then fill the gaps with micro pearls to balance everything out.
The whole design stays smooth and snag-free, which is honestly my main requirement for any nail art these days.
A curved row of micro pearls right at the cuticle line… it’s such a small detail but it makes the whole manicure look more expensive.
The almond shape helps the pearls follow the natural curve, and because they’re at the cuticle instead of the tips, you don’t have to worry about them constantly getting in your way.
Apply a sheer beige base, add a light pearl chrome layer, then press the tiny pearls into a thin line of clear gel at the cuticle.
Sometimes the simplest version is the best version. This subtle pearl finish on short almond nails is clean enough for work but still feels special.
The chrome powder gives you that glow without being too obvious about it, and over a sheer pink base, it warms up your skin tone instead of washing it out.
Two thin coats of natural base, rub in pearl chrome powder, seal with glossy topcoat
Glittery French tips with thin gold outlines and tiny pearl accents… the almond shape gives the gold details room to follow the natural curve.
It’s fancy but not over-the-top fancy, if that makes sense. Like something you’d wear to a nice dinner but wouldn’t feel weird about at the grocery store the next day.
Clear base, fine glitter tips, then trace the shape with metallic gel and add a few pearls while everything’s still workable.
Sheer nude base with tiny colored pearls and gems scattered around… it’s playful without being childish, and the short almond shape keeps everything comfortable.
The different colors add visual interest, but because they’re small and spaced out, it doesn’t feel overwhelming or busy.
Light nude polish, let it cure completely, then place small dots of clear gel where you want each pearl to sit.
Champagne nails with pearl and gold detailing concentrated at the tips instead of spread everywhere… the almond shape helps the drip effect look intentional.
It’s a nice compromise between dramatic and wearable — you get the luxury effect without the maintenance nightmare.
Shimmering nude base, let it cure, then paint delicate gold outline around tips and add small pearl clusters randomly.
I’ve been staring at pearl nail inspiration photos for weeks now, and honestly? I keep getting stuck on the same questions everyone else seems to have. The pearls look gorgeous in photos, but will they actually stay put when I’m loading the dishwasher or wrestling with Jake’s soccer cleats?
And then there’s the whole base color thing. Half the tutorials I’ve watched use completely different shades and swear theirs is “the only way” to make pearls look right.
So I did what I always do when I can’t decide — I researched everything, tried a few versions myself, and put together 28 ideas that actually work in real life.
Here’s what I figured out.
What nail shape looks best with pearl?
Short square or short squoval shapes are your safest bet if you want something that won’t drive you crazy within three days.
The pearls sit close to the nail surface, so you’re not constantly snagging them on everything. Almond nails work beautifully too, especially if you like the way small pearl accents follow that natural curve.
Coffin nails give you the most real estate for dramatic designs, but I’m going to be honest — if you’re doing school pickup and grocery runs, longer shapes with heavy pearl work get annoying fast.
Save this article for later! 👇👇
What colors look best as pearly nails?
Soft, clean base colors make pearl nails look expensive instead of craft-store DIY. Milky white, sheer pink, or a good neutral nude are your classics for a reason.
These colors let the pearl finish be the star without competing for attention. Ivory and cream work too, especially if you want something warmer than straight white.
You can absolutely use darker colors like black or navy, but keep the pearl elements simple — too much contrast can look busy instead of elegant (and trust me, I learned this the hard way).
Gold Pearl Clusters
This is exactly what I’d get for a wedding — clean white square nails that feel structured but still have that glamorous edge.
The pearls and gold beads add depth without making your hands look too busy, and honestly, the French tip base makes the whole thing feel more wearable than full-coverage glitter.
To recreate this, start with a milky base, paint clean French tips, then add the pearl clusters to just two accent nails (any more and it gets overwhelming).
The raised gel waves on these almond nails look like actual oyster shells, which is either really cool or completely over the top depending on your mood that day.
I love how the length gives you room for the texture work, but I’d be lying if I said this wouldn’t get old fast during my usual Tuesday routine of coffee with Donna and Target runs.
To get this effect, build each textured layer slowly so the waves stay smooth, then add the pearls while the gel is still tacky.
The nude and white combination feels romantic without being too sweet, and the almond shape lets you do those little heart outlines without cramming them in.
This is probably my favorite from the “cute but not trying too hard” category — it’s the kind of design that looks thoughtful but doesn’t scream for attention.
Paint the heart shapes first with a fine brush, then press micro pearls along the edges while the gel is still slightly wet so they actually stick.
Long almond nails with that frosty white base look expensive, and the curved pearl lines add just enough detail without making everything feel cluttered.
The raised gel texture gives the whole thing a soft, almost matte finish that photographs beautifully (which matters if you’re planning to post this).
Keep the base sheer, draw your swirl patterns first, then place the pearls along the curves while the gel is still workable
Chrome nails with scattered pearls and crystals in the center instead of at the edges… it’s a small change that makes a huge difference in how wearable this feels.
The long almond shape keeps everything balanced, and honestly, the chrome base does most of the work here — the pearls are just the finishing touch.
Start with your silver-pearl chrome base, place the embellishments while the gel is tacky, and space them evenly so it doesn’t look random.
The ombré base on these coffin nails is pretty, but what I really like is how the pearls are placed toward the center instead of loaded at the tips.
It keeps the design from looking top-heavy, and frankly, it’s way more practical — you’re not constantly worrying about catching the embellishments on everything.
Blend your milky nude with white, cure it, then add different sized pearls while the gel is slightly sticky for better adhesion.
Pink nails with tiny pearls and pastel hearts are exactly as sweet as they sound, and on short almond nails, they don’t feel juvenile.
Start with a nude-pink base, paint the little hearts in different spots so it looks organic, then fill the gaps with micro pearls to balance everything out.
The whole design stays smooth and snag-free, which is honestly my main requirement for any nail art these days.
A curved row of micro pearls right at the cuticle line… it’s such a small detail but it makes the whole manicure look more expensive.
The almond shape helps the pearls follow the natural curve, and because they’re at the cuticle instead of the tips, you don’t have to worry about them constantly getting in your way.
Apply a sheer beige base, add a light pearl chrome layer, then press the tiny pearls into a thin line of clear gel at the cuticle.
Sometimes the simplest version is the best version. This subtle pearl finish on short almond nails is clean enough for work but still feels special.
The chrome powder gives you that glow without being too obvious about it, and over a sheer pink base, it warms up your skin tone instead of washing it out.
Two thin coats of natural base, rub in pearl chrome powder, seal with glossy topcoat
Glittery French tips with thin gold outlines and tiny pearl accents… the almond shape gives the gold details room to follow the natural curve.
It’s fancy but not over-the-top fancy, if that makes sense. Like something you’d wear to a nice dinner but wouldn’t feel weird about at the grocery store the next day.
Clear base, fine glitter tips, then trace the shape with metallic gel and add a few pearls while everything’s still workable.
Sheer nude base with tiny colored pearls and gems scattered around… it’s playful without being childish, and the short almond shape keeps everything comfortable.
The different colors add visual interest, but because they’re small and spaced out, it doesn’t feel overwhelming or busy.
Light nude polish, let it cure completely, then place small dots of clear gel where you want each pearl to sit.
Champagne nails with pearl and gold detailing concentrated at the tips instead of spread everywhere… the almond shape helps the drip effect look intentional.
It’s a nice compromise between dramatic and wearable — you get the luxury effect without the maintenance nightmare.
Shimmering nude base, let it cure, then paint delicate gold outline around tips and add small pearl clusters randomly.
Champagne nails with pearl and gold detailing concentrated at the tips instead of spread everywhere… the almond shape helps the drip effect look intentional.
It’s a nice compromise between dramatic and wearable — you get the luxury effect without the maintenance nightmare.
Shimmering nude base, let it cure, then paint delicate gold outline around tips and add small pearl clusters randomly.
Champagne nails with pearl and gold detailing concentrated at the tips instead of spread everywhere… the almond shape helps the drip effect look intentional.
It’s a nice compromise between dramatic and wearable — you get the luxury effect without the maintenance nightmare.
Shimmering nude base, let it cure, then paint delicate gold outline around tips and add small pearl clusters randomly.
Champagne nails with pearl and gold detailing concentrated at the tips instead of spread everywhere… the almond shape helps the drip effect look intentional.
It’s a nice compromise between dramatic and wearable — you get the luxury effect without the maintenance nightmare.
Shimmering nude base, let it cure, then paint delicate gold outline around tips and add small pearl clusters randomly.
Sheer nude base with tiny colored pearls and gems scattered around… it’s playful without being childish, and the short almond shape keeps everything comfortable.
The different colors add visual interest, but because they’re small and spaced out, it doesn’t feel overwhelming or busy.
Light nude polish, let it cure completely, then place small dots of clear gel where you want each pearl to sit.
Champagne nails with pearl and gold detailing concentrated at the tips instead of spread everywhere… the almond shape helps the drip effect look intentional.
It’s a nice compromise between dramatic and wearable — you get the luxury effect without the maintenance nightmare.
Shimmering nude base, let it cure, then paint delicate gold outline around tips and add small pearl clusters randomly.
Glittery French tips with thin gold outlines and tiny pearl accents… the almond shape gives the gold details room to follow the natural curve.
It’s fancy but not over-the-top fancy, if that makes sense. Like something you’d wear to a nice dinner but wouldn’t feel weird about at the grocery store the next day.
Clear base, fine glitter tips, then trace the shape with metallic gel and add a few pearls while everything’s still workable.
Sheer nude base with tiny colored pearls and gems scattered around… it’s playful without being childish, and the short almond shape keeps everything comfortable.
The different colors add visual interest, but because they’re small and spaced out, it doesn’t feel overwhelming or busy.
Light nude polish, let it cure completely, then place small dots of clear gel where you want each pearl to sit.
Champagne nails with pearl and gold detailing concentrated at the tips instead of spread everywhere… the almond shape helps the drip effect look intentional.
It’s a nice compromise between dramatic and wearable — you get the luxury effect without the maintenance nightmare.
Shimmering nude base, let it cure, then paint delicate gold outline around tips and add small pearl clusters randomly.
Sometimes the simplest version is the best version. This subtle pearl finish on short almond nails is clean enough for work but still feels special.
The chrome powder gives you that glow without being too obvious about it, and over a sheer pink base, it warms up your skin tone instead of washing it out.
Two thin coats of natural base, rub in pearl chrome powder, seal with glossy topcoat
Glittery French tips with thin gold outlines and tiny pearl accents… the almond shape gives the gold details room to follow the natural curve.
It’s fancy but not over-the-top fancy, if that makes sense. Like something you’d wear to a nice dinner but wouldn’t feel weird about at the grocery store the next day.
Clear base, fine glitter tips, then trace the shape with metallic gel and add a few pearls while everything’s still workable.
Sheer nude base with tiny colored pearls and gems scattered around… it’s playful without being childish, and the short almond shape keeps everything comfortable.
The different colors add visual interest, but because they’re small and spaced out, it doesn’t feel overwhelming or busy.
Light nude polish, let it cure completely, then place small dots of clear gel where you want each pearl to sit.
Champagne nails with pearl and gold detailing concentrated at the tips instead of spread everywhere… the almond shape helps the drip effect look intentional.
It’s a nice compromise between dramatic and wearable — you get the luxury effect without the maintenance nightmare.
Shimmering nude base, let it cure, then paint delicate gold outline around tips and add small pearl clusters randomly.
A curved row of micro pearls right at the cuticle line… it’s such a small detail but it makes the whole manicure look more expensive.
The almond shape helps the pearls follow the natural curve, and because they’re at the cuticle instead of the tips, you don’t have to worry about them constantly getting in your way.
Apply a sheer beige base, add a light pearl chrome layer, then press the tiny pearls into a thin line of clear gel at the cuticle.
Sometimes the simplest version is the best version. This subtle pearl finish on short almond nails is clean enough for work but still feels special.
The chrome powder gives you that glow without being too obvious about it, and over a sheer pink base, it warms up your skin tone instead of washing it out.
Two thin coats of natural base, rub in pearl chrome powder, seal with glossy topcoat
Glittery French tips with thin gold outlines and tiny pearl accents… the almond shape gives the gold details room to follow the natural curve.
It’s fancy but not over-the-top fancy, if that makes sense. Like something you’d wear to a nice dinner but wouldn’t feel weird about at the grocery store the next day.
Clear base, fine glitter tips, then trace the shape with metallic gel and add a few pearls while everything’s still workable.
Sheer nude base with tiny colored pearls and gems scattered around… it’s playful without being childish, and the short almond shape keeps everything comfortable.
The different colors add visual interest, but because they’re small and spaced out, it doesn’t feel overwhelming or busy.
Light nude polish, let it cure completely, then place small dots of clear gel where you want each pearl to sit.
Champagne nails with pearl and gold detailing concentrated at the tips instead of spread everywhere… the almond shape helps the drip effect look intentional.
It’s a nice compromise between dramatic and wearable — you get the luxury effect without the maintenance nightmare.
Shimmering nude base, let it cure, then paint delicate gold outline around tips and add small pearl clusters randomly.
Chrome nails with scattered pearls and crystals in the center instead of at the edges… it’s a small change that makes a huge difference in how wearable this feels.
The long almond shape keeps everything balanced, and honestly, the chrome base does most of the work here — the pearls are just the finishing touch.
Start with your silver-pearl chrome base, place the embellishments while the gel is tacky, and space them evenly so it doesn’t look random.
The ombré base on these coffin nails is pretty, but what I really like is how the pearls are placed toward the center instead of loaded at the tips.
It keeps the design from looking top-heavy, and frankly, it’s way more practical — you’re not constantly worrying about catching the embellishments on everything.
Blend your milky nude with white, cure it, then add different sized pearls while the gel is slightly sticky for better adhesion.
Pink nails with tiny pearls and pastel hearts are exactly as sweet as they sound, and on short almond nails, they don’t feel juvenile.
Start with a nude-pink base, paint the little hearts in different spots so it looks organic, then fill the gaps with micro pearls to balance everything out.
The whole design stays smooth and snag-free, which is honestly my main requirement for any nail art these days.
A curved row of micro pearls right at the cuticle line… it’s such a small detail but it makes the whole manicure look more expensive.
The almond shape helps the pearls follow the natural curve, and because they’re at the cuticle instead of the tips, you don’t have to worry about them constantly getting in your way.
Apply a sheer beige base, add a light pearl chrome layer, then press the tiny pearls into a thin line of clear gel at the cuticle.
Sometimes the simplest version is the best version. This subtle pearl finish on short almond nails is clean enough for work but still feels special.
The chrome powder gives you that glow without being too obvious about it, and over a sheer pink base, it warms up your skin tone instead of washing it out.
Two thin coats of natural base, rub in pearl chrome powder, seal with glossy topcoat
Glittery French tips with thin gold outlines and tiny pearl accents… the almond shape gives the gold details room to follow the natural curve.
It’s fancy but not over-the-top fancy, if that makes sense. Like something you’d wear to a nice dinner but wouldn’t feel weird about at the grocery store the next day.
Clear base, fine glitter tips, then trace the shape with metallic gel and add a few pearls while everything’s still workable.
Sheer nude base with tiny colored pearls and gems scattered around… it’s playful without being childish, and the short almond shape keeps everything comfortable.
The different colors add visual interest, but because they’re small and spaced out, it doesn’t feel overwhelming or busy.
Light nude polish, let it cure completely, then place small dots of clear gel where you want each pearl to sit.
Champagne nails with pearl and gold detailing concentrated at the tips instead of spread everywhere… the almond shape helps the drip effect look intentional.
It’s a nice compromise between dramatic and wearable — you get the luxury effect without the maintenance nightmare.
Shimmering nude base, let it cure, then paint delicate gold outline around tips and add small pearl clusters randomly.
I’ve been staring at pearl nail inspiration photos for weeks now, and honestly? I keep getting stuck on the same questions everyone else seems to have. The pearls look gorgeous in photos, but will they actually stay put when I’m loading the dishwasher or wrestling with Jake’s soccer cleats?
And then there’s the whole base color thing. Half the tutorials I’ve watched use completely different shades and swear theirs is “the only way” to make pearls look right.
So I did what I always do when I can’t decide — I researched everything, tried a few versions myself, and put together 28 ideas that actually work in real life.
Here’s what I figured out.
What nail shape looks best with pearl?
Short square or short squoval shapes are your safest bet if you want something that won’t drive you crazy within three days.
The pearls sit close to the nail surface, so you’re not constantly snagging them on everything. Almond nails work beautifully too, especially if you like the way small pearl accents follow that natural curve.
Coffin nails give you the most real estate for dramatic designs, but I’m going to be honest — if you’re doing school pickup and grocery runs, longer shapes with heavy pearl work get annoying fast.
Save this article for later! 👇👇
What colors look best as pearly nails?
Soft, clean base colors make pearl nails look expensive instead of craft-store DIY. Milky white, sheer pink, or a good neutral nude are your classics for a reason.
These colors let the pearl finish be the star without competing for attention. Ivory and cream work too, especially if you want something warmer than straight white.
You can absolutely use darker colors like black or navy, but keep the pearl elements simple — too much contrast can look busy instead of elegant (and trust me, I learned this the hard way).
Gold Pearl Clusters
This is exactly what I’d get for a wedding — clean white square nails that feel structured but still have that glamorous edge.
The pearls and gold beads add depth without making your hands look too busy, and honestly, the French tip base makes the whole thing feel more wearable than full-coverage glitter.
To recreate this, start with a milky base, paint clean French tips, then add the pearl clusters to just two accent nails (any more and it gets overwhelming).
The raised gel waves on these almond nails look like actual oyster shells, which is either really cool or completely over the top depending on your mood that day.
I love how the length gives you room for the texture work, but I’d be lying if I said this wouldn’t get old fast during my usual Tuesday routine of coffee with Donna and Target runs.
To get this effect, build each textured layer slowly so the waves stay smooth, then add the pearls while the gel is still tacky.
The nude and white combination feels romantic without being too sweet, and the almond shape lets you do those little heart outlines without cramming them in.
This is probably my favorite from the “cute but not trying too hard” category — it’s the kind of design that looks thoughtful but doesn’t scream for attention.
Paint the heart shapes first with a fine brush, then press micro pearls along the edges while the gel is still slightly wet so they actually stick.
Long almond nails with that frosty white base look expensive, and the curved pearl lines add just enough detail without making everything feel cluttered.
The raised gel texture gives the whole thing a soft, almost matte finish that photographs beautifully (which matters if you’re planning to post this).
Keep the base sheer, draw your swirl patterns first, then place the pearls along the curves while the gel is still workable
Chrome nails with scattered pearls and crystals in the center instead of at the edges… it’s a small change that makes a huge difference in how wearable this feels.
The long almond shape keeps everything balanced, and honestly, the chrome base does most of the work here — the pearls are just the finishing touch.
Start with your silver-pearl chrome base, place the embellishments while the gel is tacky, and space them evenly so it doesn’t look random.
The ombré base on these coffin nails is pretty, but what I really like is how the pearls are placed toward the center instead of loaded at the tips.
It keeps the design from looking top-heavy, and frankly, it’s way more practical — you’re not constantly worrying about catching the embellishments on everything.
Blend your milky nude with white, cure it, then add different sized pearls while the gel is slightly sticky for better adhesion.
Pink nails with tiny pearls and pastel hearts are exactly as sweet as they sound, and on short almond nails, they don’t feel juvenile.
Start with a nude-pink base, paint the little hearts in different spots so it looks organic, then fill the gaps with micro pearls to balance everything out.
The whole design stays smooth and snag-free, which is honestly my main requirement for any nail art these days.
A curved row of micro pearls right at the cuticle line… it’s such a small detail but it makes the whole manicure look more expensive.
The almond shape helps the pearls follow the natural curve, and because they’re at the cuticle instead of the tips, you don’t have to worry about them constantly getting in your way.
Apply a sheer beige base, add a light pearl chrome layer, then press the tiny pearls into a thin line of clear gel at the cuticle.
Sometimes the simplest version is the best version. This subtle pearl finish on short almond nails is clean enough for work but still feels special.
The chrome powder gives you that glow without being too obvious about it, and over a sheer pink base, it warms up your skin tone instead of washing it out.
Two thin coats of natural base, rub in pearl chrome powder, seal with glossy topcoat
Glittery French tips with thin gold outlines and tiny pearl accents… the almond shape gives the gold details room to follow the natural curve.
It’s fancy but not over-the-top fancy, if that makes sense. Like something you’d wear to a nice dinner but wouldn’t feel weird about at the grocery store the next day.
Clear base, fine glitter tips, then trace the shape with metallic gel and add a few pearls while everything’s still workable.
Sheer nude base with tiny colored pearls and gems scattered around… it’s playful without being childish, and the short almond shape keeps everything comfortable.
The different colors add visual interest, but because they’re small and spaced out, it doesn’t feel overwhelming or busy.
Light nude polish, let it cure completely, then place small dots of clear gel where you want each pearl to sit.
Champagne nails with pearl and gold detailing concentrated at the tips instead of spread everywhere… the almond shape helps the drip effect look intentional.
It’s a nice compromise between dramatic and wearable — you get the luxury effect without the maintenance nightmare.
Shimmering nude base, let it cure, then paint delicate gold outline around tips and add small pearl clusters randomly.
Champagne nails with pearl and gold detailing concentrated at the tips instead of spread everywhere… the almond shape helps the drip effect look intentional.
It’s a nice compromise between dramatic and wearable — you get the luxury effect without the maintenance nightmare.
Shimmering nude base, let it cure, then paint delicate gold outline around tips and add small pearl clusters randomly.
Champagne nails with pearl and gold detailing concentrated at the tips instead of spread everywhere… the almond shape helps the drip effect look intentional.
It’s a nice compromise between dramatic and wearable — you get the luxury effect without the maintenance nightmare.
Shimmering nude base, let it cure, then paint delicate gold outline around tips and add small pearl clusters randomly.
Champagne nails with pearl and gold detailing concentrated at the tips instead of spread everywhere… the almond shape helps the drip effect look intentional.
It’s a nice compromise between dramatic and wearable — you get the luxury effect without the maintenance nightmare.
Shimmering nude base, let it cure, then paint delicate gold outline around tips and add small pearl clusters randomly.
Champagne nails with pearl and gold detailing concentrated at the tips instead of spread everywhere… the almond shape helps the drip effect look intentional.
It’s a nice compromise between dramatic and wearable — you get the luxury effect without the maintenance nightmare.
Shimmering nude base, let it cure, then paint delicate gold outline around tips and add small pearl clusters randomly.
Sheer nude base with tiny colored pearls and gems scattered around… it’s playful without being childish, and the short almond shape keeps everything comfortable.
The different colors add visual interest, but because they’re small and spaced out, it doesn’t feel overwhelming or busy.
Light nude polish, let it cure completely, then place small dots of clear gel where you want each pearl to sit.
Champagne nails with pearl and gold detailing concentrated at the tips instead of spread everywhere… the almond shape helps the drip effect look intentional.
It’s a nice compromise between dramatic and wearable — you get the luxury effect without the maintenance nightmare.
Shimmering nude base, let it cure, then paint delicate gold outline around tips and add small pearl clusters randomly.
Glittery French tips with thin gold outlines and tiny pearl accents… the almond shape gives the gold details room to follow the natural curve.
It’s fancy but not over-the-top fancy, if that makes sense. Like something you’d wear to a nice dinner but wouldn’t feel weird about at the grocery store the next day.
Clear base, fine glitter tips, then trace the shape with metallic gel and add a few pearls while everything’s still workable.
Sheer nude base with tiny colored pearls and gems scattered around… it’s playful without being childish, and the short almond shape keeps everything comfortable.
The different colors add visual interest, but because they’re small and spaced out, it doesn’t feel overwhelming or busy.
Light nude polish, let it cure completely, then place small dots of clear gel where you want each pearl to sit.
Champagne nails with pearl and gold detailing concentrated at the tips instead of spread everywhere… the almond shape helps the drip effect look intentional.
It’s a nice compromise between dramatic and wearable — you get the luxury effect without the maintenance nightmare.
Shimmering nude base, let it cure, then paint delicate gold outline around tips and add small pearl clusters randomly.
Sometimes the simplest version is the best version. This subtle pearl finish on short almond nails is clean enough for work but still feels special.
The chrome powder gives you that glow without being too obvious about it, and over a sheer pink base, it warms up your skin tone instead of washing it out.
Two thin coats of natural base, rub in pearl chrome powder, seal with glossy topcoat
Glittery French tips with thin gold outlines and tiny pearl accents… the almond shape gives the gold details room to follow the natural curve.
It’s fancy but not over-the-top fancy, if that makes sense. Like something you’d wear to a nice dinner but wouldn’t feel weird about at the grocery store the next day.
Clear base, fine glitter tips, then trace the shape with metallic gel and add a few pearls while everything’s still workable.
Sheer nude base with tiny colored pearls and gems scattered around… it’s playful without being childish, and the short almond shape keeps everything comfortable.
The different colors add visual interest, but because they’re small and spaced out, it doesn’t feel overwhelming or busy.
Light nude polish, let it cure completely, then place small dots of clear gel where you want each pearl to sit.
Champagne nails with pearl and gold detailing concentrated at the tips instead of spread everywhere… the almond shape helps the drip effect look intentional.
It’s a nice compromise between dramatic and wearable — you get the luxury effect without the maintenance nightmare.
Shimmering nude base, let it cure, then paint delicate gold outline around tips and add small pearl clusters randomly.
A curved row of micro pearls right at the cuticle line… it’s such a small detail but it makes the whole manicure look more expensive.
The almond shape helps the pearls follow the natural curve, and because they’re at the cuticle instead of the tips, you don’t have to worry about them constantly getting in your way.
Apply a sheer beige base, add a light pearl chrome layer, then press the tiny pearls into a thin line of clear gel at the cuticle.
Sometimes the simplest version is the best version. This subtle pearl finish on short almond nails is clean enough for work but still feels special.
The chrome powder gives you that glow without being too obvious about it, and over a sheer pink base, it warms up your skin tone instead of washing it out.
Two thin coats of natural base, rub in pearl chrome powder, seal with glossy topcoat
Glittery French tips with thin gold outlines and tiny pearl accents… the almond shape gives the gold details room to follow the natural curve.
It’s fancy but not over-the-top fancy, if that makes sense. Like something you’d wear to a nice dinner but wouldn’t feel weird about at the grocery store the next day.
Clear base, fine glitter tips, then trace the shape with metallic gel and add a few pearls while everything’s still workable.
Sheer nude base with tiny colored pearls and gems scattered around… it’s playful without being childish, and the short almond shape keeps everything comfortable.
The different colors add visual interest, but because they’re small and spaced out, it doesn’t feel overwhelming or busy.
Light nude polish, let it cure completely, then place small dots of clear gel where you want each pearl to sit.
Champagne nails with pearl and gold detailing concentrated at the tips instead of spread everywhere… the almond shape helps the drip effect look intentional.
It’s a nice compromise between dramatic and wearable — you get the luxury effect without the maintenance nightmare.
Shimmering nude base, let it cure, then paint delicate gold outline around tips and add small pearl clusters randomly.
Chrome nails with scattered pearls and crystals in the center instead of at the edges… it’s a small change that makes a huge difference in how wearable this feels.
The long almond shape keeps everything balanced, and honestly, the chrome base does most of the work here — the pearls are just the finishing touch.
Start with your silver-pearl chrome base, place the embellishments while the gel is tacky, and space them evenly so it doesn’t look random.
The ombré base on these coffin nails is pretty, but what I really like is how the pearls are placed toward the center instead of loaded at the tips.
It keeps the design from looking top-heavy, and frankly, it’s way more practical — you’re not constantly worrying about catching the embellishments on everything.
Blend your milky nude with white, cure it, then add different sized pearls while the gel is slightly sticky for better adhesion.
Pink nails with tiny pearls and pastel hearts are exactly as sweet as they sound, and on short almond nails, they don’t feel juvenile.
Start with a nude-pink base, paint the little hearts in different spots so it looks organic, then fill the gaps with micro pearls to balance everything out.
The whole design stays smooth and snag-free, which is honestly my main requirement for any nail art these days.
A curved row of micro pearls right at the cuticle line… it’s such a small detail but it makes the whole manicure look more expensive.
The almond shape helps the pearls follow the natural curve, and because they’re at the cuticle instead of the tips, you don’t have to worry about them constantly getting in your way.
Apply a sheer beige base, add a light pearl chrome layer, then press the tiny pearls into a thin line of clear gel at the cuticle.
Sometimes the simplest version is the best version. This subtle pearl finish on short almond nails is clean enough for work but still feels special.
The chrome powder gives you that glow without being too obvious about it, and over a sheer pink base, it warms up your skin tone instead of washing it out.
Two thin coats of natural base, rub in pearl chrome powder, seal with glossy topcoat
Glittery French tips with thin gold outlines and tiny pearl accents… the almond shape gives the gold details room to follow the natural curve.
It’s fancy but not over-the-top fancy, if that makes sense. Like something you’d wear to a nice dinner but wouldn’t feel weird about at the grocery store the next day.
Clear base, fine glitter tips, then trace the shape with metallic gel and add a few pearls while everything’s still workable.
Sheer nude base with tiny colored pearls and gems scattered around… it’s playful without being childish, and the short almond shape keeps everything comfortable.
The different colors add visual interest, but because they’re small and spaced out, it doesn’t feel overwhelming or busy.
Light nude polish, let it cure completely, then place small dots of clear gel where you want each pearl to sit.
Champagne nails with pearl and gold detailing concentrated at the tips instead of spread everywhere… the almond shape helps the drip effect look intentional.
It’s a nice compromise between dramatic and wearable — you get the luxury effect without the maintenance nightmare.
Shimmering nude base, let it cure, then paint delicate gold outline around tips and add small pearl clusters randomly.
I’ve been staring at pearl nail inspiration photos for weeks now, and honestly? I keep getting stuck on the same questions everyone else seems to have. The pearls look gorgeous in photos, but will they actually stay put when I’m loading the dishwasher or wrestling with Jake’s soccer cleats?
And then there’s the whole base color thing. Half the tutorials I’ve watched use completely different shades and swear theirs is “the only way” to make pearls look right.
So I did what I always do when I can’t decide — I researched everything, tried a few versions myself, and put together 28 ideas that actually work in real life.
Here’s what I figured out.
What nail shape looks best with pearl?
Short square or short squoval shapes are your safest bet if you want something that won’t drive you crazy within three days.
The pearls sit close to the nail surface, so you’re not constantly snagging them on everything. Almond nails work beautifully too, especially if you like the way small pearl accents follow that natural curve.
Coffin nails give you the most real estate for dramatic designs, but I’m going to be honest — if you’re doing school pickup and grocery runs, longer shapes with heavy pearl work get annoying fast.
Save this article for later! 👇👇
What colors look best as pearly nails?
Soft, clean base colors make pearl nails look expensive instead of craft-store DIY. Milky white, sheer pink, or a good neutral nude are your classics for a reason.
These colors let the pearl finish be the star without competing for attention. Ivory and cream work too, especially if you want something warmer than straight white.
You can absolutely use darker colors like black or navy, but keep the pearl elements simple — too much contrast can look busy instead of elegant (and trust me, I learned this the hard way).
Gold Pearl Clusters
This is exactly what I’d get for a wedding — clean white square nails that feel structured but still have that glamorous edge.
The pearls and gold beads add depth without making your hands look too busy, and honestly, the French tip base makes the whole thing feel more wearable than full-coverage glitter.
To recreate this, start with a milky base, paint clean French tips, then add the pearl clusters to just two accent nails (any more and it gets overwhelming).
The raised gel waves on these almond nails look like actual oyster shells, which is either really cool or completely over the top depending on your mood that day.
I love how the length gives you room for the texture work, but I’d be lying if I said this wouldn’t get old fast during my usual Tuesday routine of coffee with Donna and Target runs.
To get this effect, build each textured layer slowly so the waves stay smooth, then add the pearls while the gel is still tacky.
The nude and white combination feels romantic without being too sweet, and the almond shape lets you do those little heart outlines without cramming them in.
This is probably my favorite from the “cute but not trying too hard” category — it’s the kind of design that looks thoughtful but doesn’t scream for attention.
Paint the heart shapes first with a fine brush, then press micro pearls along the edges while the gel is still slightly wet so they actually stick.
Long almond nails with that frosty white base look expensive, and the curved pearl lines add just enough detail without making everything feel cluttered.
The raised gel texture gives the whole thing a soft, almost matte finish that photographs beautifully (which matters if you’re planning to post this).
Keep the base sheer, draw your swirl patterns first, then place the pearls along the curves while the gel is still workable
Chrome nails with scattered pearls and crystals in the center instead of at the edges… it’s a small change that makes a huge difference in how wearable this feels.
The long almond shape keeps everything balanced, and honestly, the chrome base does most of the work here — the pearls are just the finishing touch.
Start with your silver-pearl chrome base, place the embellishments while the gel is tacky, and space them evenly so it doesn’t look random.
The ombré base on these coffin nails is pretty, but what I really like is how the pearls are placed toward the center instead of loaded at the tips.
It keeps the design from looking top-heavy, and frankly, it’s way more practical — you’re not constantly worrying about catching the embellishments on everything.
Blend your milky nude with white, cure it, then add different sized pearls while the gel is slightly sticky for better adhesion.
Pink nails with tiny pearls and pastel hearts are exactly as sweet as they sound, and on short almond nails, they don’t feel juvenile.
Start with a nude-pink base, paint the little hearts in different spots so it looks organic, then fill the gaps with micro pearls to balance everything out.
The whole design stays smooth and snag-free, which is honestly my main requirement for any nail art these days.
A curved row of micro pearls right at the cuticle line… it’s such a small detail but it makes the whole manicure look more expensive.
The almond shape helps the pearls follow the natural curve, and because they’re at the cuticle instead of the tips, you don’t have to worry about them constantly getting in your way.
Apply a sheer beige base, add a light pearl chrome layer, then press the tiny pearls into a thin line of clear gel at the cuticle.
Sometimes the simplest version is the best version. This subtle pearl finish on short almond nails is clean enough for work but still feels special.
The chrome powder gives you that glow without being too obvious about it, and over a sheer pink base, it warms up your skin tone instead of washing it out.
Two thin coats of natural base, rub in pearl chrome powder, seal with glossy topcoat
Glittery French tips with thin gold outlines and tiny pearl accents… the almond shape gives the gold details room to follow the natural curve.
It’s fancy but not over-the-top fancy, if that makes sense. Like something you’d wear to a nice dinner but wouldn’t feel weird about at the grocery store the next day.
Clear base, fine glitter tips, then trace the shape with metallic gel and add a few pearls while everything’s still workable.
Sheer nude base with tiny colored pearls and gems scattered around… it’s playful without being childish, and the short almond shape keeps everything comfortable.
The different colors add visual interest, but because they’re small and spaced out, it doesn’t feel overwhelming or busy.
Light nude polish, let it cure completely, then place small dots of clear gel where you want each pearl to sit.
Champagne nails with pearl and gold detailing concentrated at the tips instead of spread everywhere… the almond shape helps the drip effect look intentional.
It’s a nice compromise between dramatic and wearable — you get the luxury effect without the maintenance nightmare.
Shimmering nude base, let it cure, then paint delicate gold outline around tips and add small pearl clusters randomly.
I’m in the thick of marriage, motherhood, and the everyday chaos of raising two young kids, and I wouldn’t have it any other way. I write about parenting without perfection, beauty and money tips that actually fit real life, and the little moments that make it all meaningful. Around here, I keep things honest, practical, and rooted in the belief that you’re already doing better than you think.
Save this post for later ❤️
We'll email this post to you, so you can come back to it later!